Lab 7: Recursion!
Objectives
In this lab you will gain experience with recursion and recursive thinking. Recursion is a powerful design technique. As is the case with any new technique, it takes a bit of practice to master recursion. In this lab, we will concentrate on a variety of recursion problems. The goal of this lab is to practice writing recursive programs and to train our brains to think recursively.
Thinking Recursively
When writing a recursive function, always start with one or more base cases. These are problems that are so small that we can solve them directly. Then, write the recursive cases. There are two parts to each recursive case:
taking an action that contributes to the solution (makes progress), and,
calling the recursive function on a smaller subproblem (which gets you closer to one of the base cases).
Getting Started
Clone the lab resources from the gitlab repository, as usual:
git clone https://evolene.cs.williams.edu/cs134-labs/22xyz3/lab07.git
where your CS username replaces 22xyz3. You will find five Python files, sumDigits.py, bedtime.py, quilt.py, shrub.py, and fancy.py, each corresponding to a task described below.
This week, you will solve five problems using recursion: a warm-up recursion (Task 0) (to be completed before lab), a fruitful recursion with lists (Task 1), two graphical recursion tasks (Tasks 2 and 3), and a fruitful graphical recursion (Task 4). Finally, there is an optional extra-credit task which is a more challenging graphical recursion. We encourage you to read through all the task descriptions before writing any code. Note: a fruitful recursion function is one that has an explicit return value.
Windows Setup
If you followed our Set Up Your Windows PC instructions at the beginning of the semester when setting up your own computer, you’ll need to perform the additional steps outlined on the Windows Setup For Turtle and Graphics page to ensure that the turtle graphics (required in Tasks 2-4) render correctly on your machine. No additional setup is required for the lab machines or Mac OS.
Task 0 [Warm-up]: Fruitful Recursion with Numbers
Please complete this task before coming to your scheduled lab session. In this task, you will write the sumDigits function in the file sumDigits.py.
The sumDigits function takes a non-negative integer num as input and computes and returns the sum of the digits
of num.
Your function should be recursive and should not use any loops. You are also not allowed to change the type of num from an integer to a string. Here are examples of how your function should behave:
>>> sumDigits(0)
0
>>> sumDigits(90)
9
>>> sumDigits(889832)
38
>>> sumDigits(1234567890)
45
As you start thinking about the recursive problem structure, consider some specific examples. For example, there are some numbers where you know the answer immediately: sumDigits(1) is 1, sumDigits(8) is 8, and so on. How does this map to a base case? Now consider a number like 178. You can think of sumDigits(178) as sumDigits(17) + 8; and sumDigits(17) as sumDigits(1) + 7; and finally, we know that sumDigits(1) is simply 1. To generalize from this example, given an integer num that does not meet your base case criteria, your recursive case should separate it into two parts using arithmetic operators:
everything except its last digit, and
its last digit.
Hint: Think about how you can use the arithmetic operators to extract digits.
Task 1: Accumulating Recursion
Bedtime stories follow a common pattern across cultures where a simple phrase repeats multiple times in a nested fashion. For example,
The mother of the parrot told a story about a cow...
    The mother of the cow told a story about a flamingo...
        The mother of the flamingo told a story about a heron...
        and then the flamingo fell asleep.
    and then the cow fell asleep.
and then the parrot fell asleep.
In this task, you will write a function called bedtimeStory which, given a list of strings characters, should return a list of strings representing the lines of a bedtime story. The above story shows the lines generated using the characters ['parrot', 'cow', 'flamingo', 'heron']. We’ve printed it nicely to help show the recursive structure, but your bedtimeStory function actually returns those lines as a list of strings without indentation:
['The mother of the parrot told a story about a cow...',
'The mother of the cow told a story about a flamingo...',
'The mother of the flamingo told a story about a heron...',
'and then the flamingo fell asleep.',
'and then the cow fell asleep.',
'and then the parrot fell asleep.']
Your implementation should be recursive and cannot use any loops. What is the recursive structure? What sort of character lists produce the simplest story? (Hint: the simplest story is [].) How do you construct the story in the recursive case?
You should use the provided helper functions firstSentence(object, subject) and lastSentence(object) in your implementation. The following examples illustrate their behavior:
firstSentence('parrot', 'cow')returns'The mother of the parrot told a story about a cow...'.lastSentence('parrot')returns'and then the parrot fell asleep.'.
Be careful about the return types of the various functions: firstSentence and lastSentence return strings, while bedtimeStory returns a list of strings (sentences of the story). We have also provided the helper function formatPrint which prints out this list of “story strings” in a nicely readable format.
Running the file bedtime.py as a Python script takes, as command line arguments, the set of characters you’d like in the story. In your Terminal, command line arguments appear after the word python3 (such as moose, bear, and reindeer in the example below). We can store these values in a list of strings for processing. We have provided the code that handles this for you in the if __name__ == "__main__" block.
For instance,
python3 bedtime.py moose bear reindeer
will produce the following story:
The mother of the moose told a story about a bear...
   The mother of the bear told a story about a reindeer...
   and then the bear fell asleep.
and then the moose fell asleep.
Note that the last character in the list (reindeer) in the above example, is just the object of a story for the bear, and not a subject of its own story.
You can test out the bedtimeStory function directly in interactive Python; here is is one test you may want to try:
>>> from bedtime import bedtimeStory
>>> bedtimeStory(['parrot', 'cow', 'flamingo', 'heron'])
['The mother of the parrot told a story about a cow...',
'The mother of the cow told a story about a flamingo...',
'The mother of the flamingo told a story about a heron...',
'and then the flamingo fell asleep.',
'and then the cow fell asleep.',
'and then the parrot fell asleep.']
You must write one new doctest for this function. When you are writing your new doctest, note that newlines between elements of lists can cause doctests to fail. Please make the tests as short as you can, but you can go over 80 characters if needed (as in the test provided with the starter code). You may wish to consider tests involving character lists with only 0 or 1 character name in them.
Task 2. Nested Squares
In this task, you will implement a recursive function to draw concentric squares with our favorite turtle:
The starter code for this task is in squares.py. The primary function you must complete is drawNestedSquares(size, gap, color, otherColor) in squares.py. The input parameters are described below:
sizeis the side length of the whole pattern (that is, the largest square); the side length of each successive square is decreased by twice thegap, where…gapis the inset for the nested squares. That is, a band of widthgapis left showing after the nested squares are drawn.coloris the color of the largest square you will draw.otherColoris the color of the first square to draw inside the outer one. (Note thatcolorandotherColoralternate roles on the nested squares…)
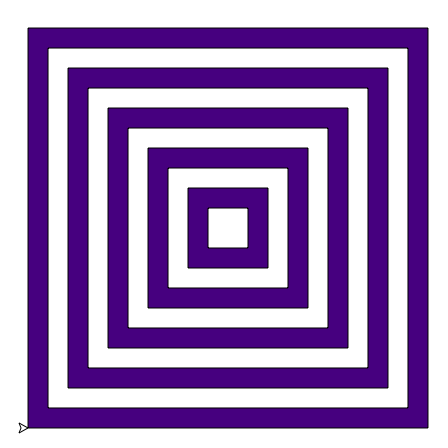
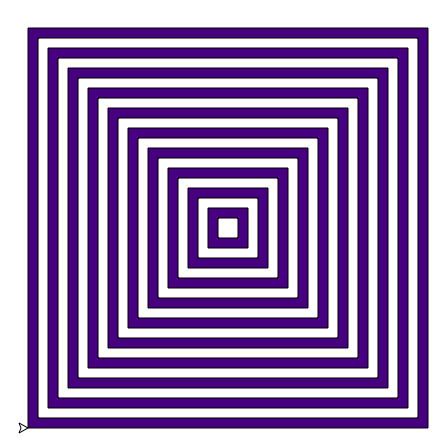
Here are a few examples of calling drawSquares(400, gap, PURPLE, WHITE) with different gaps:
gap == 40

gap == 20
gap == 10
You may assume the turtle is facing east and positioned at (-size/2, -size/2) when drawNestedSquares(size, gap, color, otherColor) is called. As usual, we should first consider the base case. The most simple drawing we may need to create is one with no squares, which will happen when size <= 0. In that case, we simply do nothing. In all other cases, we’ll need to draw a square with side length size and then recursively draw nested squares. The next nested square having side length size - 2 * gap and be centered inside the outer-most square. You’ll need to think about where that square is positioned relative to the outer square and how to ensure the squares have the right colors.
To help you write your recursive function, we provide one helper function drawSquare(size, color) that draws a square of side length size filled with color color. The turtle should be in the lower left corner of the square to draw and facing east when this is called. In addition to drawSquare, the only turtle commands you can use in your function are forward, backward, left, and right. You should not use any loops. Also, your turtle should return to where it started after drawing your nested squares.
We have set up squares.py to take size and gap as command line arguments, which means you should supply those numbers when run your program as a script, eg:
python3 squares.py 400 40
That should make it easy to experiment with different values for those parameters. We’ve stuck to gaps that evenly divide the size, but that doesn’t need to be the case – experiment a bit!
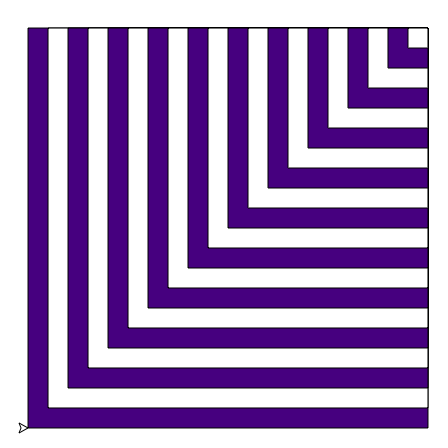
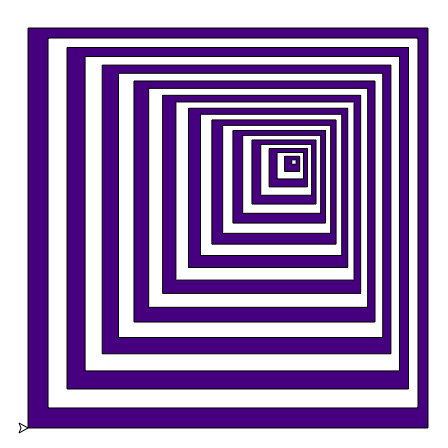
You can also change the pattern that gets drawn with small variations to the code:

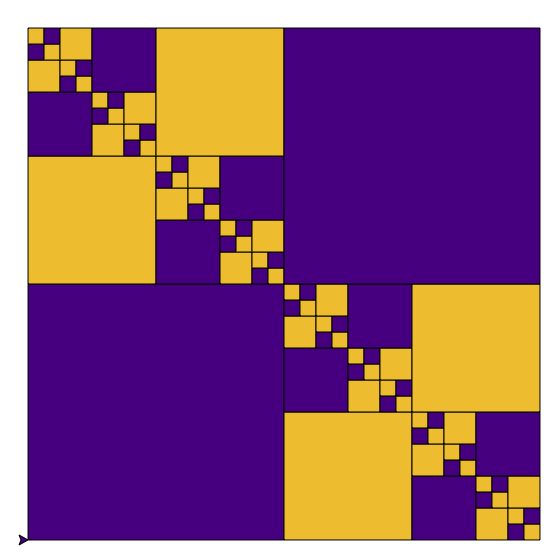
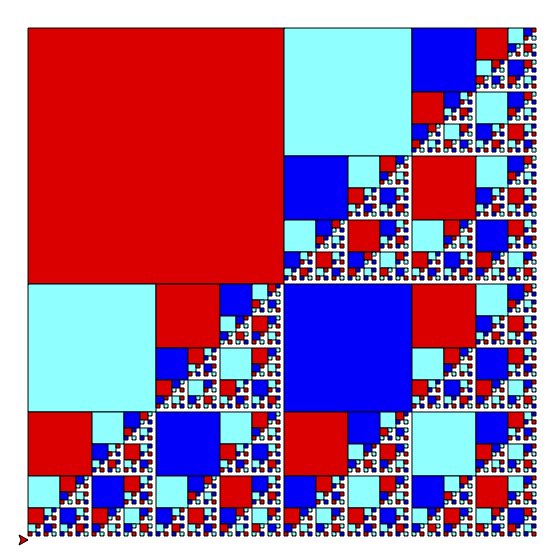
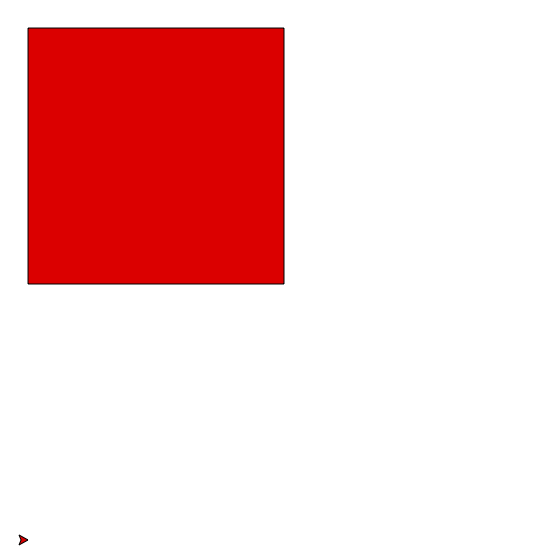
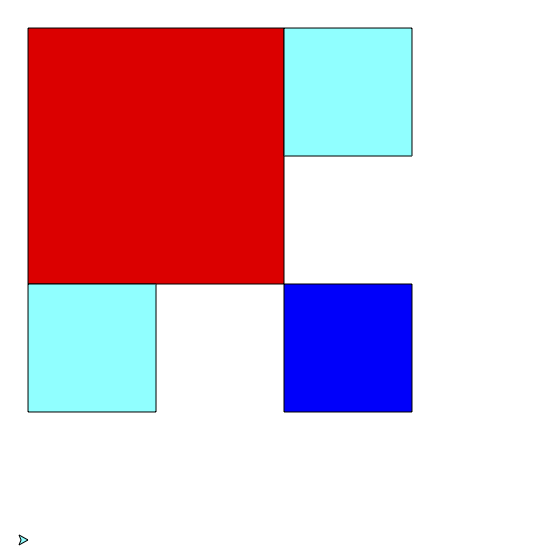
Task 3. A Williams Quilt
In this task, you will implement a recursive pattern to graphically build a purple and gold quilt:
The starter code for this task is in quilt.py, which is structured in the same way as squares.py. This time, the primary function you should complete is drawQuilt(quiltSize, patchSize, patchColor, otherColor) in quilt.py. The input parameters are described below:
quiltSizeis the side length of the whole quilt pattern.patchSizeis the side length of the largest square that can be drawn as a solid square, without further dividing it into four smaller squares.patchColoris the color to use if you draw a solid patch as part of the pattern.otherColoris the patch color to use on any recursive calls. (As in the nested squares,patchColorandotherColoralternate roles on any nested calls todrawQuilt…)
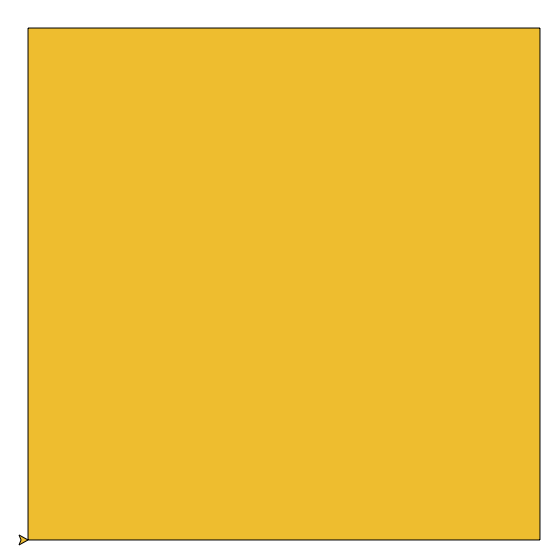
To get started on the design of your recursive function drawQuilt(quiltSize, patchSize, patchColor, otherColor), let’s explore how quiltSize and patchSize are related. Note that the patchSize will remain constant across recursive calls. Most importantly, to draw a quilt where the quiltSize is not larger than patchSize, we just draw a single square of the patchColor. This is the base case of our quilt design:
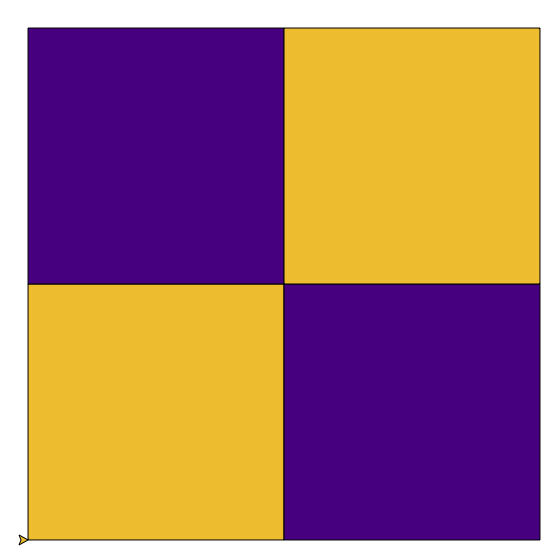
drawQuilt(512, 512, PURPLE, GOLD)

drawQuilt(512, 512, GOLD, PURPLE)
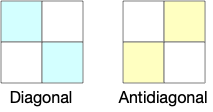
If quiltSize > patchSize, then we must divide the quilt into four smaller squares.
The smaller squares appearing on the anti-diagonal (top-right and bottom-left squares) are solid squares of patchColor. The smaller squares appearing on the main diagonal (top-left and bottom-right squares) are recursive quilts with patchColor and otherColor swapped to make the pattern more interesting. In the following two examples, the recursive calls are handled by the base case, leaving four smaller solid squares as solid patches drawn with the appropriate color:
drawQuilt(512, 256, PURPLE, GOLD)
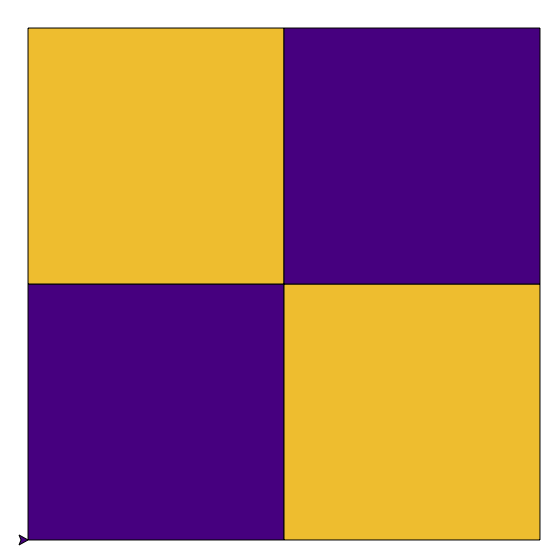
drawQuilt(512, 256, GOLD, PURPLE)
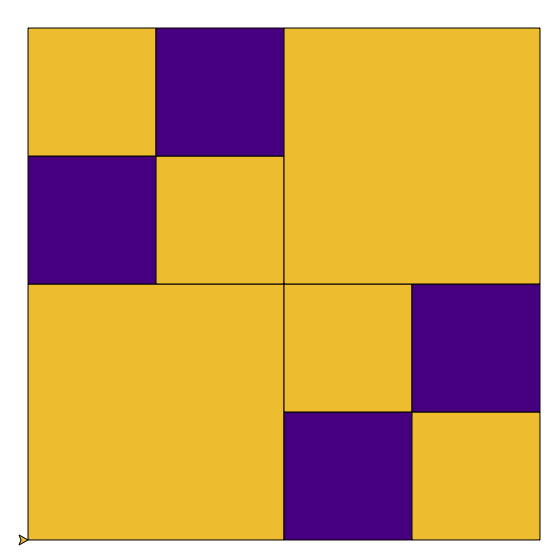
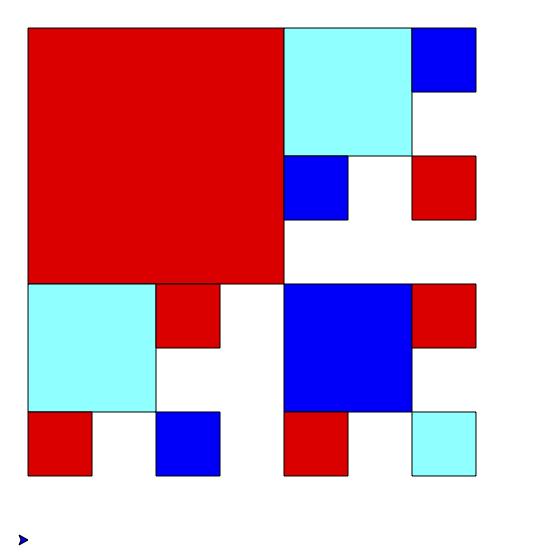
If the recursive quilt squares are still too big to be a single patch, then further recursive calls are made to break them up into four even smaller parts, yielding the following:
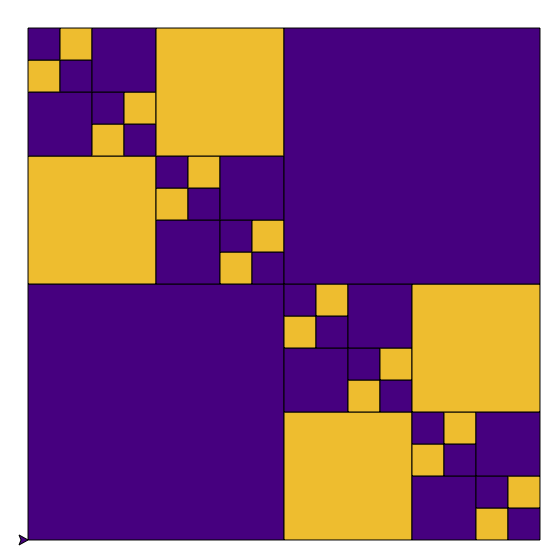
drawQuilt(512, 128, PURPLE, GOLD)
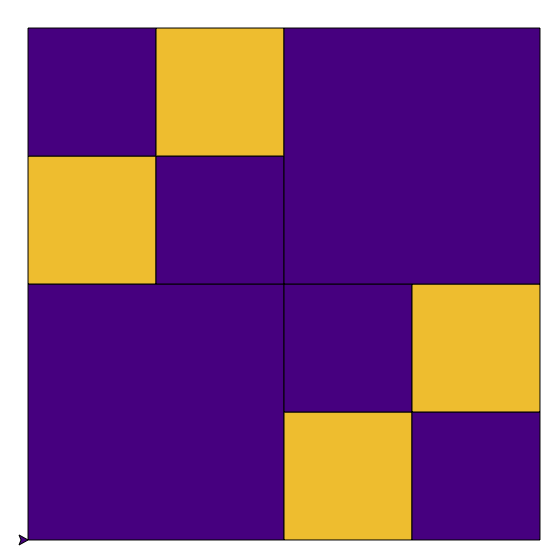
drawQuilt(512, 128, GOLD, PURPLE)
We can continue with smaller patchSizes to get even more intricate patterns:
drawQuilt(512, 64, PURPLE, GOLD)
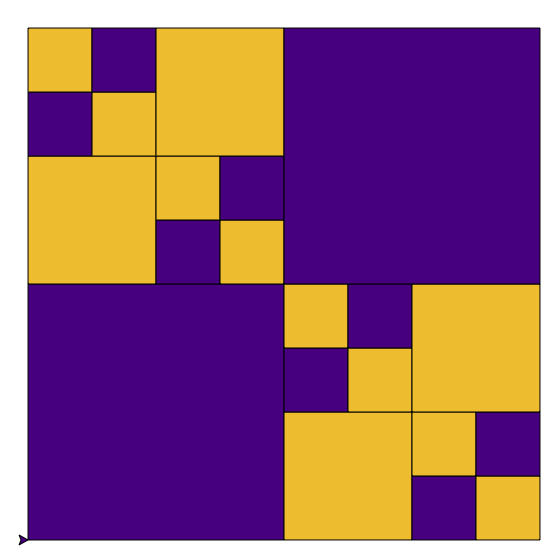
drawQuilt(512, 32, PURPLE, GOLD)
drawQuilt(512, 16, PURPLE, GOLD)
You may assume the turtle is facing east and positioned at (-quiltSize/2, -quiltSize/2) when drawQuilt(quiltSize, patchSize, patchColor, otherColor) is called. We provide the same drawSquare helper function and you should be able to write your drawQuilt function using only that and the turtle functions forward, backward, left, and right.
We have set up quilt.py to take quiltSize and patchSize as command line arguments, which means you should supply those numbers when run your program as a script, eg:
python3 quilt.py 512 128
That should make it easy to experiment with different values for those parameters. Warning: It will take a very long time to draw patterns where the patch size is a lot smaller than the quilt size…
As in Task 3, there are lots of variations for your quilt. For example, draw nested squares with your function from Task 2 in the base case. And draw something more interesting in the solid squares on the anti-diagonal:
Experiment a bit and see what you can create!
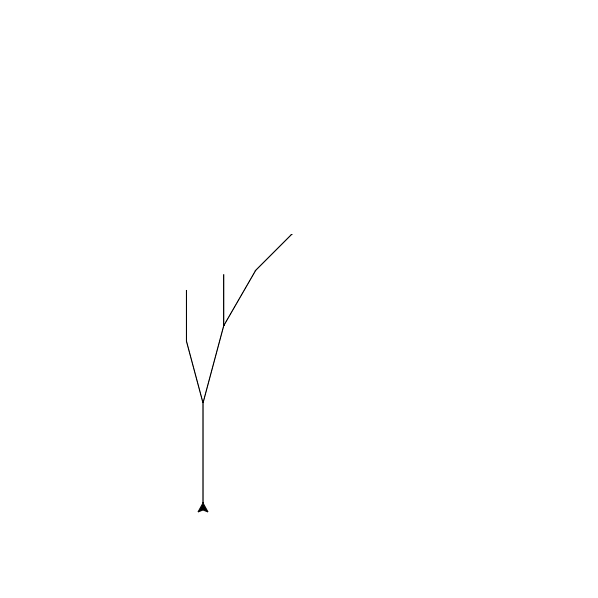
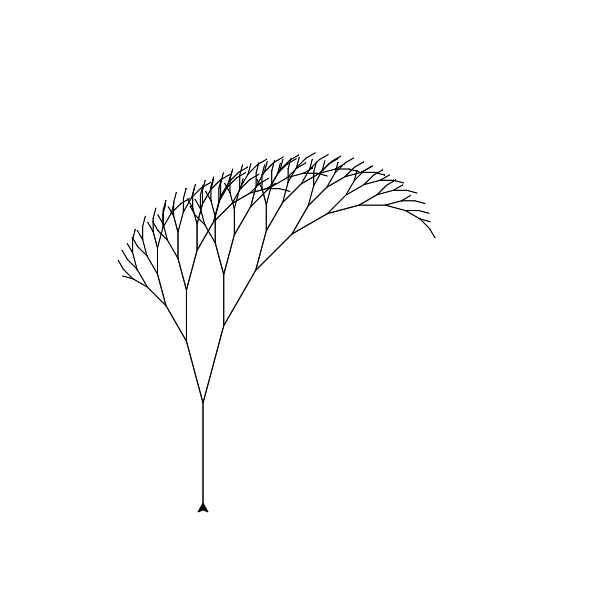
Task 4. Recursive Shrubs
In your final required task, you will write a fruitful recursive function named shrub in the file shrub.py that draws a tree pattern:
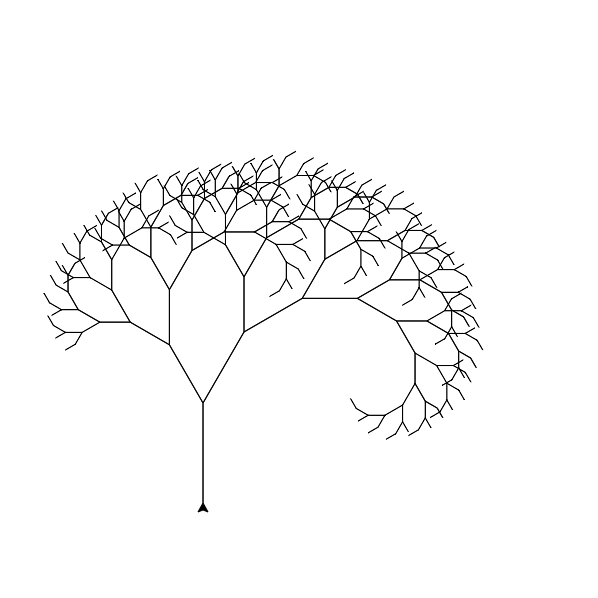
Your function will also return a tuple of values, as described below. As in the previous two tasks, you are to focus on writing on recursive
function, drawShrub(trunkLength, angle, shrinkFactor, minLength), which takes in four parameters:
trunkLengthis the length of the vertical branch at the base of the shrub.angleis the angle between a trunk and its right branch, and between the trunk and its left branch.shrinkFactoris the length of the right and left branches relative to their trunk. Specifically, the length of the right branch isshrinkFactor * trunkLength, and the trunk of the left branch isshrinkFactor * shrinkFactor * trunkLength.minLengthis the minimum branch length in the shrub.
The drawShrub function (in addition to drawing the shrub) should return a pair of items, where
the first item is the total number of branches in the shrub, including the trunk; and
the second item is the total length of branches in the shrub, including the trunk.
Please limit your shrub implementation to using only forward, backward, left, and right turtle commands.
See the sample invocations of the shrub function below, with the tuple after the function call -> indicating the value returned by that invocation.
drawShrub(100, 15, 0.8, 60)
-> (4, 308.0)
drawShrub(100, 15, 0.8, 50)
-> (7, 461.6)
drawShrub(100, 15, 0.8, 10)
-> (232, 3973.9861913600025)
drawShrub(100, 30, 0.82, 10)
-> (376, 6386.440567704483)
We have set up shrub.py to take the four necessary parameters to draw a shrub:
python3 shrub.py 100 15 0.8 60
That should make it easy to experiment with different values for those parameters. Here are some interesting test cases to try, and the expected numeric results:
python3 shrub.py 100 15 0.8 60   # should print (4, 308.0)
python3 shrub.py 100 15 0.8 50   # should print (7, 461.6)
python3 shrub.py 100 15 0.8 40   # should print (12, 666.4000000000001)
python3 shrub.py 100 30 0.82 40  # should print (12, 707.95128)
python3 shrub.py 200 90 0.75 40  # should print (20, 1524.21875)
python3 shrub.py 100 15 0.8 10   # should print (232, 3973.9861913600025)
python3 shrub.py 100 30 0.82 10  # should print (376, 6386.440567704483)
python3 shrub.py 200 90 0.75 10  # should print (232, 5056.675148010254)
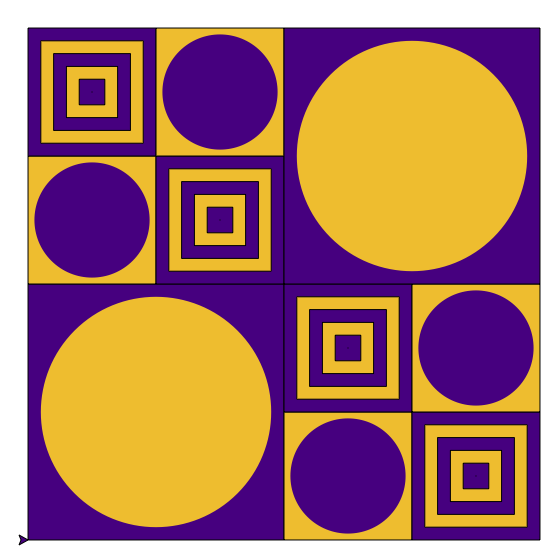
Extra Credit: Fancy Squares
In this task, you will combine the drawing of a colorful recursive pattern (as in Task 3) with the returning of tuples (as in Task 4). In particular, we will draw a recursive pattern of tri-colored squares and count the total number of squares of each color in the pattern:
This pattern contains 386 red squares, 364 blue squares, and 343 cyan squares.
You’ll implement this recursive function as drawFancySquares(patternSize, minSize, colors) in fancy.py. The parameters are the following:
patternSizedenotes the side length of the entire pattern, where the big solid square in the upper left quadrant has side lengthpatternSize/2. Recursive subpatterns of side lengthpatternSize/2fill the other three quadrants.minSizeis the smallest value ofpatternSizefor which a non-empty pattern is drawn. If thepatternSizeis strictly smaller thanminSize,recursiveSqCountdraws nothing.colorsis a tuple of three color names.colors[0]is the color of the square in the upper left corner of the pattern.colors[1]andcolors[2]are used in the recursive subpatterns, as illustrated below:
drawFancySquares(512, 1024, ("red","blue","cyan"))
-> (0, 0, 0)
drawFancySquares(512, 512, ("red","blue","cyan"))
-> (1, 0, 0)
drawFancySquares(512, 256, ("red","blue","cyan"))
-> (1, 1, 2)
drawFancySquares(512, 128, ("red","blue","cyan"))
-> (6, 4, 3)
Each calls returns a triple (that is, a 3-item tuple) where:
the first item is the total number of
color[0]squares in the patternthe second item is the total number of
color[1]squares in the patternthe third item is the total number of
color[2]squares in the pattern
The rest of the code in fancy.py is structured in the same way as in the previous tasks. You should only need to modify the drawFancySquares function, but feel free to experiment however you like!
Submitting Your Work
When you’re finished, sign the honor code and stage, commit, and push your work to the server as in previous labs.
For Task 1 , remember that you are required to add a new doctest.
For Tasks 2, 3, and 4, in addition to the Python file, you must add, commit, and push the figure generated by the specified function calls. For a review of Lab 1: Introduction to the Python/git workflow see linked slides. If you embellished any of the basic figures, feel free to submit your “improved” version, but please make sure the intended pattern is still clearly identifiable.
For Task 2, submit the figure generated by
drawSquares(400, 20, PURPLE, WHITE).For Task 3, submit the figure generated by
drawQuilt(512, 128, PURPLE, GOLD).For Task 4, submit the figure generated by
drawShrub(100, 15, 0.8, 10).For the extra credit, submit your favorite figure.
Good luck! Do not forget to add, commit, and push your work as it progresses! Test your code often to simplify debugging.
Grading Guidelines
Note that Tasks 0-4 are the only required tasks for this lab. The extra-credit recursive squares is optional. See lab Syllabus for an overview of the rubric used in grading. The file Gradesheet.txt gives you specifics of our expectations for this lab.
Functionality and programming style are important, just as both the content and the writing style are important when writing an essay. Make sure your variables are named well, and your use of comments, white space, and line breaks promote readability. We expect to see code that makes your logic as clear and easy to follow as possible. Python Style Guide is available on the course website to help you with stylistic decisions.
Acknowledgement. This lab assignment has been partially adapted from The Sampler Quilt by Julie Zelenski & Eric Roberts (1999 - 2001, Nifty Assignments) and Wellesley CS 111 Spring 2019 course materials.