Lab 1 : Introduction to XCode, Swift, and Dafny
Objective
- To learn more of Swift.
- To gain familiarity with XCode and the tools you will use for the rest of the course.
- To use a static verification tool to verify properties of programs.
Table Of Contents
Overview
Lab this week will involve several small projects to familiarize yourself with XCode, unit tests, and debugging. XCode is a very sophisticated IDE used for creating everything from playgrounds to iOS apps to desktop applications. As a result of this flexibility, configuring and writing simple projects can sometimes require more steps than you might think necessary. We’ll always remind you of or walk you through the necessary steps for settuping up our projects, so don’t get overwhelmed by the details. The primary goal this week is to gain a basic level of skill in using XCode and to become more comfortable with Swift.
We’ll also put our work on formal reasoning into practice using the Dafny software verifier.
Problem 0: Project Set Up
Check out your lab1 repository from GitHub using the steps from last week. You repository folder structure should look like this:
    Lab1/
    ├── BallsAndBoxes
    ├── Dafny
    ├── Debugging
    ├── Fibonacci
    └── HelloCow
Each folder is a separate project that you will work on below.
Problem 1: Fixing Hello, Cow
Open the HelloCow project in XCode. You can do this using the “Open…” menu item from the “File Menu” and selecting the HelloCow/HelloCow.xcodeproj in your lab folder. XCode should open a new project window that looks like the following:
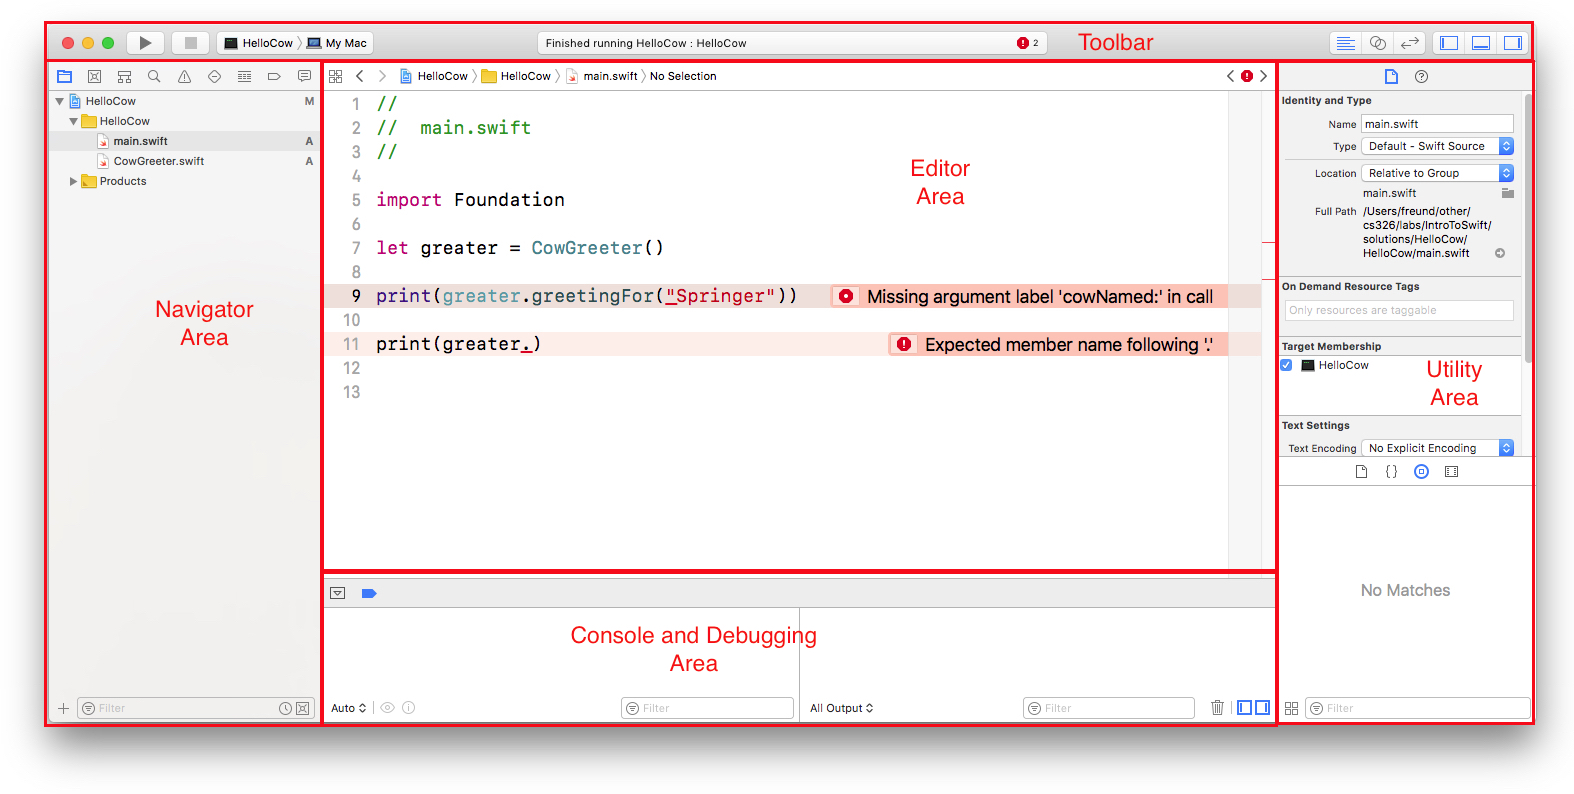
Things look a bit different than when using a playground.
The Toolbar contains a number of features we’ll use a lot:

The Activity Viewer displays relevant information about the task you are doing, in this case including that there are two errors in the code.
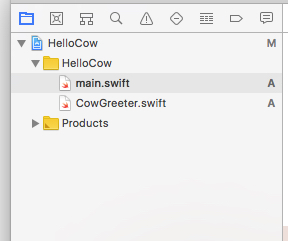
You can open different files in the editor by clicking on them in the Project Navigator. For example, click on
CowGreeter.swiftto view that file, and then switch back tomain.swift.The Navigator itself can also show different views, which are selected using the row of icons at the top. The left-most is the Project Navigator view we’ve already seen:
You may also see other views in that panel if you, for example, click on the error icon in the Activity Viewer. That brings up the Issue Navigator:
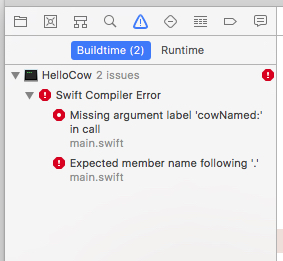
You can go back to the Project Navigator view by clicking on the first icon in the row.
Now, fix the two errors in the code. You can click on the small icons in the error messages for suggested fixes.
While we’re at it, let’s fix our variable name. Control-Click on
greater, and select “Refactor -> Rename…”. Then type in the more apropos namegreeterand press return. All occurrences ofgreatershould change.Once you have fixed the errors, run your program by clicking the Run button (or pressing the
Command-Rshortcut). If you do not see the output, you may need to click the middle Toggle icon on the right edge of the Toolbar to show the bottom panel.
After you’ve fixed the errors and run the code, it would be a good time to commit and push your changes…
Problem 2: A Swift Project: RandomHello
You will create a very small project from scratch to print random greetings to the terminal.
- Create a new project called
RandomHello. To do this:- Select “File -> New -> Project…” from the menu bar.
- Click “macOS” in the top row of buttons in the dialog box that pops up.
- Click “Command Line Tool” and then click the “Next” button.
- Enter “RandomHello” for the Product Name, fill in your name as the Organization Name, and (if necessary) fill in
williams.cs326as the organization identifier. Be sure the language is set to Swift and then click “Next”. - Choose to create the project into the folder where your other projects are stored by navigating to that folder and then clicking “Create”.
The project is created with a single source file,
main.swiftinside the “RandomHello” folder shown in the Project Navigator. Run it once to verify it compiles and runs. It should print outHello World. Make your Schemes shared. This is a pesky step to ensure that your project works when sharing it with collaborators and when we test it. Click on the Scheme pop-up menu in the Toolbar, and select “Manage Schemes…”. Click the “Shared” check box for each scheme in the table that appears in the dialog box, and then click “Close”.
Create a new Swift file in the project called
RandomHello.swiftand implement a class calledRandomHelloin that file. To create the file:- Select the folder you’d like to create it in in the Project Navigator. In this case, click on the
RandomHellofolder that currently containsmain.swift. - Select “File -> New -> File…” from the menubar, and choose “Swift File” from the dialog box that pops up.
- Click “Next”, change the name of the file to
RandomHello.swiftand click “Create”. You can copy and paste the following skeleton code in that file as a starting point.
//
//  RandomHello.swift
//  Your hame here...
//

import Foundation

/**
    RandomHello selects a random greeting to display to the user.
*/
public class RandomHello {

    /**
        - Returns: a random greeting from a list of five different
                    greetings.
    */
    public func getGreeting() -> String {
        // TODO: Remove the next two lines and write this method
        assertionFailure("getGreeting not implemented")
        return ""
    }
}
This skeleton is meant only to serve as a starting point; you are free to modify it as you see fit.
- Select the folder you’d like to create it in in the Project Navigator. In this case, click on the
Implement the
getGreetingmethod. One way to do this is to store all possible greetings in an array, and then randomly pick the index of the greeting to return. You may use any greetings you wish. Google Translate may be handy if you wish to stick to the “Hello, World” theme…You can use Swift’s
arc4random_uniformfunction to get a random integer. To pick a number in the range[0,upperBound-1], for example, you would use this function as follows:let n = Int(arc4random_uniform(UInt32(upperBound)))Casting the parameter to
UInt32and the result toIntis necessary because that function is designed to operate on values of unisgned integer typeUInt32for backwards-compatibility with older code. (If you ever need a randomDoublebetween 0.0 and 1.0, you can usedrand48().)And actually, as Bobby pointed out in lab, there’s an easier way in the version of Swift we’re using this year:
let n = Int.random(in: 0..<upperBound)You may find it useful to consult the Swift Array documentation to see how to initialize, index into, and determine the size of an array. Learn to use the Swift documentation now — it will be invaluable. You can also access the Swift documentation from inside XCode via the “Window -> Developer Documentation” menu option.
You will also need to change your
main.swiftprogram to create aRandomHelloobject and print the result of callinggetGreeting.When you are finished writing your code and it compiles, run it several times to ensure that all five greetings can be displayed.
Create a
README.mdfile for the project at the top level. Click on the project name in the top row of the Project Navigator and selected “File -> New -> File…” from the menu as before. This time scroll down near the bottom of the dialog box and click on “Markdown File” as the template. Then click “Next”, name the file “README.md”, and click “Create”. Your new should appear as the second entry in the navigator panel, right below the project name: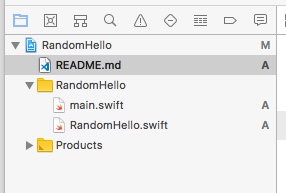
If the file is not in the right place, you can drag files around in that window. This file contains the primary documentation for the project. You should always have one. For now, something like the following suffices:
CS326 Lab 1: RandomHello
========================

Your Name Here

My first Swift project from scratch.  It prints out a **random** _greeting_!

I learned how to:

- create and run a project.
- write a class.
- add a README file.
Recall that you can find details on Markdown at GitHub or Daring Fireball.
One handy XCode feature: You can find the
README.mdfile on your hard drive by control-clicking on it in the Project Navigator and selecting “Show in Finder”. You can then control-click on that file icon, select “Open With” and then choose Atom or whichever editor you’d like to use to edit Markdown.This brings us to the last step…
Documentation and StyleEnsure your code is reasonably commented. For now, that means little more than describing the additions you made to the skeletons.
Also see the Swift Style Guide, which describes the standards for Swift style that we will expect you to follow.Now would be a good time to commit and push changes to GitHub…
Problem 3: Unit Testing
Testing is essential for writing quality software, so it’s important for testing to be a convenient part of software development. Swift includes facilities for creating unit tests. A unit test is a test for checking that a given method in a class conforms to its specification for an input. This problem provides a quick overview and simple example of how to use unit testing. Unit testing will be more significant in later assignments.
Close your open projects and open the Fibonacci project from your lab directory. There should be two folders showing in your Navigator panel – Fibonacci and FibonacciTests. Open the main.swift file from the former. This is a simple client of an object to compute Fibonacci numbers. Run the program. The console will print an incorrect result. You’ll need to fix it, with the aid of unit tests I have already written. But first, a few more handy XCode features:
- Option-click on
getFibTerm. That will bring up the “Quick Help” for that method. This is very handy for seeing a method’s specification and description. - Command-click on the
getFibTerm, and then select “Jump To Definition”. This will jump to where that method is defined. These operations also work on variables, properties, classes, etc. - Notice that the comment above
getFibTermlooks a little like Markdown. That’s intentional and XCode renders that Markdown to create the Quick Help.
After having a quick look at the Fibonacci class, open FibonacciTests.swift from the FibonacciTests folder in the Navigator. From the comments, you can see that this class contains unit tests for Fibonacci. To run those tests and fix the errors proceed as follows:
- Set the scheme in the Toolbar to be FibonacciTests by pressing the mouse on Fibonacci in the Toolbar, and changing the selection to FibonacciTests.
- Press on the Run button and hold the mouse button down — a popup menu should appear – and select the Test Item (a wrench). The Toolbar should now look like this:

- Click on the wrench, and it will run the unit tests. (You can also use the
Command-Ushortcut.)
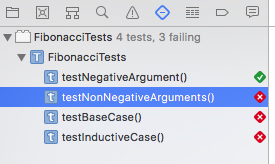
Note which icon is showing at the top of the Test Navigator – a diamond – so you can find this view later.
The first test passed, but the rest did not, as indicated in the right margin. If you click on testNonNegativeArguments, it will bring you to the source code for that test, which will contain an error indicating why the test failed. In this case, the message will be “XCTAssertNotNil failed - getFibTerm(0) returned nil”. Figure out the problem in Fibonacci.swift, fix it, and rerun the tests.
Continue debugging Fibonacci. Keep a record of what you did to debug Fibonacci as you will have to answer questions about your debugging experience below. After you have fixed all the problems in Fibonacci, you should see only green checks next to the tests in the Test Navigator.
Once all the unit tests pass, reset the Scheme to be “Fibonacci” and change the Test button back to the Run button. Run your program and verify that you get the right result in the Output Area.
Answer the following in the README.md for your Fibonacci project.
Why did Fibonacci fail the testNonNegativeArguments test? What (if anything) did you have to do to fix it?
Why did Fibonacci fail the testBaseCase test? What (if anything) did you have to do to fix it?
Why did Fibonacci fail the testInductiveCase test? What (if anything) did you have to do to fix it?
Problem 4: Debugger Tutorial
In this part, you will learn about XCode’s built-in debugger. A debugger can help you debug your program by allowing you to “watch” your program as it executes, one line at a time, and inspect the state of variables along the way. Using a debugger can be much more powerful and convenient than littering your program with statements than print output.
One of the most useful features of a debugger is the ability to set breakpoints in your program. When you run your program through the debugger, it will pause when it reaches a line with a breakpoint. You can inspect the current state of variables, then continue running your program normally or step through one line at a time to watch the variables change.
The following steps walk you through the basic features. Spend time on them now. It will save you much debugging grief later!
Open the
Debuggingproject in your Resources folder. This simple program is supposed to print the sum of two user-provided integers. Try running it a few times (or reading the source code) and you’ll see that it doesn’t behave as expected. The prompts and input are handled in the Console Area of the XCode window. If the console is not showing, you may need to click on the “show panel” icon in the lower-right corner of the “Console And Debugging Area” show in the figure below.Double-click in on the line number in the left marigin next to the line
return x - y;A blue arrow should appear, indicating a breakpoint. (Control-clicking enables you to remove the breakpoint.)- Run the program again. After entering numbers, the program will stop at the line with the breakpoint. XCode brings up a number of panels to help you explore the state of the program:
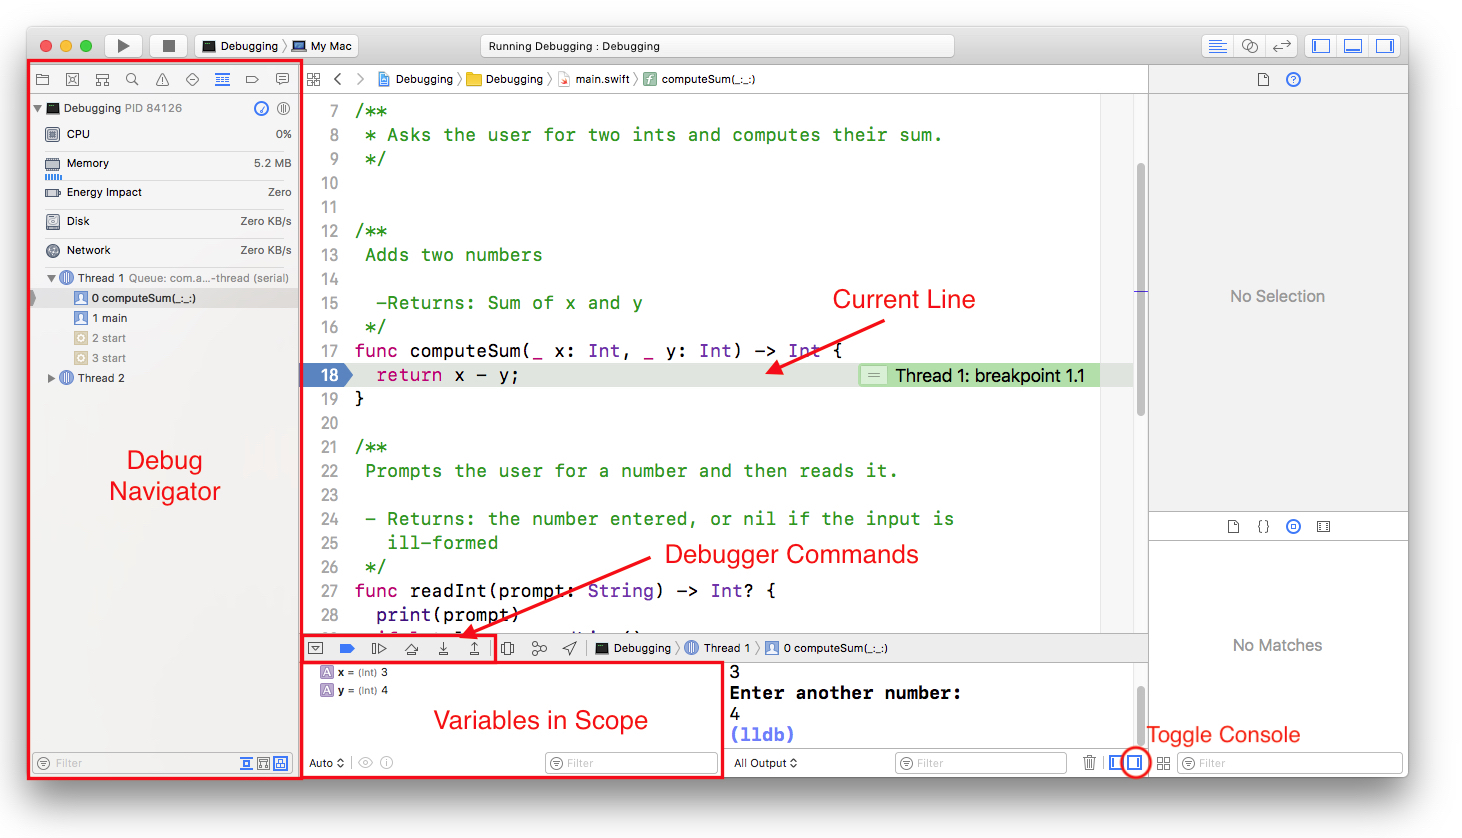
The “Current Line” is highlighted in green in the editor pane.
The “Debug Navigator” shows the current call stack. We are currently in
computeSum, which was called frommain. If you click on the line labeled1 main, it will bring the editor to the call site forcomputeSum. Click on0 computeSumto return to the current location.The “Debug Area” shows the values of all “Variables in Scope” at the current line, in this case
xandy.
Immediately above the “Debug Area” are a row of buttons to control how the debugger proceeds:
 : Hide/Show the Debug Area.
 : Deactivate/Activate the breakpoint on the current line.
 : Continue. Resume execution as normal.
 : Step. Run one line of code and then stop again.
 : Step Into. Enter the method called on the current line and stop again.
 : Step Out. Finish running the current method and stop again.
Hit “Step Over” once to execute the
returnstatement and exitcomputeSum. Hit “Step Over” again to progress to the next line. The click “Continue” to allow the program to finish executing.Remove the breakpoint you added, and create a new one at the call to
computeSumin the main code. Run the program and experiment with the debugging buttons, paying attention to what values you see at each program point, etc.When you are finished with the debugger, you can switch back to the normal “Project Navigator” view by clicking on the folder icon in the top-right of the Navigator Area.
There is nothing to turn in for this part.
Problem 5: Balls and Boxes
Until now, we have only been introducing tools. This problem delves into a programming exercise to practice using everything we’ve gone through.
Close your open projects and open the BallsAndBoxes project. As you work on this problem, record your answers to the various questions in README.md in the project’s directory.
There is no main.swift for this problem – you will complete the coding using only unit tests to ensure correctness. To that end, be sure to (1) set the scheme in the Toolbar to be BallsAndBoxesTests and (2) changing the Run button to the Test wrench. (Once the scheme is set, you can also use the Command-U shortcut to run the tests.)
Warm-Up: Creating a Ball:
Look at
Ball.swiftand the documentation for Ball. (Click on property names and method names to expose more details.)
What is wrong with this code? Fix the problems. One may be fixable before even testing the code. We have included unit tests inBallsAndBoxesTests/BallTests.swiftto help.Using Pre-Defined Data Structures:
Next, we’ll work on the
BallContainerclass. A skeleton code is provided in the project. A BallContainer is a container for Balls. BallContainer should support the following methods and properties, which are described in the specification for BallContainer. You will fill in the code to implement thesm correctly:add(_ ball:)remove(_ ball:)volumecountclear()contains(_ ball:)
In
BallContainer, we use a Set to keep track of the balls. This is a great example of using a predefined Swift data-structure to save yourself significant work.Before implementing each method, read the documentation for Set. Some of your methods will be as simple as calling the appropriate predefined methods for Set.
To help you out, we have included unit tests called
BallContainerTests.swiftin our test scheme.Before you start coding, take time to think about the following question, and write the answer in your
README.mdfile.QuestionAnswer the following in the
README.mdfor your BallsAndBoxes project.There are two obvious approaches for implementing the
volumeproperty:Every time
volumeis accessed, go through all the Balls in theSetand add up the volumes.Keep track of the total volume of the Balls in
BallContainerwhenever Balls are added and removed. This eliminates the need to perform any computations whenvolumeis called.
Which approach do you think is the better one? Why?
Implementing a Box:
In this problem, you will do a little more designing and thinking and a little less coding. You will implement the
Boxclass to conform to the specification for Box. A Box is also a container for Balls. The key difference between aBoxand aBallContaineris that a Box has only finite volume. Once a box is full, we cannot put in more Balls. The size (volume) of a Box is defined when the constructor is called:public init(volume: Double)Since a
Boxis in many ways similar to aBallContainer, we internally keep track of many things in theBoxwith aBallContainer, allowing us to reuse code. Many of the methods inBoxcan simply “delegate” to the equivalent inBallContainer. For example, removing from aBoxcannot cause it to exceed its volume limit. This design of having one class contain an object of another class and reusing many of the methods is called composition.(Optional Note: You may wonder why we did not make
BoxextendBallContainervia inheritance. That is, why did we not makeBoxa subclass ofBallContainer? We will discuss this much more deeply later in the course, but the key idea is thatBoxis not what we call a true subtype ofBallContainerbecause it is in fact more limited thanBallContainer(aBoxcan only hold a limited amount); hence, a user who uses aBallContainerin his code cannot simply substitute thatBallContainerwith aBoxand assume the same behavior. (The code may cause the Box to fill up, but we do not have this concern when using aBallContainer). For this reason, it is unwise to makeBoxextendBallContainer.)In addition to the initializer described above, you will need to implement the following new methods in
Box:add(_ ball:)getBallsFromSmallest()
A few things to consider before you start writing code:
You shouldn’t need to implement your own sorting algorithm. Instead, take advantage of the Swift API (remember: “Know and Use the Libraries”).
Also, you shouldn’t need to change your implementation of
BallContainerorBallfor this problem. In particular, you should not change them to implement the Comparable protocol. (Hint: YourBallContaineris aSequenceYou may wish to check out the varioussortmethods for a Sequence.The unit tests in
BoxTestshould help you. However, we do not guarantee that the tests we provide will catch all bugs.And, naturally, don’t forget to
commityour code more than occasionally.
QuestionsAnswer the following in the
README.mdfor your project.There are many ways to implement
getBallsFromSmallest(). Briefly describe at least two different ways. Your answers should differ in the implementation ofBox, not in lower-level implementation (for example, using an insertion sort instead of a selection sort is a lower-level implementation because it does not affect howBoxis implemented). Hint: think about different places in theBoxclass where you could add code to achieve the desired functionality.Which of the above ways do you think is the best? Why?
There is no one correct answer. Our intent is to help you fight that urge to code up the first thing that comes to mind. Remember: More thinking, less coding.
Problem 6: Dafny
This last problem gives you a taste of what it is like to program in a system that uses Hoare logic to statically verify properties of your code as you develop it. To do this, we’ll use Dafny, perhaps the most robust and easy-to-use such system.
Please go through Parts 1-9 (Introduction-Quantifiers) of the Dafny Online Tutorial.
Complete Exercises 0-9 and 11-12 in the Dafny tutorial. (Exercise 10 is optional.) Put your answers in the Dafny/ex-*.dfy files. You may find it useful to at least look over HW 1 before going too far through the tutorial.
There are several ways to run Dafny:
Edit directly in your browser window as you go through the tutorial, copying and pasting your solutions for each exercise into the appropriate
ex-*.dfyfile.Run
dafnyon the command line on any Mac lab computer. To do this, first ensure the necessary applications are on the path:$ export PATH=$PATH:/Library/Frameworks/Mono.framework/Commands/:/usr/local/dafny/(You will need to do that step each time you begin work in a new terminal window.) Then you can run Dafny via the following command:
$ dafny -compile:0 ex-0.dfy
Dafny 2.3.0.10506

Dafny program verifier finished with 0 verified, 0 errors
Feel free to continue the tutorial beyond Part 9, and have a look at that other more advanced ones if you’d like. While any verifier can be a bit painful to use at times, Dafny is a remarkable tool. The primary author, Rustan Leino, has produced a number of short videos on Dafny that are worth watching if you’d like to see more. You can start with the Basics of specification and verification of code.
What To Turn In
Be sure to submit everything in the following checklist:
- Problem 1: A fixed
HelloCowproject. - Problem 2: A complete
RandomHelloimplementation. - Problem 3:
- A solution that passes all unit tests.
- Answers to Question 1-3 in the
Fibonacci/README.mdfile.
- Problem 4: No deliverables.
- Problem 5:
- A complete
BoxesAndBallsimplementation. - Answers to Questions 4-6 in the
BoxesAndBalls/README.mdfile.
- A complete
- Problem 6: Solutions to Exercises 0-9 and 11-12 in the Dafny/ex-*.dfy files.
Before the deadline, be sure all work is pushed to Gitlab. We will grade the last commit performed before the deadline.
To ensure that everything is properly included in your repository, you should clone your repository into a temporary location and then verify all items in the checklist above are met and that your code behaves as expected. If you encounter errors, fix them and repeat this process. See the instructions in Lab 0 for doing this.
Grading Guidelines
This class emphasizes both program correctness and best practices, including programming style, documentation, specification (to the extend covered so far), sound design principles, etc. Grading will reflect both of these emphases. There is, of course, some subjectivity when evaluating design and specification decisions, but your choices should follow the basic philosophies and methodologies we have been exploring. In later weeks, our criteria will be broadened to include appropriate testing strategies and other elements we have yet to cover.
Labs will be graded on the following scale:
A+: An absolutely fantastic submission of the sort that will only come along a few times during the semester. Such a submissions reflects substantial effort beyond the basic expectations of the assignment.
A: A submission that exceeds our standard expectation for the assignment. The program must reflect additional work beyond the requirements or get the job done in a particularly elegant way.
A−: A submission that satisfies all the requirements for the assignment — a job well done.
B+: A submission that meets the requirements for the assignment, possibly with a few small problems.
B: A submission that has problems serious enough to fall short of the requirements for the assignment.
C: A submission that has extremely serious problems, but nonetheless shows some effort and understanding.
D: A submission that shows little effort and does not represent passing work.