Lab 0 : Introduction to Swift and Lab Environment
Due: Tuesday, before class
Objective
- To familiarize yourself with our lab environment.
- To learn how to manage projects with git.
- To start using Markdown to prepare documents.
- To begin learning the fundamentals of Swift.
Table Of Contents
Problem 1: The Lab Environment
You are expected to have some basic familiarity with Unix commands and working in a terminal. You can find a quick refresher here and a more detailed tutorial here.
There is nothing to turn in for this step, but you should be able to use the following commands. Spend a few minutes refreshing your memory about how to use them, or make a note to come back and do this later.
  ls         cd         cp         mv         rm         mkdir      pwd        ssh
  man        history    cat        more       grep       head       tail       scp
Unix proficiency will help you with everything you do this semester. We will also be using XCode and several other tools, which we introduce below.
Problem 2: Cloning a Repository
By the start of Lab, you will have a private repository in your GitLab account, named cs326-s20-lab0-USERNAME, where USERNAME is replaced with your Unix ID. Clone the repository to your local disk using the following steps:
- Go to https://evolene.cs.williams.edu. (This server is only available on campus.)
- Log in with your CS Unix username and password.
You should see a project repository named
cs326-s20-lab0-USERNAME. Navigate to that project by clicking on its name. Make note of the contents ofREADME.mdon the repository page – this is the part that starts with “CS326 Markdown Example” – we’ll come back to the README shortly.)Open up the Terminal.app application. You can find it in the Applications Folder on the Mac. Navigate to your home directory by entering the command
$ cd ~and pressing return. Note that, as is common in documentation for unix, the$is not part of what you actually type but instead reflects the prompt in the terminal window. So, you just need to type thecd ~part.- Make a new directory called
cs326using$ mkdir cs326. - Move into the
cs326directory using$ cd cs326. Now clone your repository to your directory. You will use a command like the following.
$ git clone https://evolene.cs.williams.edu/freund/cs326-s20-lab0-USERNAME.git
Be sure to clone with HTTPS, and not SSH.
Press return and follow the prompts for your username, and then for your password.
Change directories into the new repository directory using
$ cd cs326-s20-lab0-USERNAME.
Problem 3: Editing Markdown and Committing/Pushing Changes
Before diving into XCode, we’ll briefly introduce you to Atom, a handy editor for MarkDown, a formatting system that you will use to write up documentation and possibly your problem sets.
Open the Atom application. You can find it in the toolbar at the bottom of your desktop. (Its icon looks like a green atom…)
In Atom, click
File -> Open...and select theREADME.mdfile from your lab0 folder.The way
README.mdlooks in Atom us quite different than how it looked onevolene. The contents of that file are written in Markdown, a plain text formatting syntax that GitHub converts into HTML. (Markdown can also be converted into PDF, Word documents, and many other formats.)XCode does only a marginally useful job formatting Markdown, which is why we’ll use Atom. MacDown is another nice editor for Macs. Here are other good reference for Markdown from Daring Fireball.
You can preview the formatted version of your MarkDown file by selecting
Packages -> Markdown Preview -> Toggle Previewin Atom. A second panel will appear with a formatted version of the file. Change the title inREADME.mdtoCS326 - Lab 0, and add your name underneath it. The preview should update to reflect those changes.We will now commit and push the change, and then verify that the new version appears on
evolene. when you view your repository.To do this, switch back to your terminal window. You will now commit the change you made to
README.md. First typegit status, which will produce a message like:$ git status On branch master Your branch is up to date with 'origin/master'. Changes not staged for commit: (use "git add <file>..." to update what will be committed) (use "git checkout -- <file>..." to discard changes in working directory) modified: README.md no changes added to commit (use "git add" and/or "git commit -a")This indicates that
README.mdhas been modified since you checked it out. You can selectively choose which modified files to commit usinggit add, but most of the time you’ll want to commit all modifications, which can be done by adding the-aflag:$ git commit -aThis step will open an emacs window where you should type a descriptive message describing the changes. Every commit should have a meaningful message so you and others can understand what was modified. Type “Added name to README.md”, save (Ctrl-X Ctrl-S), and exit (Ctrl-X Ctrl-C) Emacs. You can also provide short messages with the
-mcommand line option:$ git commit -m "added my name" -aOf course, the
commitcommand doesn’t push those changes to GitHub, but only to your local repository. To make the changes appear on GitHub, use the command$ git pushView your project on
evolenein a browser again, and confirm that the changes you made appear there.
Using GitHub in Lab
Be sure to add/commit/push your work to evolene every time you stop working in lab. Any uncommitted or un-pushed work is only stored on the local hard drive of the computer you are sitting at. Your work will still be there if you return to the same computer later, but if you log into any other machine in lab, those changes will not be there.
And when you sit down at a computer in lab, it is always a good idea to run
$ git pullin your repository in case you had made and pushed any changes since the last time you used that computer.
Problem 4: Swift Tour
In your Lab 0 folder and double click on the IntroToSwift.playground. This will open the Swift Tour Playground in XCode. (Playgrounds are a simple form of XCode project that allow you to easily write and experiment with small pieces of code.)
Your XCode window will look like the following (though the text in the Editor Area may be formatted differently):
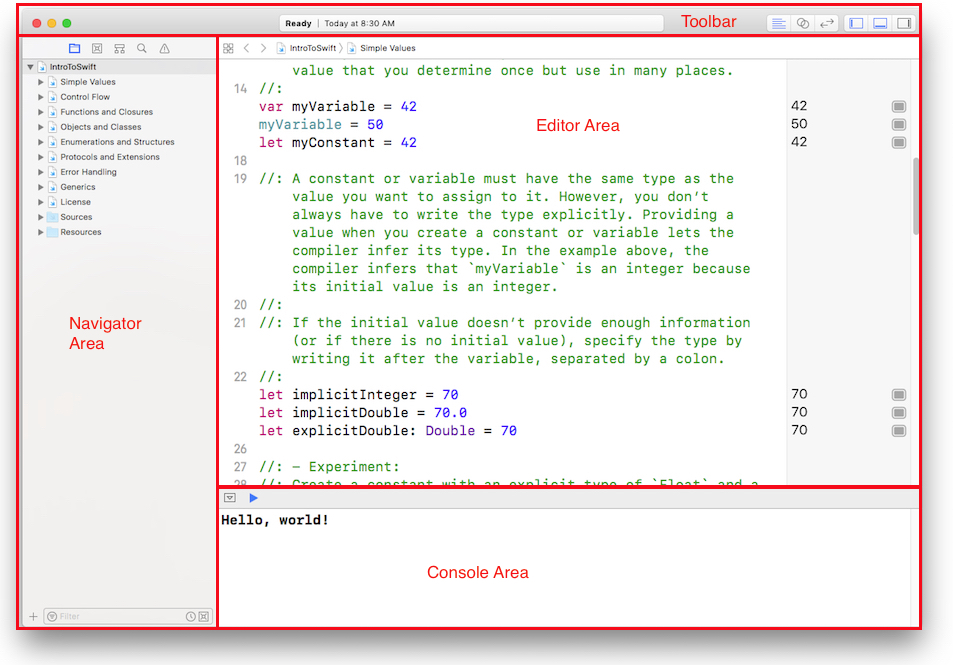
If XCode is not showing the Navigator on the left, you will need to show it. That is done by clicking the third button from the right margin in the Toolbar (the square with a bolded line on the left edge). The other buttons in that row toggle other panels around the edges. The second from the right margin toggles the console area, which you may also need to show.
Don’t be overwhelmed by all the panels, buttons, and menus. We’ll eventually learn to use many of them, but right now you won’t need to use any features of XCode beyond navigating through the Playground sections on the left and editing the source code in the middle panel.
Click on “Simple Values” in the Navigator. The editor window will show the first few lines of the tutorial, and XCode will present the result of running each to the right after a couple of seconds. The Console area contains any messages printed by the code with the print method.
Before getting starting, click and hold the play button (blue triangle) at the top-left corner of the Console area. Select “Manually Run” from the pop-up that appears, as shown below:
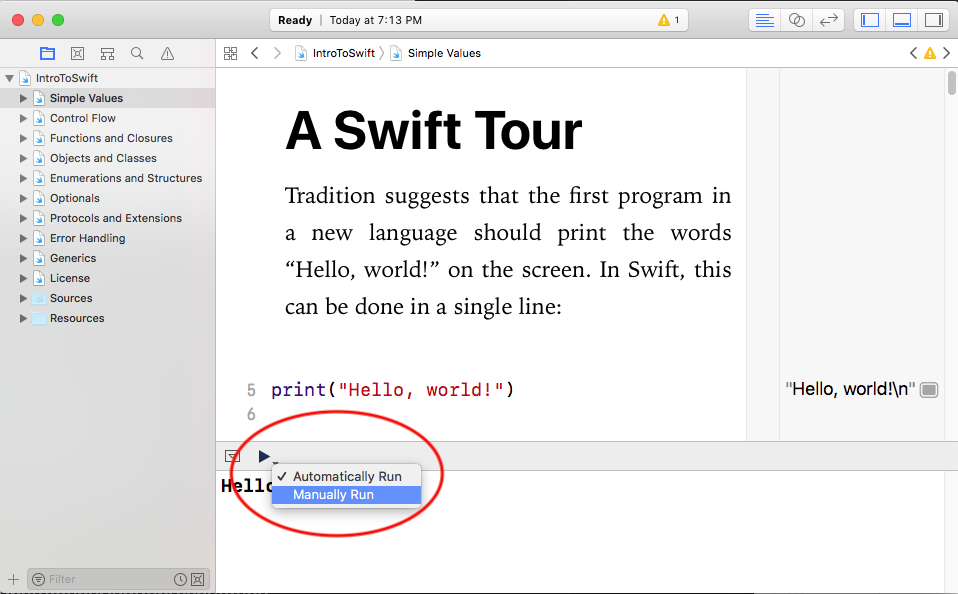
This prevents XCode from trying to continually re-run playgrounds as you edit them, which sometimes causes pesky crashes in this version of XCode. Instead, it will only re-run the code for the current page when you press that play button.
Saving, quitting, etc. work as in any other Mac application.
Go through at least the first six sections by the due date, completing each “experiment.” You’ll want to return to the playground and complete the other sections as we cover those topics in class.
- Simple Values
- Control Flow
- Functions and Closures
- Objects and Classes
- Enumerations and Structures
- Optionals
- Protocols and Extensions
- Error Handling
- Generics
As you work through the tutorial, you should read the relevant sections in The Swift Programming Language.
In the README.md for your project, please answer the following briefly.
- Give me your first impressions of Swift. Anything jump out at you as particularly different/interesting/useful?
- Which features would you like to understand better?
There are no “correct” answers to these questions – I’ll use your answers to guide what we cover in the upcoming lectures.
A Few Details
Playgrounds can be a little flaky in the most recent version of XCode. If the message in the toolbar at the top of the window says “Running IntroToSwift” but nothing happens after a few seconds, you may wish to close XCode and reopen it. (Don’t worry – we’re only going to use Playgrounds for this one lab, so this won’t be an potential annoyance all semester.)
XCode shows playgrounds in a mix of code and formatted prose. The “Editor -> Show Raw Markup” menu option will show the prose as Swift comments – you can switch that option if you find it pesky to work around the formatted prose blocks.
XCode highlights errors in the source code as shown below:
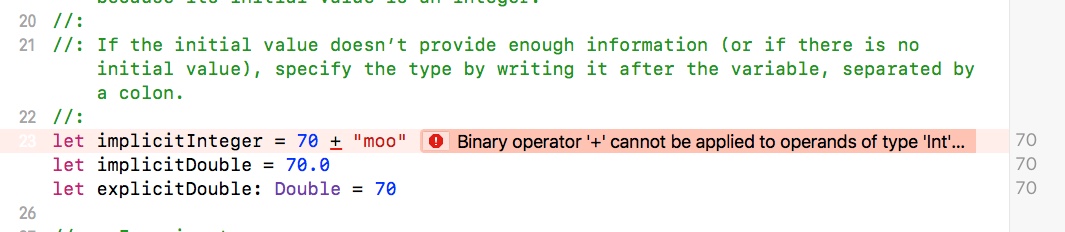
Clicking on the red stop sign in the message will reveal additional details about the error, and possibly some suggestions on how to fix the problem.
The goal is to become familiar with the syntax and features of Swift. The time you invest in learning Swift and our development environment now will pay off later in the semester.
Problem 5: XCode and Git
We have started to use the key git operations on the command line:
$ git clone REPOSITORY
$ git status
$ git add
$ git commit -m MESSAGE -a
$ git push
$ git pull
Git commands are also built into XCode. I typically perform clone from the terminal to initially set up my local environment but then use the other commands inside XCode. To commit and push from a git-controlled project, for example, select “Source Control -> Commit…” from the XCode menus. A dialog box will appear like the following:
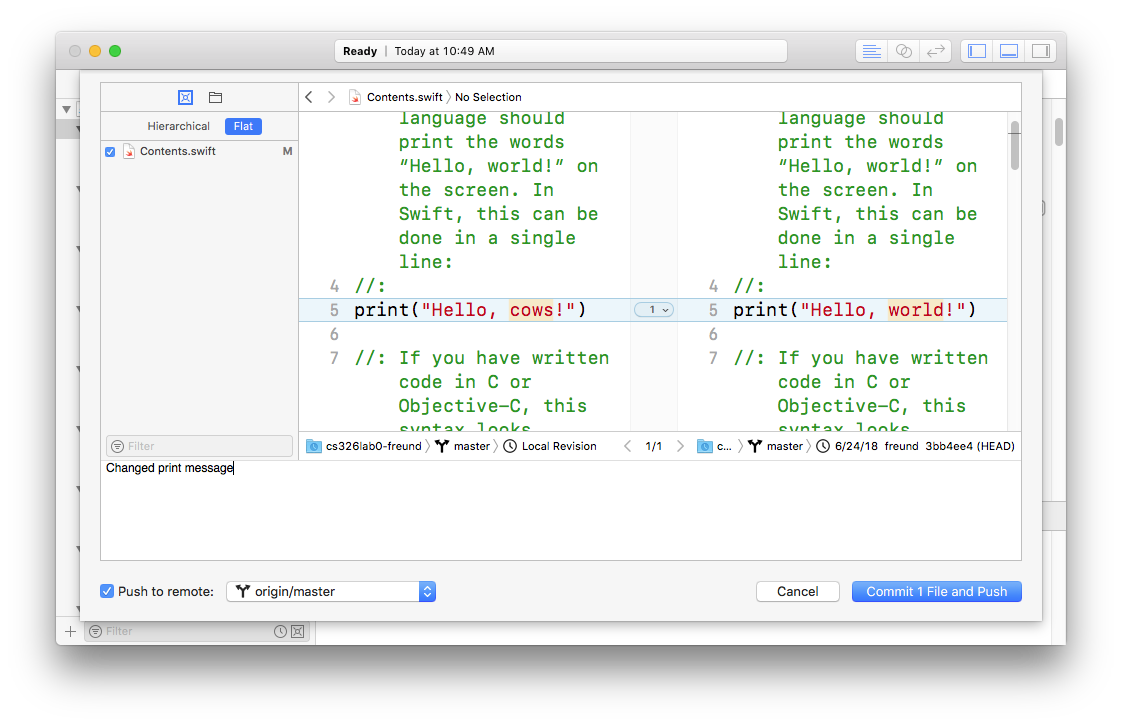
The left pane in the dialog shows the modified files that will be committed, the middle pane shows a diff of the changes (I changed “world” to “cows”), and the bottom pane is a text box where you can add the commit message. If you wish to push at the same time, check the box in the lower left corner.
The “Source Control” menu also has options for pulling, cloning, etc.
Try these XCode features out by making, committing, and pushing some changes to your files from inside XCode.
What To Turn In
Be sure to submit everything in the following checklist:
- Your playground with code for all experiments in the required sections of the tutorial.
- Your answers to Questions 1 and 2 in
README.md.
Before the deadline, be sure all work is pushed to Gitlab. We will grade the last commit performed before the deadline.
To ensure that everything is properly included in your repository, you should clone your repository and attempt to compile and run the code after you have pushed all of your work:
$ cd /tmp/
$ git clone https://evolene.cs.williams.com/~freund/cs326-s20-lab0-freund.git
$ cd cs326-s20-lab0-freund
$ open IntroToSwift.playground
Then verify all items in the checklist above are met and that your code behaves as expected. If you encounter errors, fix them and repeat this process.