Lab 5 : Graph ADT
Objective
- Create a precise specification of an ADT, namely a graph.
- Given an abstract, high-level specification, develop a robust Swift implementation.
- Create unit tests to demonstrate that your implementation works correctly.
Table Of Contents
Please start using the new git repository that I will create shortly for the next couple of labs. The new repository will have a name like cs326-s20-graphs-freund. You’ll be notified when it is available. If you started work in the old repository, copy/paste from there into the new files.
Partners
You may work with a partner on this lab. Partners are strongly encouraged not required.
Overview
In this assignment you will design, implement, and test a directed labeled multi-graph ADT.
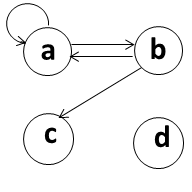
A graph is a collection of nodes (also called vertices) and edges. Each edge connects two nodes. In a directed graph, edges are one-way: an edge e = ⟨A,B⟩ indicates B that is directly reachable from A. To indicate that B is directly reachable from A and A from B, a directed graph would have edges ⟨A,B⟩ and ⟨B,A⟩.
The children of node B are the nodes to which there is an edge from B. In Fig. 1, the children of B are A and C. Similarly, the parents of B are the nodes from which there is an edge to B. In Fig. 1, B has only one parent, A.
A path is a sequence of edges ⟨node1,node2⟩, ⟨node2,node3⟩, ⟨node3,node4⟩, .... In other words, a path is an ordered list of edges, where an edge to some node is immediately followed by an edge from that node. In Fig. 1, one possible path is ⟨B,A⟩,⟨A,B⟩,⟨B,C⟩. This path represents traveling from B to A to B to C. A path may traverse a particular edge any number of times.
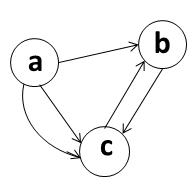
In a multigraph, there can be any number of edges (zero, one, or more) between a pair of nodes. Fig. 2 shows a multigraph with 2 edges from A to C.
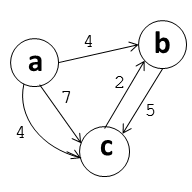
In a labeled graph (Fig. 3), every edge has a label containing information of some sort. Labels are not unique: multiple edges may have the same label. In theory a graph could contain two “identical” edges with the same starting point, ending point, and label, but for this project you may decide whether or not to allow identical edges in your implementation. (Whatever you decide, make sure it is clearly documented so clients understand how they can use your ADT.)
Problem 0: Project Setup
Clone your graphs repository following the same steps as previous weeks. The repository contains several files:
GraphProjects
├── GraphADT
│   ├── GraphADT.xcodeproj
│   ├── Package.swift
│   ├── README.md
│   ├── Sources
│   └── Tests
├── GraphProjects.xcworkspace
├── SocialNetworks
├── CampusPaths
└── GraphClients
This week, you will work in the GraphADT, either by editing the files in Source and Tests, or by opening the GraphADT/GraphADT.xcodeproj XCode project. (The GraphProjects.xcworkspace workspace and other directories will be used in later weeks. GraphADT/GraphADT.xcodeproj is a different type of project: it doesn’t generate an app. Instead, it generates a library (or framework) that we can use in other projects. In particular, it generates a framework GraphADT containing your Graph definition. Other projects can import your framework and use your Graph implementation. When working on Graph, you will find that it does not make sense to run the program in the traditional sense. Instead, you will simply design and run unit tests on your ADT until you are satisfied with it. You will always be able to go back and change Graph later, but we will design and test it in isolation.
Also, I’ve added the TAs as members of your repositories so that they can more easily answer questions about and help you debug your code — just make sure everything is pushed to evolene before asking them for assistance.
Problem 1: Graph Specification
To start, you will specify the API for a class or classes representing a directed labeled multigraph. The API, or public interface, is the collection of public classes, methods, and properties that clients of your graph ADT can use. (Structs are totally fine as well. I’ll stick to using “class” to refer to both structs and classes.) We recommend that you work in iterative layers of detail. Start rough — preferably with pencil and paper — by identifying what operations the ADT needs to support, how it might be logically broken into classes and interfaces, and how these classes and interfaces rely on each other. Then, jot down a list of methods for each class that provide these operations. Think through some possible client applications, such as Lab 6 (Coming soon!) or the optional GraphViz Client below, to get an idea for what operations are needed. Perhaps write some pseudocode (or even real code) for the layout application and make sure your graph interface meets its needs. (Note: don’t worry about actually implementing the clients yet – just focus on the lower-level operations needed to build the graph and to be able to write those clients later.)
Keep your initial design rough — don’t write formal class and method specifications with all the proper clauses right away. Your design will likely go through multiple iterations, and it’s easier to throw away parts if you have invested less effort in them.
Once you are satisfied with your high-level design, write a Swift specification for each class, method, and property in the Graph.swift file inside the GraphADT project.
Follow the format we have developed in lecture, remembering to use both standard tags (Parameter, Returns, …) and ones introduced for this course (**Requires**, **Effects**, **Modifies**). Your documentation must be properly formatted and readable in the Quick Help box that pops up when you option-click on the names of your properties, methods, classes, etc.
A good approach for designing the interface is to create skeleton implementations of your classes containing only method “stubs”, and then write your specifications in the right place in the source file. A stub is a not-yet-implemented method whose body simply fails immediately. I typically use
preconditionFailure("Not Implemented!")for this purpose, as you saw in previous labs. Stub methods give you the flexibility to run client code and tests before all your methods are implemented correctly.
You may assume edges are uniquely identified by their data contents: that is, no two edges store entirely equal data. You may handle the case where an edge matching an existing edge is added however you like. Also, your design should support self edges (ie, an edge that connects a node to itself.)
For this assignment, you may restrict your graph to store the data in nodes and edge labels as Strings. In a future assignment, you will use generics to make your ADT work with other data types — text, integers, doubles, etc.
Design problems such as this one are open-ended by nature: we are not looking for one “right” design. There are principles of good design you have learned in lecture, however. You will also find suggestions of what to consider and how to approach the problem in the Hints section. Also, designs naturally evolve as requirements change, so try to make your code easy to expand without making it overly general right away.
Answer the following in the GraphADT/README.md file.
- Write a brief description (perhaps one to two paragraphs) of why you included the operations you did and why you feel they are a sufficient interface to a graph. If your design includes multiple classes or interfaces, explain why you included each one; if not, explain whether you considered additional classes and why you decided not to include them.
Problem 2: Graph Tests
Write a test suite for your Graph specifications. It’s important to write your tests before your code, but of course, your tests will not pass until you have completed Problem 4.
You must include both implementation and specification tests, described in the testing handout. Specification tests must satisfy the format and layout we provide; in other words, they must be valid tests for any solution to this assignment. By contrast, implementation tests are unit tests for the methods and properties unique to the specification and implementation you designed for your own ADT.
Implementation Tests: Write unit tests to thoroughly test your classes, just as you have seen in earlier labs. Create one test class per public ADT class, and be sure to write tests for at least every public method. Add your test classes to the
GraphTestsproject folder.Specification Tests: Because we didn’t specify any of the class or method names you need to write for this assignment, specification tests cannot test your interface directly. Instead, you will construct specification test cases in the format specified in the Test Script File Format section. Each test case consists of a “test” file containing a series of commands, and an “expected” file containing the output that the commands should produce. The file names should have the same base name but end with
.testand.expected, respectively. For example, you may have a command file namedtestAdd.testwith expected output intestAdd.expected. These files must be in theGraphTestsdirectory alongsideSpecificationTests.swiftwe provide. They should have descriptive file names and comments that explain what case is being tested, and just like methods in unit tests, each test file should test only one distinct condition.When you run the tests, our
SpecificationTestscode will find all of the.testfiles in that directory and run them. It then compares the actual output to the.expectedfile and fails if they are different. The actual output must match the expected output exactly, including whitespace. We cover how to run these tests and interpret their results below.
Answer the following in the GraphADT/README.md file.
- Write a few paragraphs documenting and explaining your testing strategy. Frame your approach in terms of the different types of tests and approaches to generating test inputs we discussed in lecture.
Be sure all implementation tests and specification test files are checked into git.
Problem 3: Graph Implementation
Your next job is to write the code to satisfy your specification. Recall from CSCI 136 that there many ways to represent a graph. Here are a few:
- As a collection of edges
- As an adjacency list, in which each node is associated with a list of its outgoing edges
- As an adjacency matrix, which explicitly represents, for every pair ⟨A,B⟩ of nodes, what edges there are (if any) from A to B
You first step is to decide what your representation will be.
Answer the following in the GraphADT/README.md file.
- Write a few paragraphs briefly describe your representation. For at least the three representations above and your representation (if it is not one of the ones above), explain the advantage of that representation. Explain why you chose the representation you did.
After you have chosen the representation and justified your choice:
Write an explicit abstraction function and representation invariant for your
Graphdata type (and any other ADTs you create). Also implement an appropriatecheckRep()method.Write the implementation of your graph data type. Strive first for a good design without worrying too much about performance right now. In later labs you will create and operate on large graphs, so the scalability of your implementation will be important, but a well-designed implementation can always be adjusted later.
Since the first two apps – graph layout and path finding – must frequently look up the children for a given node, you should, however, try to make this operation should be fast even for large graph sizes. Aim for constant time here.
Your graph building operations should also be reasonably efficient. Since you will be building on top of the standard Swift data structures, be sure to understand the computational complexity of methods in Array, Set, and Dictionary.
Be sure to call your
checkRep()where appropriate.As you work on your implementation, think about whether new tests are needed in addition to those you wrote before you started coding. If so, add these to your test suite. Keep track of these for the questions below…
Answer the following in the GraphADT/README.md file.
Did your specification change at all while implementing it? If so, why? (It is fine if it did. There are many reasons it may have, but it is always good to reflect on this.)
Describe any new tests you added, or why you feel that your original tests are sufficient.
Problem 4: Test Driver for Graph
The provided SpecificationTests test driver reads script files written in the format described under the Test Script File Format section and prints its results to the console (as well as comparing it to the expected output). Our skeleton implementation takes care of parsing the input file format, etc., but you need to tailor the code to your specific Graph ADT. Thus, when you first run the specifications tests all will fail. You can run them either in XCode or on the command line with swift test. If you are on the command line, you will see output like the following:
...
Test Script '-[SpecificationTests testScripts]' graphTest1.test: started.
graphTest1.test:14: error: -[GraphTests.SpecificationTests testScripts] : Output Mismatch(< is actual; > is expected)
1   # Sample testing file.
...
12
13   # Create a graph
14   created graph graph1
15
16   # Add a pair of nodes
17 > added node n1 to graph1
17 < addNode not implemented.
...
This report shows that when running graphTest1.test, line 17 of the actual output did not match the expected output was “added node n1 to graph1”.
When using XCode, this output will appear in the Console. The output is also accessible by going to the log of the unit test run:
- Be sure to run the tests at least once at this point.
- Open the Report Navigator by clicking on the last icon in the row of choices at the top of the Navigator Panel, or find it in the “View -> Navigators” menu list.
- Click on the “Test” line at the top of the list that appears. (This is the most recent run.)
Click “Logs” at the top of the panel that appears in the editor pane. XCode should now look like the following:
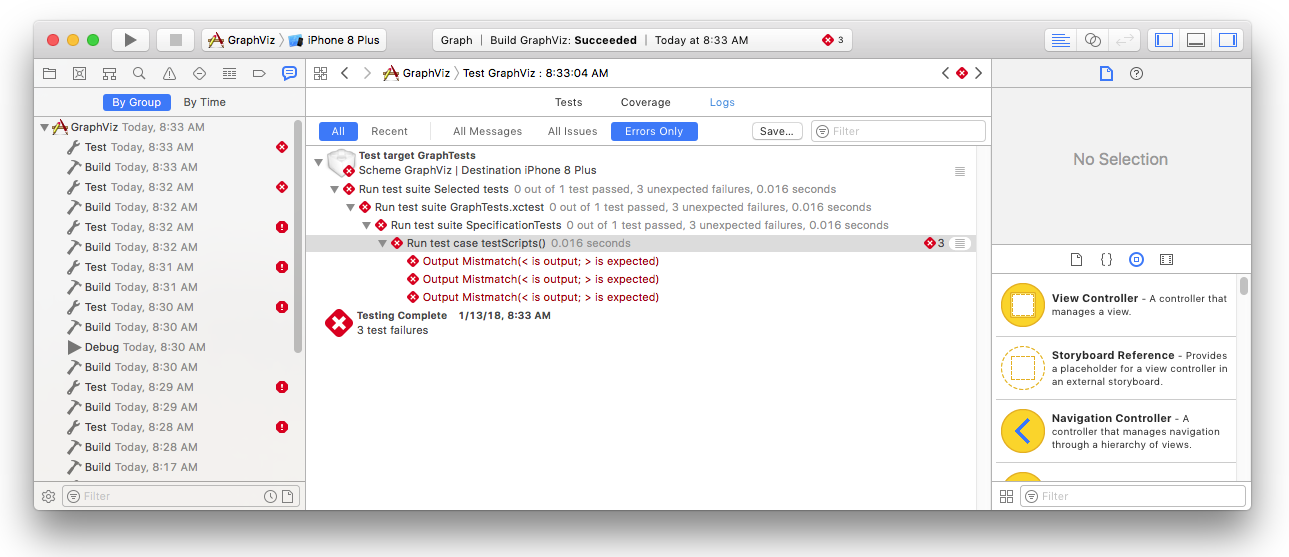
The line “Run test case testScripts()” reports three failures. You can see the details by clicking in the right margin on the “expand” icon next to “3”. You will then see text containing the following snippets:
Complete the SpecificationTests file by adding code where specified by comments to perform the appropriate operations on your ADT. Be sure to use the write method rather than print in this class to ensure the output goes to where the driver expects it.
Warning: If your driver does not work properly it will likely cause some or all tests to fail when your assignment is graded. Be sure it works.
Test Script File Format
Because you and your classmates will have different specifications for the class(es) in this assignment, it is important that there is a standardized interface to use and test your code. To that end, we specify a text-based scripting format used to write instructions that will be executed by your graph.
The testing script is a simple text file with one command listed per line. Each line consists of words separated by white space. The first word on each line is a command name. The remaining words are arguments to that command. To simplify parsing the file, graph names and node and edge data may contain only alphanumeric characters (in other words, numbers and English letters (upper or lower case)).
There are example programs in the GraphTests directory.
The following is a description of the valid commands. Each command has an associated output, which will be logged when the command is executed. Lines that have a hash (#) as their first character are considered comment lines and are echoed to the output when running the test script. Lines that are blank should cause a blank line to be printed to the output. These commands were chosen for ease of testing and are not meant to suggest what methods you should include in your graph specifications or how you should implement them. For example, it is unlikely to make sense for your graph ADT to store a name for the graph.
Command:
CreateGraph graphNameCreates a new graph named graphName. The graph is initially empty (has no nodes and no edges). The command’s output is:
created graph graphNameIf the graph already exists, the output of this command is not defined. Note that graph names are used purely in the test script; it is unlikely to make sense for your graph ADT to store a name.
Command:
AddNode graphName nodeDataAdds a node represented by the string nodeData to the graph named graphName. The command’s output is:
added node nodeData to graphNameIf a node with this data is already in the graph, the output of this command is not defined.
Command:
AddEdge graphName parentNode childNode edgeLabelCreates an edge from parentNode to childNode with label edgeLabel in the graph named graphName. The command’s output is:
added edge edgeLabel from parentNode to childNode in graphNameIf either node does not exist in the graph, the output of this command is not defined. If an identical edge (same parent, child, and label) already exists, the output of this command is not defined either, as it is left to your discretion whether to allow identical edges in your implementation.
Command:
ListNodes graphNameThis command has no effect on the graph. Its output starts with:
graphName contains:and is followed, on the same line, by a space-separated list of the node data contained in each node of the graph. The nodes should appear in alphabetical order. There is a single space between the colon and the first node name, but no space if there are no nodes.
Command:
ListChildren graphName parentNodeThis command has no effect on the graph. Its output starts with:
the children of parentNode in graphName are:and is followed, on the same line, by a space-separated list of entries of the form node(edgeLabel), where node is a node in graphName to which there is an edge from parentNode and edgeLabel is the label on that edge. If there are multiple edges between two nodes, there should be a separate node(edgeLabel) entry for each edge. The nodes should appear in alphabetical order by node name and secondarily by edge label, e.g.:
firstNode(someEdge) secondNode(edgeA) secondNode(edgeB) secondEdge(edgeC) thirdNode(anotherEdge)There is a single space between the colon and the first node name, but no space if there are no children.
Hints
Writing Specifications
To give you some sense of the kinds of issues you should be considering in your design, here are some questions worth considering. These don’t in general have simple answers. You’ll need to exercise judgment, and think carefully about how different decisions may interfere with each other.
- Will the graph be mutable or immutable?
- Will the graph be implemented as a single class, or will there be a protocol for the Graph specification and a separate class for the implementation?
- Will edges be objects in their own right? Will they be visible to a client of the abstract type?
- Will nodes be objects in their own right? Will they be visible to a client of the abstract type?
- When will the user specify the nodes and/or edges in the graph? (In the initializer? With an insertion method? Both? Can the user add multiple nodes and/or edges at once?)
- How will the user get all nodes in the graph?
- How will the user access edges for a particular node?
- Will the type use any standard Swift collections in its implementation?
In choosing what operations/methods to include, strive to include enough that the ADT will be convenient and useful for a client, but avoid the temptation to write an “everything but the kitchen sink” API. Generally speaking, it is better to design a minimal than a maximal API. In the real world, you can always add methods later. However, you can never remove them from a published API, and such methods may over-constrain the implementation in the future.
Working Incrementally
Although it is generally a bad idea to start coding before you have thought deeply, it often makes sense to work incrementally, interleaving design and coding. Once you have a sketch of your specification, you may want to write some experimental code. This should give you some concrete feedback on how easy it is to implement the methods you’ve specified. You may also want to write code that uses your type even before finishing your ADT implementation, so that you can be confident that the methods you provide will be sufficient.
This strategy can backfire and degenerate into mindless hacking, leaving you with a pile of low-quality code and an incoherent specification. To avoid that:
- First, you must be willing to start again: experimental code isn’t experimental if you’re not prepared to throw it away.
- Second, whenever you start coding, you must have a firm idea of what you’re trying to implement. There’s no point starting to code to a specification that is vague and missing crucial details. That doesn’t mean that your specification must be complete and polished, but it does mean that you shouldn’t start coding a method until at least you have its own specification written.
- Third, you must write down the specification of a method and not just imagine it; it’s too easy to delude yourself. Try to write it on paper and mull it over before you start any coding. It’s tempting to sit in front of an editor, write some specification as comments, and then start coding around them, but this tends not to be nearly so effective.
Designing Tests
It can be difficult to come up with a good test suite. You would like to test a variety of “interesting” graphs, but what are interesting graphs? One possible approach is a “0, 1, 2” case analysis: test scripts with 0, 1, and 2 graphs are interesting; graphs with 0, 1, and 2 nodes and 0, 1, and 2 edges are interesting. For each method, 0, 1, and 2 parameters and 0, 1, and 2 results are interesting; for example: AddEdge on nodes that currently have 0, 1, and 2 children; ListChildren on nodes with 0, 1, and 2 children; etc. This approach, while certainly not required, can give a good way to structure your tests to cover many important cases without too much redundancy.
Abstraction function, representation invariant, and checkRep
Include an abstraction function, representation invariant, and internal checkRep() method in all new classes you create that represent an ADT. If a class does not represent an ADT, place a comment that explicitly says so where the AF and RI would normally go.
Be conscious of how certain operations in checkRep(), particularly iterating over a large data set, may affect the “big-O” runtime of your methods. If your program suffers performance problems in later labs, checkRep() is a good place to start looking for problems.
Hashable, Comparable, and CustomStringConvertible
You may find it useful to define structs or classes that implement several protocols: CustomStringConvertible, Hashable, and Comparable. We’ll cover these in the coming days, but here is an quick example of a RGB class implementing these protocols to get you started if you do want to use them.
Also, if you implement the Hashable interface, be sure to that values that are equal according to your definition of == have equal hashValues, otherwise your objects may behave strangely if used in containers like sets and dictionaries.
What To Turn In
Be sure to submit everything in the following checklist:
- All code. Classes representing ADTs (eg:
Graph) should be specified with:- the abstract state,
- the abstraction function, and
- the rep invariant.
They should include a suitable
checkRep()method.Strive for simplicity, elegance, and correctness in your code. Recall the design objectives we discussed in lecture, such as consistency, cohesion, and completeness, as well as our style and documentation guidelines.
- Your
testandexpectedfiles, as well as any additional implementation unit tests. You specification tests should cover the cases outline in your specifications of each graph operation. Answers to the Questions 1-5 in the
GraphADT/README.mdfile.
As always, verify your solution is complete and runs by cloning your repository to a temporary location and checking it.
Grading Guidelines
This class emphasizes both program correctness and best practices, including programming style, documentation, specification, sound design principles, testing methodology, etc. Grading will reflect both of these emphases. There is, of course, some subjectivity when evaluating design and specification decisions, but your choices should follow the basic philosophies and methodologies we have been exploring. Labs will be graded on the following scale:
A+: An absolutely fantastic submission of the sort that will only come along a few times during the semester. Such a submissions reflects substantial effort beyond the basic expectations of the assignment.
A: A submission that exceeds our standard expectation for the assignment. The program must reflect additional work beyond the requirements or get the job done in a particularly elegant way.
A−: A submission that satisfies all the requirements for the assignment — a job well done.
B+: A submission that meets the requirements for the assignment, possibly with a few small problems.
B: A submission that has problems serious enough to fall short of the requirements for the assignment.
C: A submission that has extremely serious problems, but nonetheless shows some effort and understanding.
D: A submission that shows little effort and does not represent passing work.