Now you are ready for the final step toward becoming an expert at making background: candy corn.
Given that Halloween was coming up, we had a bowl of candy corn in our home. It inspired me to take out the digital camera and take a few closeup shots of the candy so that we could make a rather tasteless background out of it. In the process, you will learn how to make images that tile nicely even when they don't naturally fit together like bricks.
To start, in the "Lab 6 Images" folder in "CS 105" in "Courses" you will find two images named "corny.jpeg" and "cornier.jpeg". Copy one of these images to your "lab6" folder. There really isn't anything cornier about one than the other, so don't agonize over the choice.
Double click on the copied image to open it with PhotoShop.
While the camera I used is excellent, it didn't quite capture the color of candy corn as well as one might have hoped. As a first step in preparing your background image you should improve the color of the image a bit.
Once the corn has bright enough colors to make a really garish background you will need to make a second copy of the image. One copy will be slowly transformed into your background tile. The other copy will serve as a source of "spare parts" to use as you edit the background image.
The only problem with the copy will be that PhotoShop has added it as a new layer. This will make it difficult to save in JPEG format later. So:
Now, using the cropping tool, select a region roughly 500 by 500 pixels which will become the source for the tile of your background. Double click in the cropping box to complete the crop.
Once you have cropped your background tile, save it as "cornybg.jpeg" in your "lab6" folder (make sure to save it in JPEG format rather than in "Photoshop 3.0" format).
Now, return to PageSpinner. Make yet another "New", "Custom Page":
Once this is all done, click "New".
Now, immediately save the page you have created ("cornybg.html" would be a good name) and then click on the PageSpinner preview button so that you can see how your background looks. Unless you are extremely lucky (or maybe that should be unlucky), the tiling effect should be a bit pretty obvious when your page is viewed. The edges stand out clearly where the copies of the cropped candies meet.
To fix this up, return to Photoshop.
As with the bricks, the use of the offset filter places the mismatched edges in the middle of your image where you can work with them and ensures that the outer borders of the image will match perfectly with one another.
Now, you need to fix the mismatched edges. It would take an awful lot of skillful smudging to do this job. You may, in fact, want to do a bit of smudging to finish off the process. The bulk of the work, however, will depend on a more direct approach. We will "borrow" a piece or two of candy corn from the uncropped copy of the image and paste them on top of the mismatched edges to hide them.
To do this, we need to select one candy corn from the original. Then we can copy and paste it into the cropped and offset image.
You know enough techniques for selecting parts of images that you probably could get a candy corn selected with a bit of patience, but I'd like to teach you another technique instead (PhotoShop has many, many mechanisms for doing just about everything!).
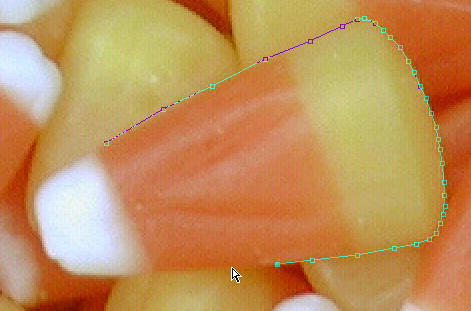
The technique I want to show you involves a PhotoShop mechanism called "Paths". Building a path in PhotoShop is a bit like making a connect-the-dots picture. Instead of drawing lines between the dots, however, you draw the dots and PhotoShop connects them to form a path which you can then easily turn into a selection.
As you work, the screen should look like:
What you have now is a path, but what you need is a selection. To convert the path into a selection:
At this point, you have added the corn to your cropped and offset image. Now, you need to move it around and rotate it so that it covers as much of some section of the edges running through your image as possible but still fits in well with the surrounding candies.
Now, do it again. That is:
If you get tired of using copies of the same corn, you can go back to the original and get another one. You may want to make a collection of them in windows of their own so that you can easily pick the right one for each step of the process.
Once most of the edge is covered, switch tactics. Using the smudge tool, eliminate the any slight remaining traces of the sharp edges that appeared where the former edges of your image now meet.
When you think you have smoothed over the edges sufficiently, you are ready to finish up by reducing the size of the image and saving it.
Use the "Image Size" item in the "Image" menu to reduce the size of you image to about 150x150. Keep the resolution at 72 pixels per inch and make sure that the proportions are constrained.
Then, save the new image, return to Netscape and reload the page to see how things have improved. The background pattern may still look fairly repetitive, but the edges should be invisible now. How repetitive it looks depends somewhat on how clever you were about covering up the edges, but I'll leave it to you to decide whether to practice this skill. If the edges are fine move on. Otherwise, return to Photoshop for a bit more smudging and try again.