This week, we will introduce techniques for adding somewhat more sophisticated graphics to your web pages. We will explore three topics: background images, transparency in images and image maps. For each topic, this document will guide you through the construction of pages designed to familiarize you with the techniques involved.
We will be creating a number of new image and HTML files in this lab. So, to keep things organized you should start by creating a new "lab6" subfolder within the "www" directory in your CS bull account. Within this folder we will create several fairly content-free HTML files (the content will be mainly in the backgrounds). When you are all done, make sure to provide easy links to all your work from your CS 105 labs page. You should make one link from the cs105labs page to one of the background pages and then add links to the other pages from there.
Remember to put your name in comments in all HTML files created.
If you have questions about the instructions for this lab, you are encouraged to ask them through the discussion area for this lab in the course discussion forum.
The BODY tag in an HTML file accepts two attributes designed to let you get away from the boring gray default color. Almost all of you have used the first of these tags, BGCOLOR. This tag lets you change from the solid gray background to any other solid color.
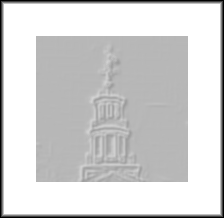
As an alternative to BGCOLOR, you may alter the appearance of your page's background by including a BACKGROUND attribute that specifies the URL for an image file (jpeg or gif). If this attribute is included in the BODY tag, the browser fetches the image and tiles the background with as many adjacent copies of the image as it takes to fill the entire background area. The multi-page online version of this section is tiled with a copy of the image shown below.
I deliberately picked an image which would make the repetition performed during the tiling process obvious. Often, the images used as backgrounds are carefully chosen so that the viewer will be unaware of the repetition of the image. Constructing such images will be your goal for this first portion of this lab.
The HTML required to use backgrounds is so simple that the trick to getting beautiful backgrounds is not writing the HTML but getting appropriate images. The easiest way to do this, of course, is to borrow someone else's. So, we will start out by building a page using a borrowed background image and then later work on making appropriate images "from scratch."
We will borrow your first background image from Adobe, the good people who bring you PhotoShop. To do this:
This folder contains a number of small images that can be used to build backgrounds. We would like you to choose one to work with. To help you pick, a selection of the images available is shown below.
Then, click "SAVE" to save the file.
Now that you have an image to use as a background, you need to create a page to use it. So, start PageSpinner by clicking on its icon in the launcher. Close the "Untitled.html" page that PageSpinner displays when you start it up. Instead of using that page template:
It should look pretty terrible (editorial opinion: pages with background often do!). In particular, the high contrast of the background should make the page heading and other text you typed in all but unreadable.
When background images are used on pages containing text, it is more common to use something with muted colors. We will make the background you just borrowed from the PhotoShop patterns more usable by adjusting the contrast a bit.
So, get back to PhotoShop so that we can change the "patternbg" file a bit.
There is a "Brightness/Contrast" adjustment mechanism built into PhotoShop. For producing appropriate background, however, I find it easier to proceed by adjusting layer opacities. So, we first need to make some layers.
At this point, both layers are identical. What we want to do is make the background layer solid white and then adjust the opacity of "Layer 1" to let some of the white background show through the pattern.
To see if you have succeeded in making the background white, you can click on the "eye" icon at the left end of the Layers palette "Layer 1" entry. This should leave only the white background visible. Once you have verified that the background is white, click the "eye" again to redisplay the pattern.
Now, we can adjust the opacity of the pattern.
Once the pattern looks light enough, you should save the image as "pattern.gif" and reload your HTML page to see the improvement. Since you have several layers in your image now, you will not be allowed to immediately save it in GIF format. You could flatten the image, but this would make it difficult to come back and readjust the contrast if necessary after viewing your page. So, it would be better to instead:
Now, get back to Navigator and reload the page to see if the text is more readable. If it is still not good enough, you will get to find out why we used the "export" mechanism rather than flattening and saving the image. You can go back to PhotoShop, readjust the opacity of the pattern layer and export the image again.
|
|
So far, we have worked with a pre-made pattern designed to tile the screen nicely. We now want to begin to show you how to take an arbitrary image and modify it so that it will tile a background well. The general problem in creating such an image is that one has to make sure the edges match up. Normally, this means that the top and bottom must match and that the left and right edges must match. We can make things a little simpler by starting with a class of backgrounds in which you only need to worry about making the top and bottom edges match. Many web pages feature borders produced using background images. The trick is to make a pattern image that is wide enough to fill the whole page but not very tall. All but the left edge of the image is usually uniform in color. If you want, you can see what we mean by looking at the image used as a border on the multi-page version of this page by clicking on this border link. When the browser tiles the page with such an image, the result looks like a border. To see how this is done, we will create a "brick wall" border. In the "CS 105" folder in the "Courses" volume on the Cider Press server you will find a folder named "Lab 6 Images." In this folder there is a file named "bricks.jpeg" (a bit of Bronfman to take home with you). Copy the "bricks.jpeg" file from the "Lab 6 Images" folder to your "lab6" folder. Open the copy of "bricks.jpeg" in your folder with PhotoShop. Using the cropping tool, cut out a section of bricks four bricks high and about 200-250 pixels wide. (If you can't judge 200 pixels without help yet, you can ask PhotoShop to "Show Rulers" in the "View" menu and, if necessary, set the ruler units to pixels using the "Preferences" sub-menu of the "Edit" menu.) Remember that you can rotate the cropping area by dragging the mouse while outside the cropping region or move the corners by dragging them with the mouse. Use these techniques to line up the cropping box so that the right edge lines up with the right edge of the bricks and the top and bottom edges fall in the mortar between layers of bricks. The "mortar" through which the cropping box passes at the top and bottom will become the edges that have to match well to make the tiling work. So, choose carefully. Once the region selected looks good, crop by double-clicking the mouse within the cropping box (or just press return). Now, to see how good the edge match is (and to make it better), apply the "Offset" filter to this image. The Offset filter shifts your image's pixels to the right and down by amounts you specify in a dialog box. With the "Wrap Around" button selected in its dialog box, this filter shifts the pixels that fall off the bottom edge back in on the top. (Similarly, pixels that fall off the right edge reappear on the left.) If you think about this effect for a moment, you will realize that this means the top edge of your image will now match up nicely with the bottom edge when tiled. Unfortunately, a mismatch is likely to appear in the middle of your image where the former edges now meet. This is an improvement, however, because now you can use PhotoShop to touch up the picture a bit and hide the mismatch. So,
If there is a mismatch, we can touch it up using the "smudge" tool. Don't work too hard on this, however. The next step will probably make the edge invisible anyway. The smudge tool is located in the toolbox on the left side of the sixth
row. It appears just below the eraser. It is grouped with several other
tools in a pullout menu. If you do not see it, point the mouse at the
This tool basically lets you do finger painting. If you drag it over a portion of your image, it "pushes" color from the region where you started into whatever area you drag to. First, make sure that the "brush" shape associated with the smudge tool is fairly small so you don't change too much. Do this by selecting a small brush from the "Brushes" palette. Then, try smudging a portion of the mortar (just once). Then select "Undo". If you carefully drag the smudge tool back and forth over any sharp edge that appears in your mortar you should be able to hide the edge pretty well. You will probably want to zoom in on the image before trying. If things look worse after your first attempt with the smudge tool there is a feature of PhotoShop you will be happy to learn about. One of the tabs in the palletes on the right of your screen is labeled "History". If the "History" palette is not visible, click once on this tab so that you can see it. The History palette contains one box for each of the operations you have performed on your image. It doesn't go back forever, but it goes back many steps. By clicking on a "step" in the pallete, you can undo (or redo) all operations performed after (or before) the step you clicked on. So, if you want to try smudging again, simply scroll back in the history list to find your first "smudge" and click on the step before it. This is obviously useful with many things other than the smudge tool. When you are happy with the matchup, there is still work to be done. The bricks are a bit too large for a border. So, use the "Image size" item in the "Image" menu to resize the picture so that it is 80 pixels wide and has a resolution of 72 pixels per inch. Make sure "Resample image" and "Constrain proportions" are both selected when you do this. Finally, to make the image border-like, we need to extend the image so that it is wide. Select "Canvas size" from the "Image" menu. Under "Anchor", click the middle box in the first column so that the bricks will be "left-justified" in the expanded image. Then, change the image width to make it 12 inches across. To save a little space in the saved image, now change the image mode from RGB color to indexed color. While the indexed color dialog box is open, select "Adaptive" as your palette and then use the lowest resolution you can get away with (4 or 5 bits per pixel will probably work fine). Use the "best" color selection rather than the fastest. Finally, save your image as "brickbg.gif". Now make up a quick "Custom Page" with PageSpinner using "brickbg.gif" as your background. Add a bit of text to this page. Rather than just typing the text in, you should create a table to ensure that your text is indented to the right of the border area. The TABLE tag for this table should specify a WIDTH of 100%. The table will have just one row and two columns. The first column should be specified with a WIDTH of at least 80, the mysterious "NOWRAP" attributes (which helps it come out 80 pixels wide) and a <BR> tag as its contents. Its purpose is to make sure that the real contents of the page are indented past the border. Your sample text is then added as the second column of the table. |
Now you are ready for the final step toward becoming an expert at making background: candy corn.
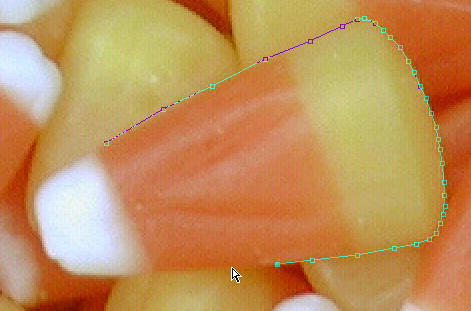
Given that Halloween was coming up, we had a bowl of candy corn in our home. It inspired me to take out the digital camera and take a few closeup shots of the candy so that we could make a rather tasteless background out of it. In the process, you will learn how to make images that tile nicely even when they don't naturally fit together like bricks.
To start, in the "Lab 6 Images" folder in "CS 105" in "Courses" you will find two images named "corny.jpeg" and "cornier.jpeg". Copy one of these images to your "lab6" folder. There really isn't anything cornier about one than the other, so don't agonize over the choice.
Double click on the copied image to open it with PhotoShop.
While the camera I used is excellent, it didn't quite capture the color of candy corn as well as one might have hoped. As a first step in preparing your background image you should improve the color of the image a bit.
Once the corn has bright enough colors to make a really garish background you will need to make a second copy of the image. One copy will be slowly transformed into your background tile. The other copy will serve as a source of "spare parts" to use as you edit the background image.
The only problem with the copy will be that PhotoShop has added it as a new layer. This will make it difficult to save in JPEG format later. So:
Now, using the cropping tool, select a region roughly 500 by 500 pixels which will become the source for the tile of your background. Double click in the cropping box to complete the crop.
Once you have cropped your background tile, save it as "cornybg.jpeg" in your "lab6" folder (make sure to save it in JPEG format rather than in "Photoshop 3.0" format).
Now, return to PageSpinner. Make yet another "New", "Custom Page":
Once this is all done, click "New".
Now, immediately save the page you have created ("cornybg.html" would be a good name) and then click on the PageSpinner preview button so that you can see how your background looks. Unless you are extremely lucky (or maybe that should be unlucky), the tiling effect should be a bit pretty obvious when your page is viewed. The edges stand out clearly where the copies of the cropped candies meet.
To fix this up, return to Photoshop.
As with the bricks, the use of the offset filter places the mismatched edges in the middle of your image where you can work with them and ensures that the outer borders of the image will match perfectly with one another.
Now, you need to fix the mismatched edges. It would take an awful lot of skillful smudging to do this job. You may, in fact, want to do a bit of smudging to finish off the process. The bulk of the work, however, will depend on a more direct approach. We will "borrow" a piece or two of candy corn from the uncropped copy of the image and paste them on top of the mismatched edges to hide them.
To do this, we need to select one candy corn from the original. Then we can copy and paste it into the cropped and offset image.
You know enough techniques for selecting parts of images that you probably could get a candy corn selected with a bit of patience, but I'd like to teach you another technique instead (PhotoShop has many, many mechanisms for doing just about everything!).
The technique I want to show you involves a PhotoShop mechanism called "Paths". Building a path in PhotoShop is a bit like making a connect-the-dots picture. Instead of drawing lines between the dots, however, you draw the dots and PhotoShop connects them to form a path which you can then easily turn into a selection.
As you work, the screen should look like:
What you have now is a path, but what you need is a selection. To convert the path into a selection:
At this point, you have added the corn to your cropped and offset image. Now, you need to move it around and rotate it so that it covers as much of some section of the edges running through your image as possible but still fits in well with the surrounding candies.
Now, do it again. That is:
If you get tired of using copies of the same corn, you can go back to the original and get another one. You may want to make a collection of them in windows of their own so that you can easily pick the right one for each step of the process.
Once most of the edge is covered, switch tactics. Using the smudge tool, eliminate the any slight remaining traces of the sharp edges that appeared where the former edges of your image now meet.
When you think you have smoothed over the edges sufficiently, you are ready to finish up by reducing the size of the image and saving it.
Use the "Image Size" item in the "Image" menu to reduce the size of you image to about 150x150. Keep the resolution at 72 pixels per inch and make sure that the proportions are constrained.
Then, save the new image, return to Netscape and reload the page to see how things have improved. The background pattern may still look fairly repetitive, but the edges should be invisible now. How repetitive it looks depends somewhat on how clever you were about covering up the edges, but I'll leave it to you to decide whether to practice this skill. If the edges are fine move on. Otherwise, return to Photoshop for a bit more smudging and try again.
Now that you know all about screen backgrounds, you need to learn about transparent image backgrounds. Sometimes you want to integrate an image into the design of a page rather than display it as a framed object in a gallery. If the background of the page is a solid color, you can accomplish this with PhotoShop by coloring the background of the image with the same solid color. In a page using a textured border, however, this approach no longer works.
The GIF format provides a way to deal with such situations. When you create a GIF file, you can specify that certain pixels should be treated as transparent. When displayed in a browser, the background will show through such pixels. The images below illustrate the difference between making a background white and making it transparent.
To see how this works, pick some image from which you know you can easily "Cut" the background. If you can't come up with anything else, you might want to try one of the plates I had you work with in lab 2 or the picture we took of you during that lab (if it was taken against a fairly plain background).
Open the picture you would like to work with. If it was a GIF file, change the mode from indexed color to RGB color.
Your first goal is to select the portion of the image that you don't consider the background. How you make this selection will depend on the image you chose, but here are some suggestions. Usually, the best way is to select the background and then choose "inverse" from the select menu to reverse the selection. Remember that holding down the shift key while selecting regions with the magic wand or marquee tool adds new pixels to your current selection. Also, recall that the "Grow" item in the "Selection" menu can be helpful.
Once you get the "foreground" item in the image selected, you will want to place a copy of the foreground on its own layer. To do this, choose "Copy" and then "Paste" from the "Edit" menu.
Now, click once on the "eye" icon next to the "background" layer to make the background disappear. You should now see the foreground image you selected displayed in front of a light checkerboard pattern. In the layer you are viewing, the original background has been replaced by a transparent one.
To save this version of the picture, select "GIF89a Export" from the "Export" submenu of the "File" menu. A dialog box appears giving you several options.
The "Transparency Index Color" determines the color that will be displayed as this image's background if the browser that displays it does not know how to deal with transparent pixels. It defaults to the default browser background color. Clicking on the gray square will give you access to a dialog from which you can pick an alternate default background.
The "Palette" option should be set at "Adaptive".
The "Colors" item lets you control how many distinct colors are used to store your image. For simple pictures you might want to select a number less than 255 from the menu next to this item.
Finally, checking the "Interlaced" option stores your image in a format that lets a browser display it incrementally as it arrives. If this box is checked, a rough version of the entire image will be displayed quickly and then refined to show details as additional data arrives through the network.
Once you fill in the dialog box, click "OK". Then, enter a name for your file and navigate to your lab6 folder to save it.
Add an IMG tag for this file and the original non-transparent image to the candy corn background page you created earlier to see how the transparency works out.
The last bit of high-tech graphics trickery we want to cover in this lab is the creation of images with distinct regions that serve as links to different URL's. Such images are called image maps. You have almost certainly encountered them on the web, but if you haven't noticed you might want to re-visit WSO's home page. Each of the images by the tips of the fingers in the image on that page links to a distinct destination.
There are several varieties of image maps used. We will work on the simplest -- client-side image maps. If you want your image maps to be functional for the largest possible set of visitors (including those using old browsers), you should also learn about server-side image maps someday.
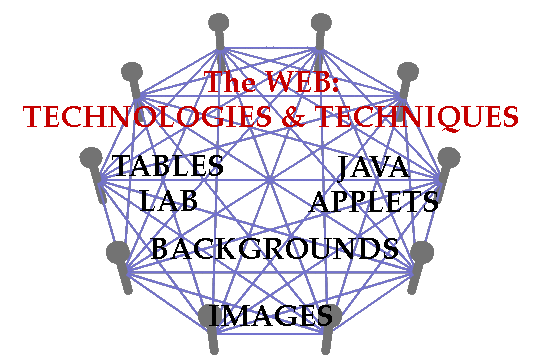
To learn about client-side image maps, I'd like you to augment the text links to your labs from your CS 105 labs page with an image-map version of these links. The image I want you to use is shown below and available in the "Lab 6 Images" folder as "blandnails.gif". In the on-line version of this document, I've set this image up as a map that will take you to the lab writeups for the topics indicated. I'd like you to put a copy in your page modified so that clicking on the topic of a lab will take you to the page containing the work you did for the lab. You should start by copying the image itself into your "www" folder (not your Lab 6 folder because it will be referenced from your CS 105 labs page).
The use of image maps requires the creation of a "map" specification that gives the coordinates of the active regions of the image and the URLs these regions should serve as links for. There are many utilities available to simplify the creation of these maps. We will use such a utility in this lab. Like PageSpinner, this utility is shareware. Unlike PageSpinner, we have not paid a license fee for this utility. I felt the brief use you will make of this utility in this lab fell under the category of "trying" the product. If you do become a frequent user of such a mapping utility, you should be aware that we have not paid any shareware fee to cover that use.
The utility I want you to use is called "ImageMapper". I have put a copy of it in the "CS 105" folder on Cider Press. ImageMapper and other similar utilities can be found on the WSO software archive server. You should copy the ImageMapper folder onto the desktop of the machine you are using to make it more accessible.
Before launching ImageMapper, open your "cs105labs.html" file using PageSpinner and add the "blandnail.gif" image to the top of the page. Then, without quiting PageSpinner, launch ImageMapper-v1.4. After the program starts, choose "Open Graphic" from the file menu and find and open your copy of "blandnails.gif".
The ImageMapper program will display the image in a window and a small set of tools in another "Tools" window. Select the "rectangle" tool from the "Tools" window with the mouse and then drag to draw a rectangle around the text: "The WEB: Technologies and Techniques".
As soon as you draw the rectangle, ImageMapper will display a default URL in the "Object Info" window. Drawing the rectangle indicates that the region you outlined should become a link. ImageMapper now wants you to enter the edit the default URL it has displayed, replacing it with the URLfor the page that region should link to. Fill in "http://www.cs.williams.edu/~tom/courses/105" as the URL.
Follow the same procedure to associate URL's with each of the blocks of text describing one of this semester's labs. Feel free to experiment with shapes other than rectangles even though rectangles are probably most appropriate for this particular image. For each lab, enter the URL for the page you produced during that lab. The URL's will eventually be stored in your 105 labs page, so URL's relative to the folder containing that HTML file will work fine.
When you are all done, select "Generate MapImage" from the "Image" menu. Make sure that "Client-side HTML" is selected in the dialog box that appears and then click "Compile". In the next dialog box displayed, enter "labsMap" for the Name and then click "Generate".
At this point, ImageMapper should pop-up a new window with the HTML for a simple but complete page containing your image and a map that would turn it into an image map. Rather than use this page, however, you should copy just the specification of the map from this page to the PageSpinner window for your cs105labs.html file.
So, drag the mouse over the text of the map specification (from the < MAP > tag to the < /MAP >). Go to the "Edit" menu and select "Copy". Switch to PageSpinner at this point and "Paste" into a point just before where you inserted the IMG tag for "blandnails.gif."
All you have to do to finish the job is include the attribute
in your IMG tag (you may also want to add BORDER=0).usemap="#labsMap"
Save your updated labs page and view it using a browser. Test all the links to make sure you typed the URL's correctly.


