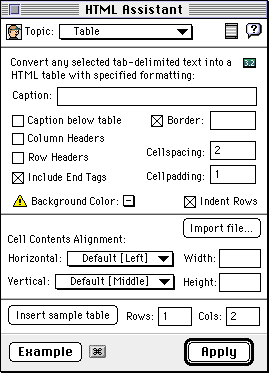
 If you read the text near the top of the dialog box, it
explains that the "normal" way to use the table assistant
is to:
PageSpinner provides a number of menu items and a toolbar button designed to aid the HTML author in the creation of tables. In my experience, most of these facilities are not very useful. Simply typing in the HTML tags for a table is often the easiest approach. To be fair to PageSpinner, however, I will give you a brief introduction to the aspects of its table support that appear to be most useful.
On the PageSpinner menu bar,
![]() there is a a "Table" button (it is located just to the left of the button whose icon
looks like the head of someone wearing a visor). If you click on this
button, the PageSpinner HTML Assistant dialog box for tables pops
up. It is shown
to the right of your browser window.
there is a a "Table" button (it is located just to the left of the button whose icon
looks like the head of someone wearing a visor). If you click on this
button, the PageSpinner HTML Assistant dialog box for tables pops
up. It is shown
to the right of your browser window.
 If you read the text near the top of the dialog box, it
explains that the "normal" way to use the table assistant
is to:
For example, to construct the table of cute conglomerations
of punctuation marks, you could type in the headings:
pressing TAB rather than entering spaces between the words. Do the same for all the entries in the table (skip the long rows of '-'s). Then, drag the mouse over all the entries to select them and press the PageSpinner table button. Fill in the dialog box appropriately (make sure the headings come out as headings and that the table has a border). Then click "APPLY" and PageSpinner should add almost all the HTML tags and attributes you need. Whatever you do, DON'T TRUST IT. Check the HTML produced to make sure it makes sense and after viewing the table, add or modify attributes to improve the table's appearance.Smiley Meaning Smiley Meaning
There is another way to use the HTML Assistant Table dialog box. It involves using the "Insert sample table" button found at the lower left of the dialog box. In the "normal" approach just described, you first enter the contents of all the table cells and then get PageSpinner to add all the needed tags around them. With this second approach, PageSpinner will instead first produce a template for a table with a particular number of rows and columns and then you can fill in the contents.
To use the "Insert sample table" button, first click in your HTML file window to set the cursor where you would like to add the table. Then, click on the "Table" button in the toolbar to open up the HTML Assistant Table dialog box. Using the entries in the dialog box, indicate how many rows and columns you want, whether you want headers, border dimensions, etc. Once you have filled in all the details you need, click "Insert sample table". PageSpinner will add all the tags needed for a table meeting your requirements. Since you had not previously provided contents for the table cells, PageSpinner will fill in the cells with labels like "r1c1" for "row one column one" and "r2c3" for "row two column three". You can then proceed to edit the file replacing these identifiers with the desired cell contents. Try creating some small table using this approach just so that you can see what PageSpinner inserts. Once you have taken a good look at the skeletal table, delete it.
This second approach is handy when you want to create a table (like the one required in the next step of this lab) that uses the ROWSPAN, COLSPAN or other table cell attributes. For example, if the cell in row two column three of a table has a COLSPAN of 2, then you won't want any contents specified for row two column four. PageSpinner will have inserted a cell for row two column four with the label "r2c4". This label will make it very easy for you to find the HTML tags for the cell and delete them to make room for the COLSPAN=2 entry.
With these tools in hand, you should now use PageSpinner to add the "smileys" table shown above to your "tables.html" file.