 If you read the text near the top of the dialog box, it
explains that the "normal" way to use the table assistant
is to:
If you read the text near the top of the dialog box, it
explains that the "normal" way to use the table assistant
is to:
This week's lab is designed to give you some experience working with tables in HTML. Unlike the previous HTML lab, which assumed you were unfamiliar with the software being used, this lab writeup will be more concerned with telling you what to do than telling you how to do it. We will, however, start by giving you a brief introduction to the limited support PageSpinner provides for creating HTML tables.
For Part I of this lab, you should create a new "tables.html" page and link it to your CS 105 labs page. During the lab period you will add two simple tables to this page and then nest them within a larger table to learn how tables can be used to format a page.
For part II you will have a choice. I would like to make the assignment open-ended so that you can experiment with page layout using tables. At the same time, I want to make sure that whatever you do gives you significant practice with HTML table tags. I also want to make sure that those who are not interested in page design don't have to worry about making up an assignment as well as doing one.
So, for part II, I will give you the option of either formatting a table I will describe at the end of the handout or making up a page design of your own and implementing it using tables. I will require the use of a certain minimum number of features of the table mechanism if you choose the page layout option. The details are discussed later in this document.
If you have questions about the instructions for this lab, you are encouraged to ask them through the discussion area for this lab in the course discussion forum.
I am afraid that by the end of this lab many of you will find yourselves thinking (or even saying) "unkind things" about HTML, PageSpinner, this course, your instructor...
There are two reasons for this fear, and I would like to try to warn you about them ahead of time in hopes of reducing the frustration some of you will probably experience.
The first problem is something I have been warning you about for a while now. When you make a mistake in an HTML file, browsers just do the best they can to display something reasonable rather than producing some form of error report. So far, this feature of browsers has probably helped you avoid frustration. With the simple subset of HTML we have been using, the browser has been pretty successful at producing reasonable results given incorrect HTML and has thereby saved you the effort required to get everything just right.
Unfortunately, HTML tables are not so simple. If you make a mistake in a table, the browser is unlikely to be able to guess what you really meant. Instead, you will find yourself looking at tables with more or fewer rows or columns than expected or cells in strange places. Worst of all, you may find yourself looking for tables or other parts of a web page that disappear completely. When this happens, you will suddenly wish that your browser displayed some cryptic message when it got confused. The messages that Metrowerks produced when your Java code was wrong last week might not have meant much to you, but at least Metrowerks usually pointed you at the line in the file that was incorrect!
The bad news is that this is only half the bad news. The other problem with tables is that some of the table attributes you can specify are really only "hints". In particular, when you specify the width or height of a cell, you will find that you are really negotiating more that specifying. Netscape's "counteroffers" may surprise you. For example, specifying that a column should be wider may sometimes actually result in it getting narrower.
There are several things you can do to maintain your composure as you work on tables.
<TABLE>
   <TR>
      <TH> YEAR </TH>
      <TH> MINIMUM </TH>
      <TH> AVERAGE </TH>
   </TR>
   <TR>
      <TH> 1970 </TH>
      <TD> 10,039 </TD>
      <TD> 13,290 </TD>
   </TR>
   . . .
</TABLE>
<TABLE>
<TR>   <TH> YEAR </TH>   <TH>
MINIMUM </TH>  <TH> AVERAGE </TH>
</TR>   <TR>   <TH> 1970 </TH>
      <TD> 10,039 </TD>
<TD> 13,290 </TD>
   </TR>
   . . .
</TABLE>
One extra bit of HTML that might help you keep your HTML clear enough to fix easily is the HTML comment. A comment is an HTML tag that the browser ignores completely. It allows you to put annotations on your HTML intended to clarify your HTML to someone reading it directly rather than through a browser. The format of a comment is:
Putting comments like:<!-- Any text you want to type goes here -->
at the appropriate point in your HTML can make life much easier.<!-- The first row of this table begins here -->
To make sure you practice using comments at least a little bit, we will require you to add a comment including your name and the day and time of the lab you are scheduled to attend to the beginning of each HTML file you create for the remainder of the semester. In addition to giving you practice, this will help us avoid misplacing your work as we grade it.
Given all the warnings in the preceding sections, it seems appropriate to start by asking you to format a very simple table. I've chosen one that comes from (one of the lighter chapters of) a text on computer networks by Andrew Tanenbaum. It is a chart of some of the punctuation sequences used to add a bit of feeling to email messages. I've formatted it below using the "PRE" tag. As your first encounter with HTML tables I want you to format it as a <TABLE . . .>.
  Smiley     Meaning       Smiley       Meaning
--------------------------------------------------
  :-)    | I'm happy    | =|:-)     | Abe Lincoln
  :-(    | I'm sad      | *<:-)     | Santa Claus
  :-(0)  | I'm yelling  | ;-)       | I'm winking
--------------------------------------------------
You could do this by simply starting up PageSpinner and typing in the appropriate tags. You should, however first read the next section which discusses the facilities PageSpinner provides to make it easier to create tables.
PageSpinner provides a number of menu items and a toolbar button designed to aid the HTML author in the creation of tables. In my experience, most of these facilities are not very useful. Simply typing in the HTML tags for a table is often the easiest approach. To be fair to PageSpinner, however, I will give you a brief introduction to the aspects of its table support that appear to be most useful.
On the PageSpinner menu bar,
![]() there is a a "Table" button (it is located just to the left of the button whose icon
looks like the head of someone wearing a visor). If you click on this
button, the PageSpinner HTML Assistant dialog box for tables pops
up. It is shown
to the right of your browser window.
If you read the text near the top of the dialog box, it
explains that the "normal" way to use the table assistant
is to:
there is a a "Table" button (it is located just to the left of the button whose icon
looks like the head of someone wearing a visor). If you click on this
button, the PageSpinner HTML Assistant dialog box for tables pops
up. It is shown
to the right of your browser window.
If you read the text near the top of the dialog box, it
explains that the "normal" way to use the table assistant
is to:
For example, to construct the table of cute conglomerations
of punctuation marks, you could type in the headings:
pressing TAB rather than entering spaces between the words. Do the same for all the entries in the table (skip the long rows of '-'s). Then, drag the mouse over all the entries to select them and press the PageSpinner table button. Fill in the dialog box appropriately (make sure the headings come out as headings and that the table has a border). Then click "APPLY" and PageSpinner should add almost all the HTML tags and attributes you need. Whatever you do, DON'T TRUST IT. Check the HTML produced to make sure it makes sense and after viewing the table, add or modify attributes to improve the table's appearance.Smiley Meaning Smiley Meaning
There is another way to use the HTML Assistant Table dialog box. It involves using the "Insert sample table" button found at the lower left of the dialog box. In the "normal" approach just described, you first enter the contents of all the table cells and then get PageSpinner to add all the needed tags around them. With this second approach, PageSpinner will instead first produce a template for a table with a particular number of rows and columns and then you can fill in the contents.
To use the "Insert sample table" button, first click in your HTML file window to set the cursor where you would like to add the table. Then, click on the "Table" button in the toolbar to open up the HTML Assistant Table dialog box. Using the entries in the dialog box, indicate how many rows and columns you want, whether you want headers, border dimensions, etc. Once you have filled in all the details you need, click "Insert sample table". PageSpinner will add all the tags needed for a table meeting your requirements. Since you had not previously provided contents for the table cells, PageSpinner will fill in the cells with labels like "r1c1" for "row one column one" and "r2c3" for "row two column three". You can then proceed to edit the file replacing these identifiers with the desired cell contents. Try creating some small table using this approach just so that you can see what PageSpinner inserts. Once you have taken a good look at the skeletal table, delete it.
This second approach is handy when you want to create a table (like the one required in the next step of this lab) that uses the ROWSPAN, COLSPAN or other table cell attributes. For example, if the cell in row two column three of a table has a COLSPAN of 2, then you won't want any contents specified for row two column four. PageSpinner will have inserted a cell for row two column four with the label "r2c4". This label will make it very easy for you to find the HTML tags for the cell and delete them to make room for the COLSPAN=2 entry.
With these tools in hand, you should now use PageSpinner to add the "smileys" table shown above to your "tables.html" file.
After you have constructed the table of cute punctuation marks, I'd like you to work on a table with cells that span multiple rows and columns. The inspiration for the table I'd like you to produce comes from the good folks at WSO.
One of the services WSO provides is an online and multiyear version of the student face book. If you are unfamiliar with this service, you should visit WSO's facebook and look up your friends.
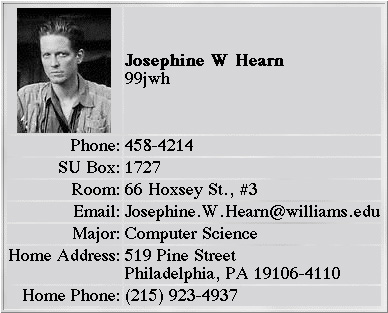 The WSO facebook provides a picture and basic information on
almost all students on campus. For a few special students,
however, a picture might be more than we deserve.
So, their entries look like the display
shown or the right.
The WSO facebook provides a picture and basic information on
almost all students on campus. For a few special students,
however, a picture might be more than we deserve.
So, their entries look like the display
shown or the right.
You should notice immediately that the display WSO provides
in its facebook is formatted using HTML tables. There is
absolutely nothing wrong the the layout WSO has chosen,
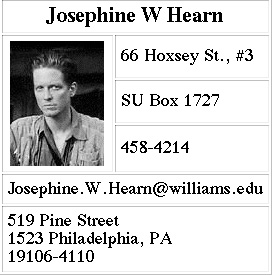 but there is nothing wrong with experimenting with other
possibilities either. So, I'd like you to take your own
facebook entry and reformat it as I have reformatted
Jodie Hearn's as shown on the left. The main advantage of the
alternative format is that it uses cells that span
multiple rows and columns, which is something I want
you to try. You can either use the photo we took of
you or grab your actual facebook picture from WSO using
Netscape.
but there is nothing wrong with experimenting with other
possibilities either. So, I'd like you to take your own
facebook entry and reformat it as I have reformatted
Jodie Hearn's as shown on the left. The main advantage of the
alternative format is that it uses cells that span
multiple rows and columns, which is something I want
you to try. You can either use the photo we took of
you or grab your actual facebook picture from WSO using
Netscape.
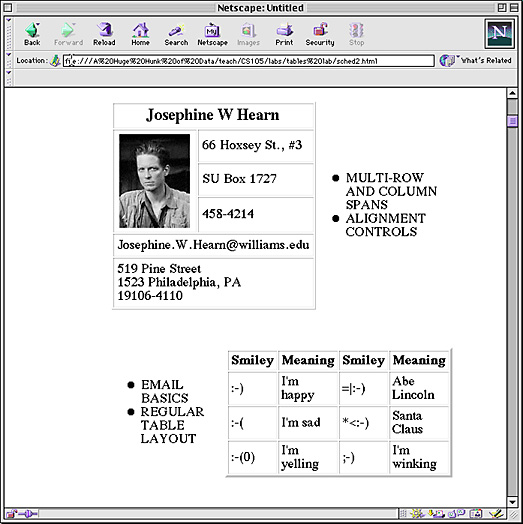
To complete Part I, simply use a big table to format your entire "tables" lab page. This table should include cells containing the two tables you have produced so far and cells containing text captions describing the tables. Since we also talked about lists in class this week, I would ask you to think of several things to say about each table and use lists to say them. A sample of what I have in mind is shown below. Feel free, however, to be more creative.
Note that the layout shown is not a simple 2x2 table. If it were, the right edge of the table on the left would not overlap with the left edge of the table on the right. The overlab is obtained by including more than 2 columns in the table and using the COLSPAN attribute to determine where to place the sub-tables.
While the final version of this table should have no border, you may find it helpful to add a border while working on the table. The border often makes it easier to understand what is wrong if the effect produced is not what you were expecting.
When you are all done with part I, your "tables" page should look something like the display below and it should be linked into your CS 105 labs page.
I already gave most of the details of Part II away in the introduction. I'd like to encourage each of you to design and lay out a page using tables. It could be a redesign of an existing page or something completely new. You could use tables to layout your home page more "professionally", put your family photo album online, etc. The choice of subject is up to you.
I will, however, give you one suggestion. If you want to perform a service of benefit to the rest of the class and you have more of a knack for graphic design than I have (not hard), you are invited to take on the re-design of the page format I use for lecture slides. Pick one of my slides and make a prototype of a layout you like the looks of. If somebody does a good job of this, we could all enjoy a refreshing change in the appearance of the screen display in class.
While you are free to chose the content of the page you format using tables, there are some technical requirements. First, make it clear what page is to be graded as your "Part II" (put a link on your cs105labs page that will lead us to the example of table based layout you have produced). Also, don't take advantage of the open-endedness of this by producing a very simple table. Effort will count. In particular, at a minimum your layout must use at least two of the following "techniques":
For those who don't feel like making up a page design, I have concocted an HTML table making project that will give you comparable experience with the table layout techniques. Below, I show a table I created to display my weekly schedule. If you would rather not work on page design, just build a similar table for your own course schedule. Like mine, your table will have to use cell heights and ROWSPAN's to arrange for the cells indicating course meetings to line up correctly with the cells showing the hours of the day in the leftmost column of the table. Your course schedule table should:
You are allowed to "cheat" on this exercise by examining the HTML for my course schedule. It illustrates some tricks you may find essential.
If you choose this option, just add the completed table to your "tables.html" page.
Monday Tuesday Wednesday Thursday Friday 8:00 CS 105 Lect. CS 105 Lect. 9:00 CS 134 Lect. CS 134 Lect. CS 134 Lect. CS 105 Lab 10:00 CS 134 Lect. Office
HoursCS 134 Lect. CS 134 Lect. 11:00 CS 105 Lab. 12:00 1:00 CS 134 Lab. Meeting
with
honors
studentsOffice
HoursCS 105 Lab 2:00 Office
HoursCS Colloq. 3:00 4:00