


Go backward to A Quick Tour
Go up to Part I
Go forward to Zooming in and Out
Modifying an Image's Size
The butterfly image you opened using Photoshop is a bit too large to
fit nicely on a web page and the butterfly itself is a bit small
(relative to the rest of the image). We will fix this using
Photoshop's features for cropping and image resizing.
When we say the original image is too large, we are not just talking
about good taste. When used on the web it is important to consider an
image's size not just in inches but in bits. How many pixels does the
image contain? The more pixels, the longer it will take to transmit
the picture through the network to a remote computer. This can be
particularly significant if the remote computer is connected through a
modem -- even the fastest modem!
If you look in the lower left hand corner of the window displaying
the butterfly you will see the amount of computer memory Photoshop is
using to hold this image.
It should show that the image requires 4.44 million 8-bit units of
memory.
To see why the image is so large:
- Depress the mouse on the "Image"
menu and drag to select the "Image Size" item. A dialog box like
the one shown below should appear.
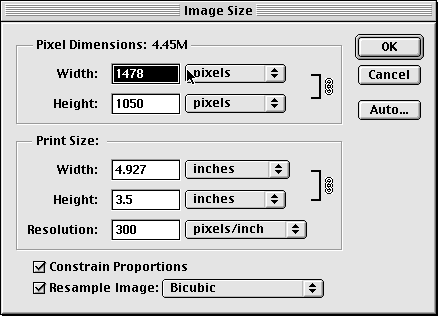
- Note that the image is about 3.5 by 5 inches and that 300
pixels are recorded per inch. It also shows that the
image is 1050 by
1478 pixels or that there are over 1,500,000 pixels in the image!
- Click cancel to dismiss the "Image Size" dialog box.
As a first step in reducing the number of pixels in this image we
will crop the image so that it includes just the butterfly and a
little bit of the surrounding greenery. To do this:
- Make sure that there are rulers visible on the top and left
sides of the image window. If not, select "Show rulers" from the
"View" menu.
- Select the cropping tool from the tool box. The cropping
tool will not initially be visible in the toolbox. It is
grouped in the toolbox with the selection marquees. To select
it you must therefore:
- Point the mouse at the rectangular selection
marquee icon in the upper left corner of the toolbox.
- Depress the mouse button to make the pull-out
menu of marquee tools appear.
- Drag the mouse to the cropping tool
(the rightmost entry in the menu) and then release
the mouse.
- Move the mouse into the image window so that the cropping
tool icon appears just above the butterfly's antennae and about 2 1/4
inches from the left edge of the image (use the rulers to determine
the correct distance).
- Depress the mouse button and drag the mouse down and to the
right to form a rectangle that completely encloses the butterfly.
- Release the mouse button.
You are ready to crop the picture. First, however, let's see what
options you have before you take this drastic step.
- Without depressing the mouse button slowly move the mouse
in and out of the box around the butterfly. Notice what happens to
the mouse cursor as you move in and out of the box or over the
little boxes found at the corners and on the sides of the cropping
box.
As you move the mouse around the window, the cursor displayed chages to
indicate the action PhotoShop would perform if you were to depress
the mouse button at that screen position.
- Point the mouse at the little box on one of the corners of
the cropping box you drew.
The cursor becomes a two-headed arrow drawn on a diagonal.
- Depress the mouse button and move the mouse around a bit.
PhotoShop adjusts the size of the cropping box so that the
corner you selected follows the mouse.
- Release the mouse button and try the same experiment --
depressing the mouse button and dragging the mouse around a bit
-- to learn how PhotoShop's reaction depends on the position
at which you first depress the mouse.
You should discover that:
- If you depress the mouse button while inside the cropping
box the size of the box remains fixed but you can move the box
around the image by moving the mouse.
- If you depress the button while pointing at the midpoint of
one of the sides of the cropping box you can move that
side back and forth or up and down.
- If you depress the button while pointing ourside the box
you can rotate the cropping box
By this point you will probably have completely messed up the selection
I asked you to make initially. So, you really don't want to crop.
To cancel the cropping operation:
Next, repeat the steps used to draw the original cropping box.
- Move the mouse into the image window so that the cropping
tool icon appears just above the butterfly's antennae and about 2 1/4
inches from the left edge of the image.
- Depress the mouse button and drag the mouse down and to the
right to form a rectangle that completely encloses the butterfly.
- Release the mouse button.
- Press the return key to tell PhotoShop to
complete the crop.
At this point, you should save your modified image to your CS bull account.
- Select "Save As" from the File menu.
- Use the controls in the dialog box to navigate up to the
desktop and then down into the "graphics" folder you created in
your file server account's "www" folder.
- Make sure the file format is set to "Photoshop" and the
file name is "butterfly"
then click "Save".
Throughout this lab you should save your work after each major step is
completed.