This is Part 2 of the two-week Boggle lab. In this part of the lab,
you will be implementing the BoggleGame class. The
BoggleGame class will use BoggleBoard
and BoggleCube objects to implement the graphics and
game-playing logic, and the end result will be a fully functional
one-player digital Boggle game!
Before you start on this part, make sure your
BoggleBoard and BoggleCube classes are working
correctly. Before you begin Part 2, please implement any necessary fixes
in response to the feedback received from the Part 1 automated
tests.
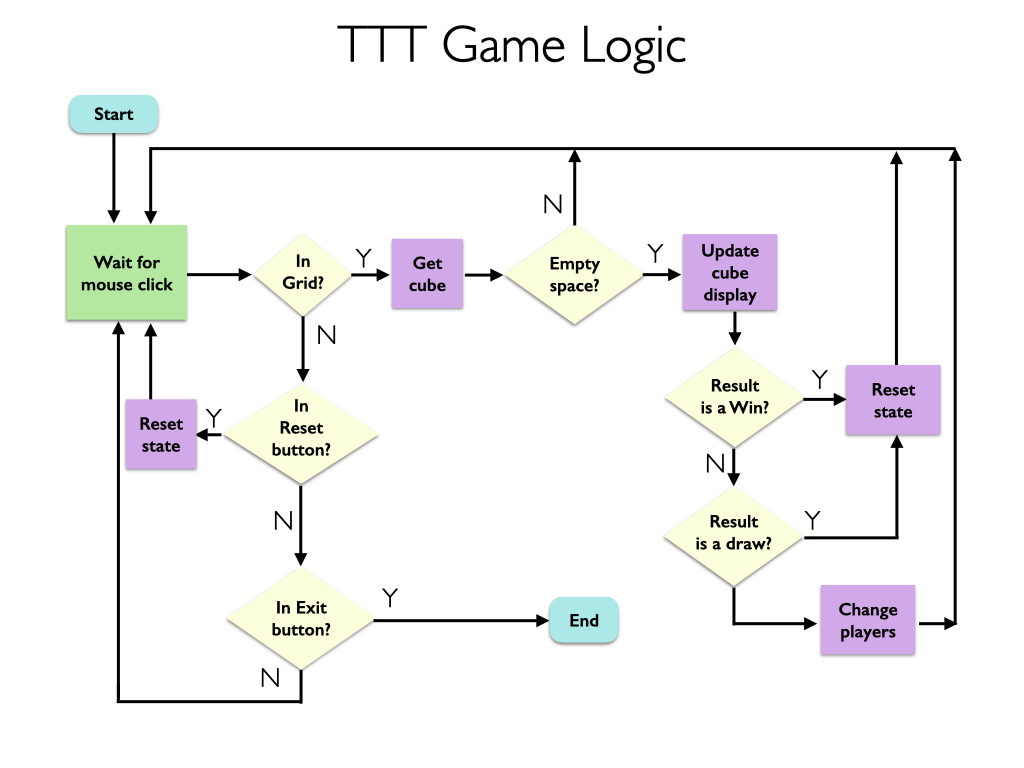
Recall the flow-chart from lecture describing the logic of the Tic-Tac-Toe game class.
Prelab Task. Draw a similar flow diagram that
describes the logic of a digital (one-player) Boggle game. As in the TTT
example, your diagram should divide the steps into (a) decision steps
(represented by yellow diamonds above) and (b) action steps (represented
by pink squares above) and clearly label the sequence of steps using
arrows (labeled with Y and N annotations when
appropriate).
We encourage you to play a real boggle game with your partner a few times first and as you play, write down each step. How would these steps map to the graphical game? Carefully read the “Playing Boggle” and “CS134 Boggle” sections again to remind yourself of the expected behavior of the Boggle game you will be implementing.
This Part 2 handout begins with a review of the rules of the Boggle game.
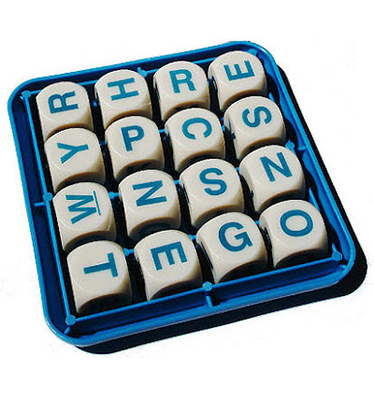
The official rules for Boggle are posted here. In Boggle, players form words by linking together adjacent letters appearing on dice that are arranged in a 4x4 grid. Points are awarded based on the length of the word found, and the player finding words with the highest total score after 3 minutes wins. A picture of a physical version of the game is shown below, and the version that we will be implementing is shown below it.
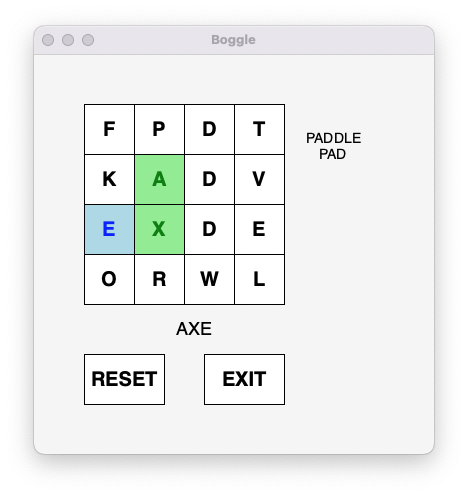
The screenshot above shows the most important elements of the user
interface. Instead of physical dice, we use a
4x4 grid of cubes labeled with letters. In
this single-player version, when the player identifies a group of
letters that form a word, they enter the word by clicking the
appropriate cubes in the order that the letters appear in the word. The
letters of the word currently being entered are displayed
below the grid in the program window. In the example
shown, the letters AXE appear below the grid, indicating
that the buttons labeled A, X and
E have been clicked in that order.
In your version, you are welcome to customize the game with different colors and fonts (but please adhere to the colors specified in the “Creating a word” section).
Below we give an overview of the main features of the game you will implement.
In the figure above, you may notice that the letters A
and X are displayed in green while the letter
E is displayed in blue. In our implementation,
the most recently clicked letter is displayed in blue
and the letters clicked while entering the current word are
displayed in green. If the next letter clicked is
adjacent to the last one (i.e., the one displaying a
blue letter) and if the letter is not already included in the current
word (i.e., it is white with black text rather than green), then that
letter is added to the current word. The letter that had been displayed
in blue becomes green and the letter that was most recently added
becomes blue. The word in progress is displayed (as text) below the
board. Your game should provide similar feedback as letters are clicked
and words are completed.
To indicate that a complete word has been entered, the player clicks a second time on the last (blue) letter of the word. The program then checks to make sure the word is at (1) least three letters long, (2) has not previously been entered, and (3) is a valid word (using the provided dictionary). If it passes these three tests then the word is added to the collection of words the player has found, and the text area to the right of the grid is updated to include the word.
The player can indicate that a mistake has been made and there is no apparent way to complete the word by clicking any letter that is non-adjacent to the blue letter. Doing this will reset the colors of all of the selected letters to black text with white background, and clear the word in progress shown below the grid, allowing the player to start over by clicking the first letter of a new word.
The components at the bottom of our program’s window are used to
control when games start and end. If the RESET button is
pressed, the program randomizes the letters displayed on the boggle
cubes (described below), clears all
words and text areas, and begins a new game. If the EXIT
button is pressed, the game ends and the window closes.
Whenever you press RESET, your code should randomize the
letters shown in the grid of buttons representing the Boggle cubes. The
game of Boggle uses a set of cubes labeled with letters in a way that is
intended to yield a nice mix of consonants and vowels when the Boggle
box is shaken to randomize the letters. To make your game resemble the
original, your program should choose the letters displayed based on the
letters appearing on the actual Boggle cubes. To do this, you will use
the provided brandom.py Python random module, which has
functions for picking a random integer and for shuffling the contents of
a list. This algorithm is described in detail below.
To review the documentation of the classes from Part 1, you can type
pydoc3 followed by name of module in the Terminal (note
that you can type “q” to quit when finished looking to get back to your
Terminal). For example, to review the documentation of
BoggleBoard type:
pydoc3 boggleboardThe following helper methods from the Board class will
be useful to keep in mind as you implement the game.
| Board Method | Behavior |
|---|---|
in_grid(self, point) |
is mouse click in grid |
in_exit(self, point) |
is mouse click in exit button |
in_reset(self, point) |
is mouse click in reset button |
get_position(self, point) |
if mouse click in grid, return grid coordinates (row,
col) |
reset_grid_graphics(self) |
resets the text color and fill color of grid to default values |
set_string_to_text_area(self, text) |
setter for right text area (where completed words are displayed) |
set_string_to_lower_text(self, text) |
setter for lower text area (where current word is displayed) |
set_string_to_upper_text(self, text) |
setter for upper text area (optional display) |
BoggleGame
ClassAfter completing the BoggleCube and
BoggleBoard classes, you are ready to implement the rules
of the Boggle game in the BoggleGame class in
bogglegame.py. This step requires careful planning. Think
through all possible scenarios as you play the game, and remember to
reset the relevant “game state” when appropriate (grid square colors,
class attribute values, text areas, etc.).
The BoggleGame class contains four attributes:
_valid_words: the set of all valid Boggle words. A
helper method __read_lexicon() is provided that reads all
valid Boggle words (one per line in the file bogwords.txt)
and returns a set of valid uppercase Boggle words._board: a BoggleBoard instance._found_words: a list of strings containing all valid
words found by the user while playing the current game._selected_cubes: a list of BoggleCube
objects that the player has clicked on while building the current word.
(That is, a list containing the BoggleCubes that are either
blue or green during play.) The cubes should appear in the list in the
order they are clicked so that _selected_cubes corresponds
to the order of the letters in the word being spelled.The do_one_click(self, point) method should be called
whenever the user clicks in the window. Here, point is the
(x,y) pixel value of the mouse click. Your method should
determine what actions to take in response to that click and perform
those actions. It should also return a boolean value:
it should return True if play should continue or
False if the game is over. You will likely want to create
several private helper methods to simplify the design of
do_one_click.
Clicking on Cubes. Each time a player clicks on one
of the cubes in the Boggle grid, the method do_one_click
should account for the following possible cases:
whether the cube clicked is the same as the last cube clicked (when this occurs, the user has finished building the potential word), or
whether the cube clicked is one of the other cubes already used in the current word (thus canceling the current word), and if not
whether the cube clicked is adjacent to the last cube added to the current word (thus adding a cube to the current word).
To check these conditions and update the state of the board, use
relevant methods implemented in the BoggleCube and
BoggleBoard class, as well as your BoggleBoard
attributes. Make sure you review the expected game-play behavior as
described under “Playing Boggle” and “CS134 Boggle” at the top of this
handout. In particular, your BoggleCube objects should be
highlighted with colors as letters are clicked, completed words should
appear in the right text area, and the “word in progress” should appear
in the lower text area. In addition, your game should not allow the same
cube to be used more than once in a word, and repeat words should not
appear in the right text area. Clicking reset should clear all game
state and start a new game.
Highlighting selected cubes. Remember that the cubes
must change colors as they are selected as described in the “CS134
Boggle” section at the top. You may find the method
__highlight_cube(self, cube, text_color, fill_color) useful
to implement this behavior. Helpful string values for colors to use are:
"blue" and "green" for the text,
and"light blue" and "light green" for
corresponding fill colors.
do_one_click (self, point)The crux of the game play is implementing the
do_one_click method in BoggleGame. Here is an
outline of one approach (you are free to do things differently.)
FalseBoggleCube of clicked pointWe have provided this outline to help guide your thinking, but you
should consider translating this logic into comments inside your
program. As you implement the steps, we encourage you to add helper
methods to make your implementation as readable and efficient as
possible. When complete, running bogglegame.py as a script
(e.g., typing python3 bogglegame.py at the command line)
should have the behavior of a correctly-functioning Boggle game that can
be played.
The if __name__ == "__main__:" block is set up with our
usual click handling loop. As in Part 1, if you’d like to produce
different boards on each run, add a call to randomize() at
the start of that block.
If you would like to do so, optionally, you can think of creative ways to extend the game in to enhance the user’s experience. Some ideas for improving the game that students have done in the past include:
time module
and the non-blocking checkMouse() can come in handy to
implement a timer if you wish to add it. (This one is hard!)Note. If you choose to modify
bogglegame.py for adding optional features, please make a
copy first. Submit your “original” file and create a new file
bogglegame_optional.py for implementing the enhanced game
features.
Some things to keep in mind:
Subclasses should make use of the methods and attributes available via their superclass. Avoid repetitive code that duplicates what the superclass does!
Similarly, do not write redundant code that has already been implemented in a different class: make use of your classes and helper methods/functions effectively.
Just like previous labs, we require that the functions, methods, and attributes provided in starter code follow our specifications exactly. Do not modify the method names, their parameters, nor what is returned.
Test your code as you go, using
if __name__ == "__main__" or interactively, to simplify
debugging. The longer you wait before testing, the harder it is to
diagnose errors! Incremental debugging is best.
Near the bottom of the README.md, there is a
breakdown of the grading expectations that will form the basis of your
lab’s evaluation. Please keep these in mind as you work through your
lab!
Functionality and programming style are important, just as both the content and the writing style are important when writing an essay. Make sure your variables are named well, and your use of comments, white space, and line breaks promote readability. We expect to see code that makes your logic as clear and easy to follow as possible.
When you’re finished, stage, commit, and push your work to the server as in previous labs. Good luck and have fun!
Download a .zip archive of your work. Download
your assignment files for submission by going to your lab repository on
Gitlab, selecting the Download source code icon (a down
arrow), and select zip. Doing so should download all of
your lab files into a single zip archive as lab09-main.zip,
and place it inside your Downloads folder (or to whichever folder is set
as your browser’s default download location).
Submit your work. Navigate to the CS134 course on Gradescope. On your Dashboard, select the appropriate Lab Assignment. Drag and Drop your downloaded zip archive of the Lab Assignment from the previous step, and select ‘Upload’.