In this lab we will use classes to implement a version of an
algorithm that is ubiquitous on modern smart phones: autocomplete!
During this lab, you’ll gain experience with the following concepts:
Writing classes and methods
Thinking through some decisions to improve the efficiency of your
code
Algorithm and Overview
Where would the world be without decent autocomplete? Stuck in the
paste? Royally skewed? Up ship creek without a poodle? Fortunately, our
phones are better than that. Most of the time…
As soon as you start typing in a word, you’ll notice that it suggests
some possible completions for the word based on the letters typed in so
far. For example, for the input auto, the phone might
suggest a list of completions such as
[auto, automatic, automobile]. Ideally, these suggestions
also apply some clever rules to maximize their utility to the user; one
way to ensure this is to say that the first suggestion will be the input
itself if it already corresponds to a word in the dictionary, while the
rest of the suggestions (including the first suggestion if the input
isn’t a word in the dictionary) are presented in order of how commonly
they are used in everyday speaking. We will implement a version of this
algorithm in this week’s lab.
In the last part of the lab, we’ll also consider an alternative
algorithm where the user can enter a word containing “wildcard
characters” that match any letter. If the user enters
r...s, our algorithm will return the three most common
words starting with “r”, ending with “s”, and having any three letters
in between. The output here may be ranks, rooms, rules, for
example. While you may not find this particular feature on a cell phone,
you may appreciate its utility if you’ve ever stared at a picture like
this: .
The final product will be a program that takes words or patterns to
complete from the Terminal and generates the three best completions.
(Here the bracketed numbers are how common each completion is.)
Using the form provided, you may have designated up
to one partner that you will work with, side-by-side, through
all stages of the main assignment. To facilitate this collaboration, we
created one code repository per group. All graded work must be
done within this repository. At the end of this document, there are
additional instructions that describe the group submission logistics on
the gradescope platform.
If you are working individually, you can ignore those extra steps.
All lab logistics for independent submissions remain the same as they
have been during prior labs.
Getting Started
Before you begin, clone this week’s repository using:
where usernameA-usernameB are you and your partner’s
usernames sorted alphabetically.
There are three Python files for this assignment:
freqword.py, result.py, and
autocomplete.py. Each will contain one class definition, as
outlined below. You will also find a couple of CSV files called
gutenberg.csv and mini_gutenberg.csv in the
data folder of your repository. Each line in these files corresponds to
a word and the number of times it occurs in all of the books downloaded
from Project Gutenberg. It
contains 29,053 words. The mini_gutenberg.csv, on the other
hand, contains only five words. We’ll mostly use that version for
testing and debugging purposes so you have a small file to look at to
ensure your code is working as intended. We will use the full
gutenberg.csv file corpus for determining the
frequency with which words are used to order our autocomplete
suggestions.
Take a second to look through your repository and familiarize
yourself with these files.
Part 1: The FreqWord
Class
The FreqWord class is one of two helper classes that
will make your autocompletion code more elegant. A FreqWord
object represents one word from a corpus (or collection of words), as
well as the number of times that word appears in the corpus. This class
should contain two protected attributes to record that information:
_text that stores a string and _count that
stores an integer.
Your first task is to implement the following methods appearing in
the FreqWord class in the freqword.py
file:
the constructor __init__(self, text, count), that
populates a new FreqWord object with the supplied
text and count parameter values (make sure
_count is stored as an int by passing in count
as an int);
the accessor methods get_text(self) and
get_count(self) that return the object’s attribute
values;
the method has_prefix(self, prefix) that returns
True if the text attribute in the FreqWord
object starts with the string prefix. Recall that we
designed a similar function in Lab 3, but for this lab, we will learn
how to call a built-in string method to achieve the same result. In
particular, you may use the .startswith() string method,
which works as follows:
str_a.startswith(str_b) returns True if
str_b is a prefix of str_a, else it returns
False.
the method __str__(self) that returns a string
representing the objects attributes in a readable form.
Note that there is one additional method in the FreqWord
class, matches_pattern(), is not mentioned in the list
above. You will implement this method in Part 4 of this lab; we will
ignore it for now.
Here is an example of using the methods in interactive Python. Note
the string printed by the print(w) test. Your
__str__() method should return a string representing a
FreqWord object using that format.
As a preliminary way to test your code, you can type
the following into the Terminal:
python3 runtests.py q1
It would be beneficial to do additional testing in interactive Python
or by adding new tests to runtests.py. You are not required
to submit new tests inside runtests.py, but mistakes in
your FreqWord class will cascade into additional errors in
code that depends on FreqWord functionality. So, as always,
be sure to comprehensively test your code as you go, whether through
extra runtests.py tests, experimentation in interactive
Python, or in an if __name__ == "__main__": code block.
Part 2: The Result
Class
Our second helper class, Result, helps the autocompleter
present results to the user in a readable format. This class should
contain two protected attributes: _input that stores a
string that the user entered for autocompletion, and
_completions that stores a list of
FreqWord objects corresponding to suggested
completions.
In the Result class, implement the following
methods:
The constructor
__init__(self, input_word, completion_list) that creates an
instance of Result with the given input word and list of
possible completions.
The method __str__(self) that constructs a string
representing the attributes of an instance in a readable format.
A demonstration of creating an instance of this class and printing
its string representation in interactive Python is shown below.
>>>from result import*>>> r = Result("the", [FreqWord("the",4), FreqWord("theirs",3), FreqWord("then",2)])>>>print(r)the --> the[4] | theirs[3] | then[2]
As a preliminary way to test your code, you can type
the following into the Terminal:
python3 runtests.py q2
It would be beneficial to do additional testing, either in
interactive Python, by adding tests to runtests.py, or by
adding code in an if __name__ == "__main__": code
block.
Part 3: The
AutoComplete Class
We are now ready to implement the AutoComplete class.
Before starting, take a look at the contents of the code provided to you
in autocomplete.py to familiarize yourself with the
attributes and methods of the class.
The AutoComplete class has one protected attribute:
_words. This is a list of
FreqWord objects, sorted in alphabetical order. You will
initialize this attribute in the constructor. The class also has the
following methods, which you should implement and test:
The constructor __init__(self, corpus) : This method
should read the contents of a CSV file (where corpus is a
string representing the filename) that contains word-frequency pairs on
each line. It initializes the attribute _words to be a
sorted list of FreqWord objects (as described above).
To accomplish the alphabetical sorting, we recommend that you
use the built-in sorted() function. In addition to
passing sorted the sequence that we want to it sort for us,
we also need to specify the criteria that we want it to use when sorting
that sequence (we want to arrange the FreqWords according
to their _text attributes). We can do that using the
optional key parameter to tell sorted to use
the getter method from the FreqWord class to extract the
_text attribute as follows:
The protected method _match_words(self, criteria):
This helper method takes as input a stringcriteria and returns a list of all
FreqWord objects in _words whose text begins
with that string. Take a look at the corresponding documentation in the
starter code for an example of how the method works. (Hint: You
should call methods in FreqWords whenever possible to
simplify your code.)
The method suggest_completions(self, input_string):
This method takes as input a string called input_string and
returns an instance of the Result class, where the
_input attribute corresponds to the input provided, and the
_completions attribute is the top suggested autocompletions
generated according to the following two-step algorithm:
Generate possible completions using _match_words to
find all words having input_string as a prefix.
Sort the possible completions according to their frequency of
occurrence, and return a Result instance with output
corresponding to the top 3 frequently occurring words. Note: If
there are less than 3 possible completions, this list may be shorter
(possibly even empty corresponding to no possible completions).
Helpful Hint. To sort a list of
FreqWord objects in decreasing order of their
_count attribute, we need to call the built-in
sorted function using the _count attribute as
the sorting key (which we can do by using the
FreqWord.get_count getter method, similar to what we did in
the implementation of __init__ above) as well as use the
optional reverse parameter as True.
The method __str__(self): This method should
generate a string with each FreqWord in _words on a
separate line as shown below. Note that we have NOT provided tests for
this method, so you should definitely test this yourself. You can test
it by using interactive python or putting the following print statement
in the if __name__ == '__main__': code block in
autocomplete.py.
As a preliminary way to test your code, you can type
the following into the Terminal:
python3 runtests.py q3
It would be beneficial to do additional testing in interactive
Python, by adding tests to runtests.py and/or utilizing the
if __name__ == "__main__": block at the end of the file. In
particular, we have NOT provided tests for the
str method, so you should definitely test this
yourself.
We have provided code in the autocomplete.py file that
accepts and then uses command-line arguments (any arguments passed to
the program appear in the list sys.argv[1:] in the order
that they are given). To generate autocompletions for one or more
prefixes, just list them on the command line:
We’ll now extend your autocompleter to allow for more general
matching based on patterns. For example, computing the completions for
the pattern 'c..l' will produce the three most common
4-letter words starting with c and ending the
l. To do this:
Implement the matches_pattern(self, pattern) method
in your FreqWord class. This method takes as input a string
pattern, which contains a mix of letters and wildcard
characters denoted as '.', and returns whether or not
the text of the FreqWord matches that pattern. The wildcard
characters are used to denote that any letter is acceptable in the given
spot where it appears. You can test this method in interactive Python as
follows:
Modify your _match_words(self, criteria) helper
method in the AutoComplete class to handle input strings
containing wildcards. Specifically, if criteria (a string)
does not contain wildcard characters, _match_words() should
behave exactly as before. If criteria does have wildcards,
it should instead use the matches_pattern() method in
FreqWord to construct a list of all words in
_words matching the pattern.
For example, if _words is a list of
FreqWord instances for the words
'call', 'cat', 'chill', 'cool' and the given pattern is
'c..l', this method should return a list containing only
the instances for 'call', 'cool'. Note that ‘chill’ is not
returned as it consists of 5 letters rather than 4 as required by the
pattern.
A demonstration of using the extended version of
suggest_completions in interactive Python is shown
below.
Note: The Terminal has its own autocomplete that
tries to match words with wildcards to filenames. So, to use command
line arguments as patterns, put quotes around them to tell the terminal
not to process them.
Submitting Your
Work and Grading Guidelines
When you’re finished, commit and push your work to the evolene server
as in previous labs. Using the command
git commit -am "Your message here" will commit all files
that have changed. Note that if you omit the -a option when
committing your files, you will need to first manually add each file
that you would like to submit using the git add
command.
Do not modify function names or interpret
parameters differently from what is specified! Make sure your functions
follow the expected behavior in terms of type of input and output: for
example, if they return lists, their default return
type must always be list. A
function’s documentation serves, in some way, as a contract
between you and your users. Deviating from this contract makes it hard
for potential users to adopt your implementation!
Functionality and programming style are important, just as both
the content and the writing style are important when writing an essay.
Make sure your variables are named well, and your use of comments, white
space, and line breaks promote readability. We expect to see code that
makes your logic as clear and easy to follow as possible.
Do not forget to add, commit, and push your work as it
progresses! Test your code often to simplify debugging.
Please edit the README.md file and enter the names
of any appropriate students and resources on the
Collaboration line. Add, commit, and push this
change.
Near the bottom of the README.md, there is a
breakdown of the grading expectations that will form the basis of your
lab’s evaluation. Please keep these in mind as you work through your
lab!
Download a .zip archive of your work. Download
your assignment files for submission by going to your lab repository on
Gitlab, selecting the Download source code icon (a down
arrow), and select zip. Doing so should download all of
your lab files into a single zip archive as lab08-main.zip,
and place it inside your Downloads folder (or to whichever folder is set
as your browser’s default download location).
Submit your work. Navigate to the CS134 course
on Gradescope. On your
Dashboard, select the appropriate Lab Assignment. Drag and Drop your
downloaded zip archive of the Lab Assignment from the previous step, and
select ‘Upload’.
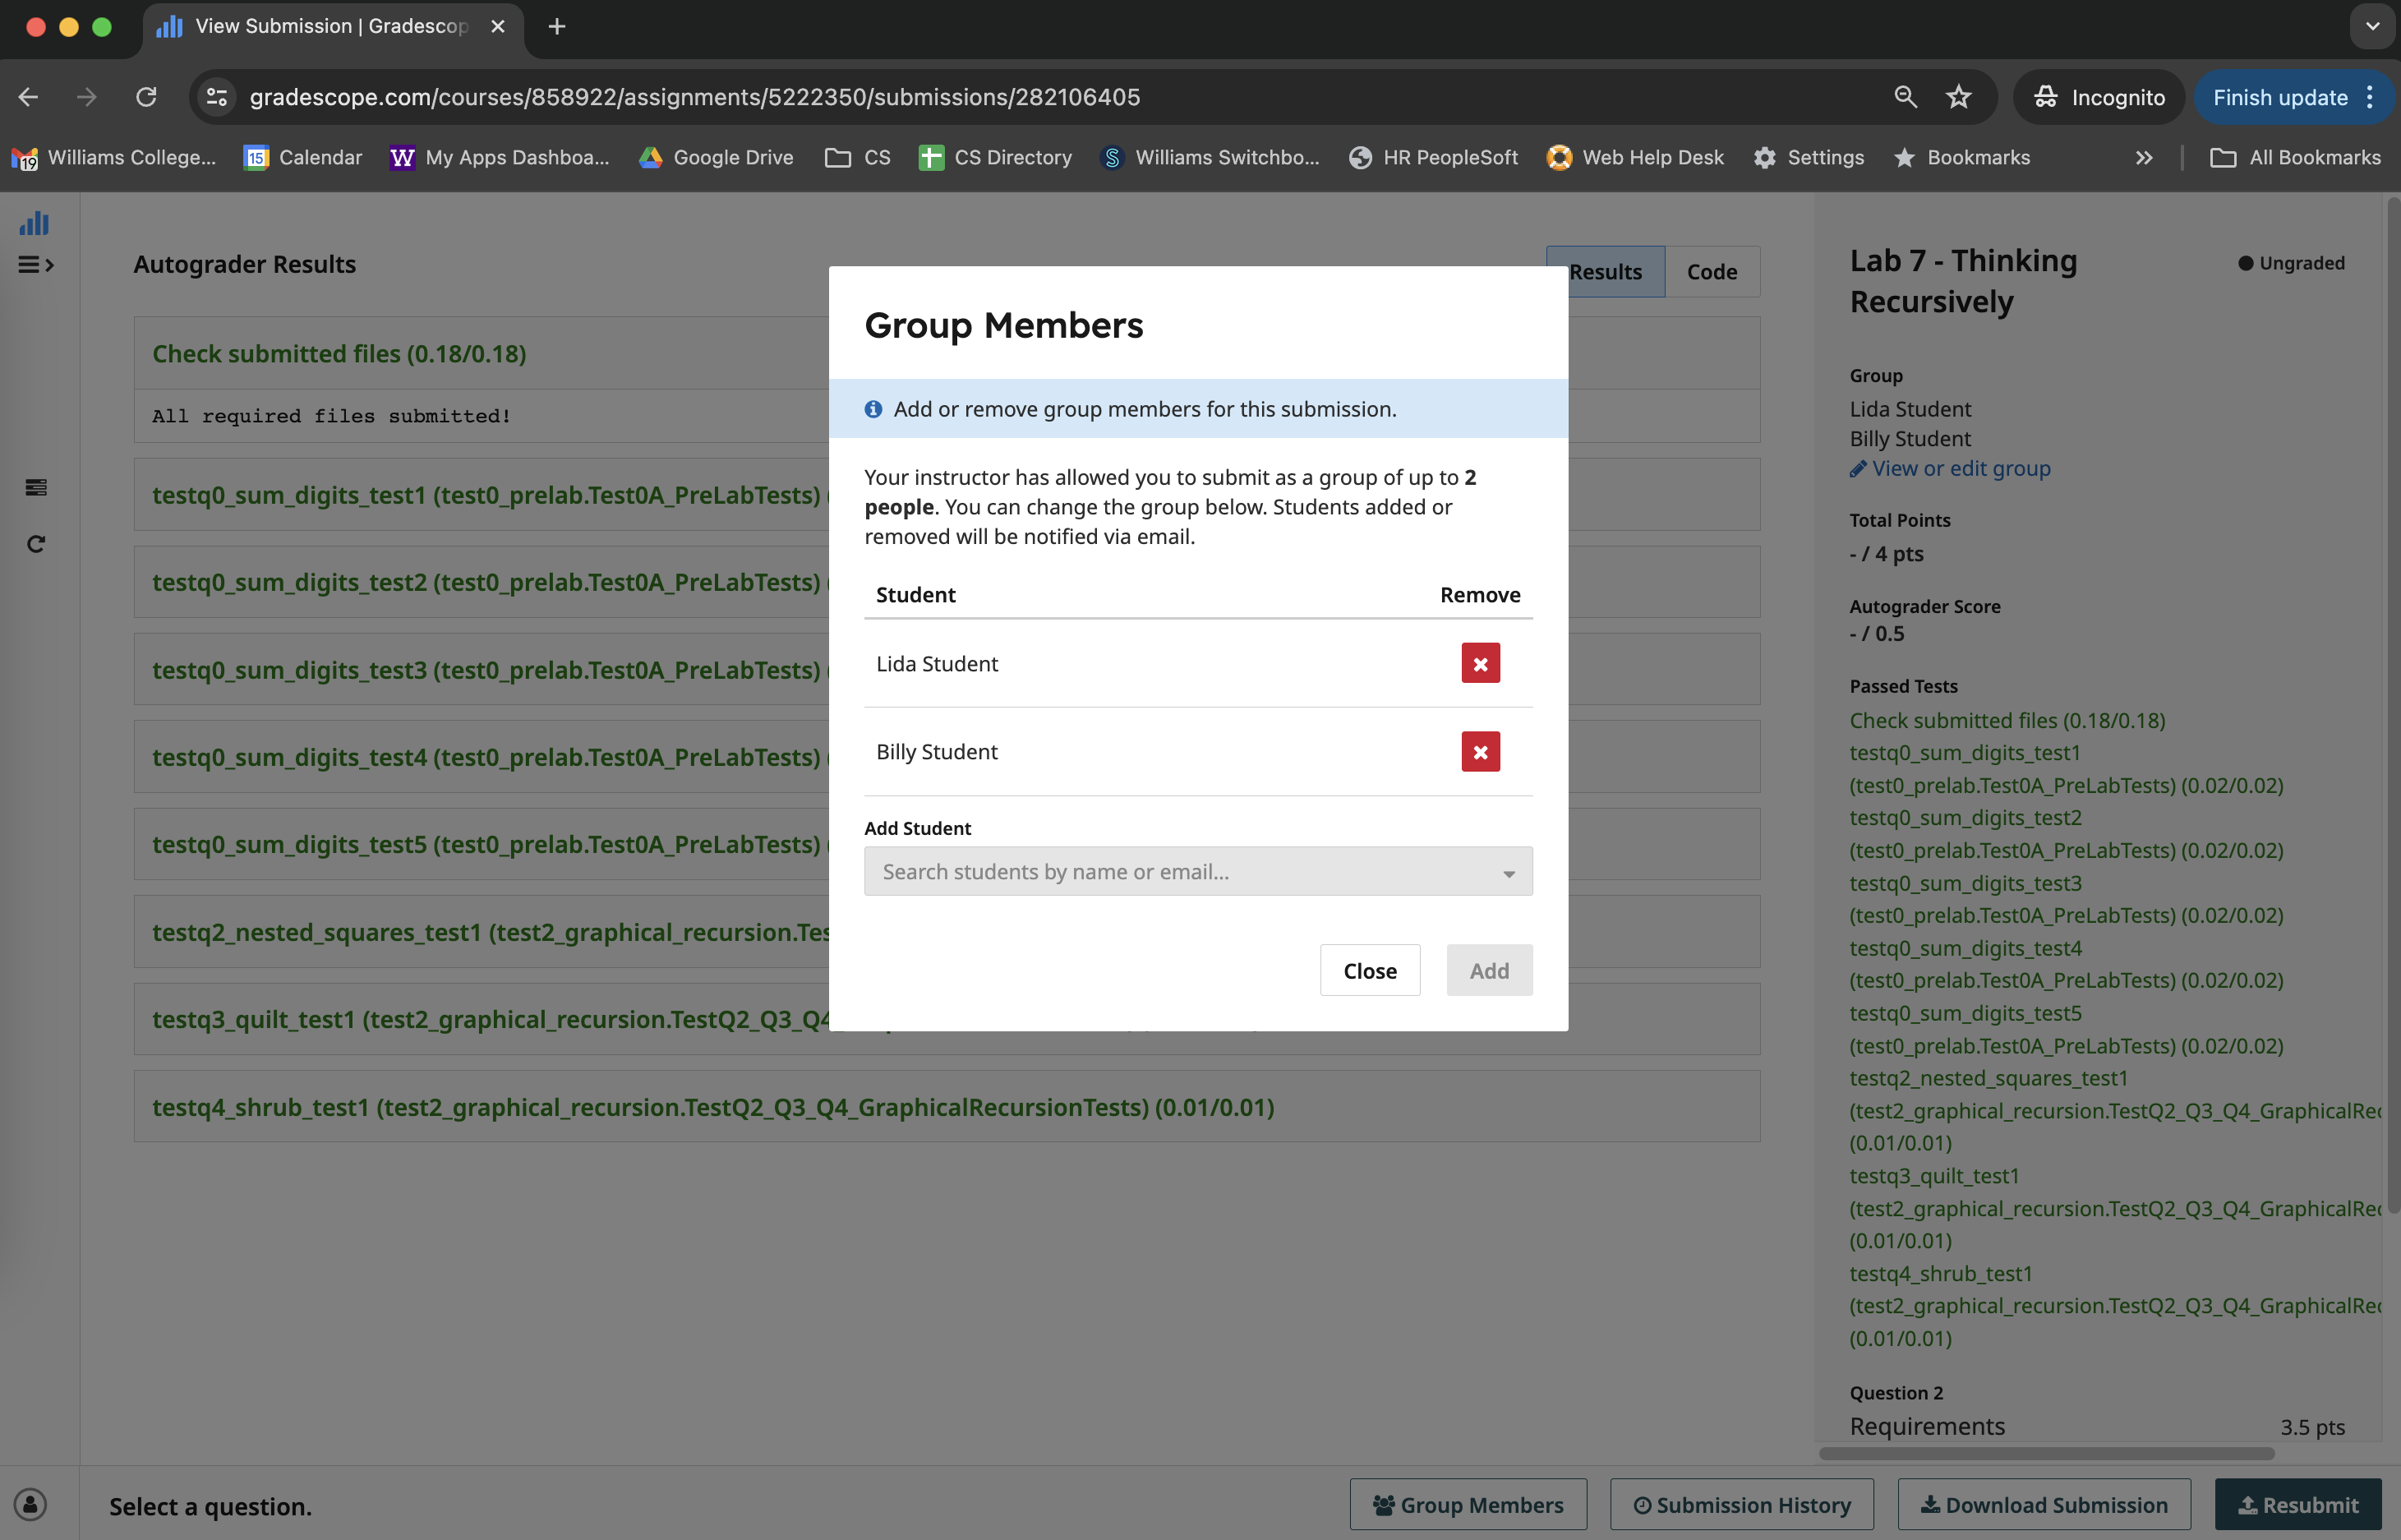
If you are working with a partner, only one group member should
upload the completed assignment as described above. However, that group
member must also add both team members to the
submission to ensure that both team members receive credit. At the
bottom of the window (to the left of the submission button), there is
button labeled “Group Members” that you must click. You will then be
asked to select a group member from among the students in the course.
Find your partner from that list and add them. A picture of this process
is shown here:
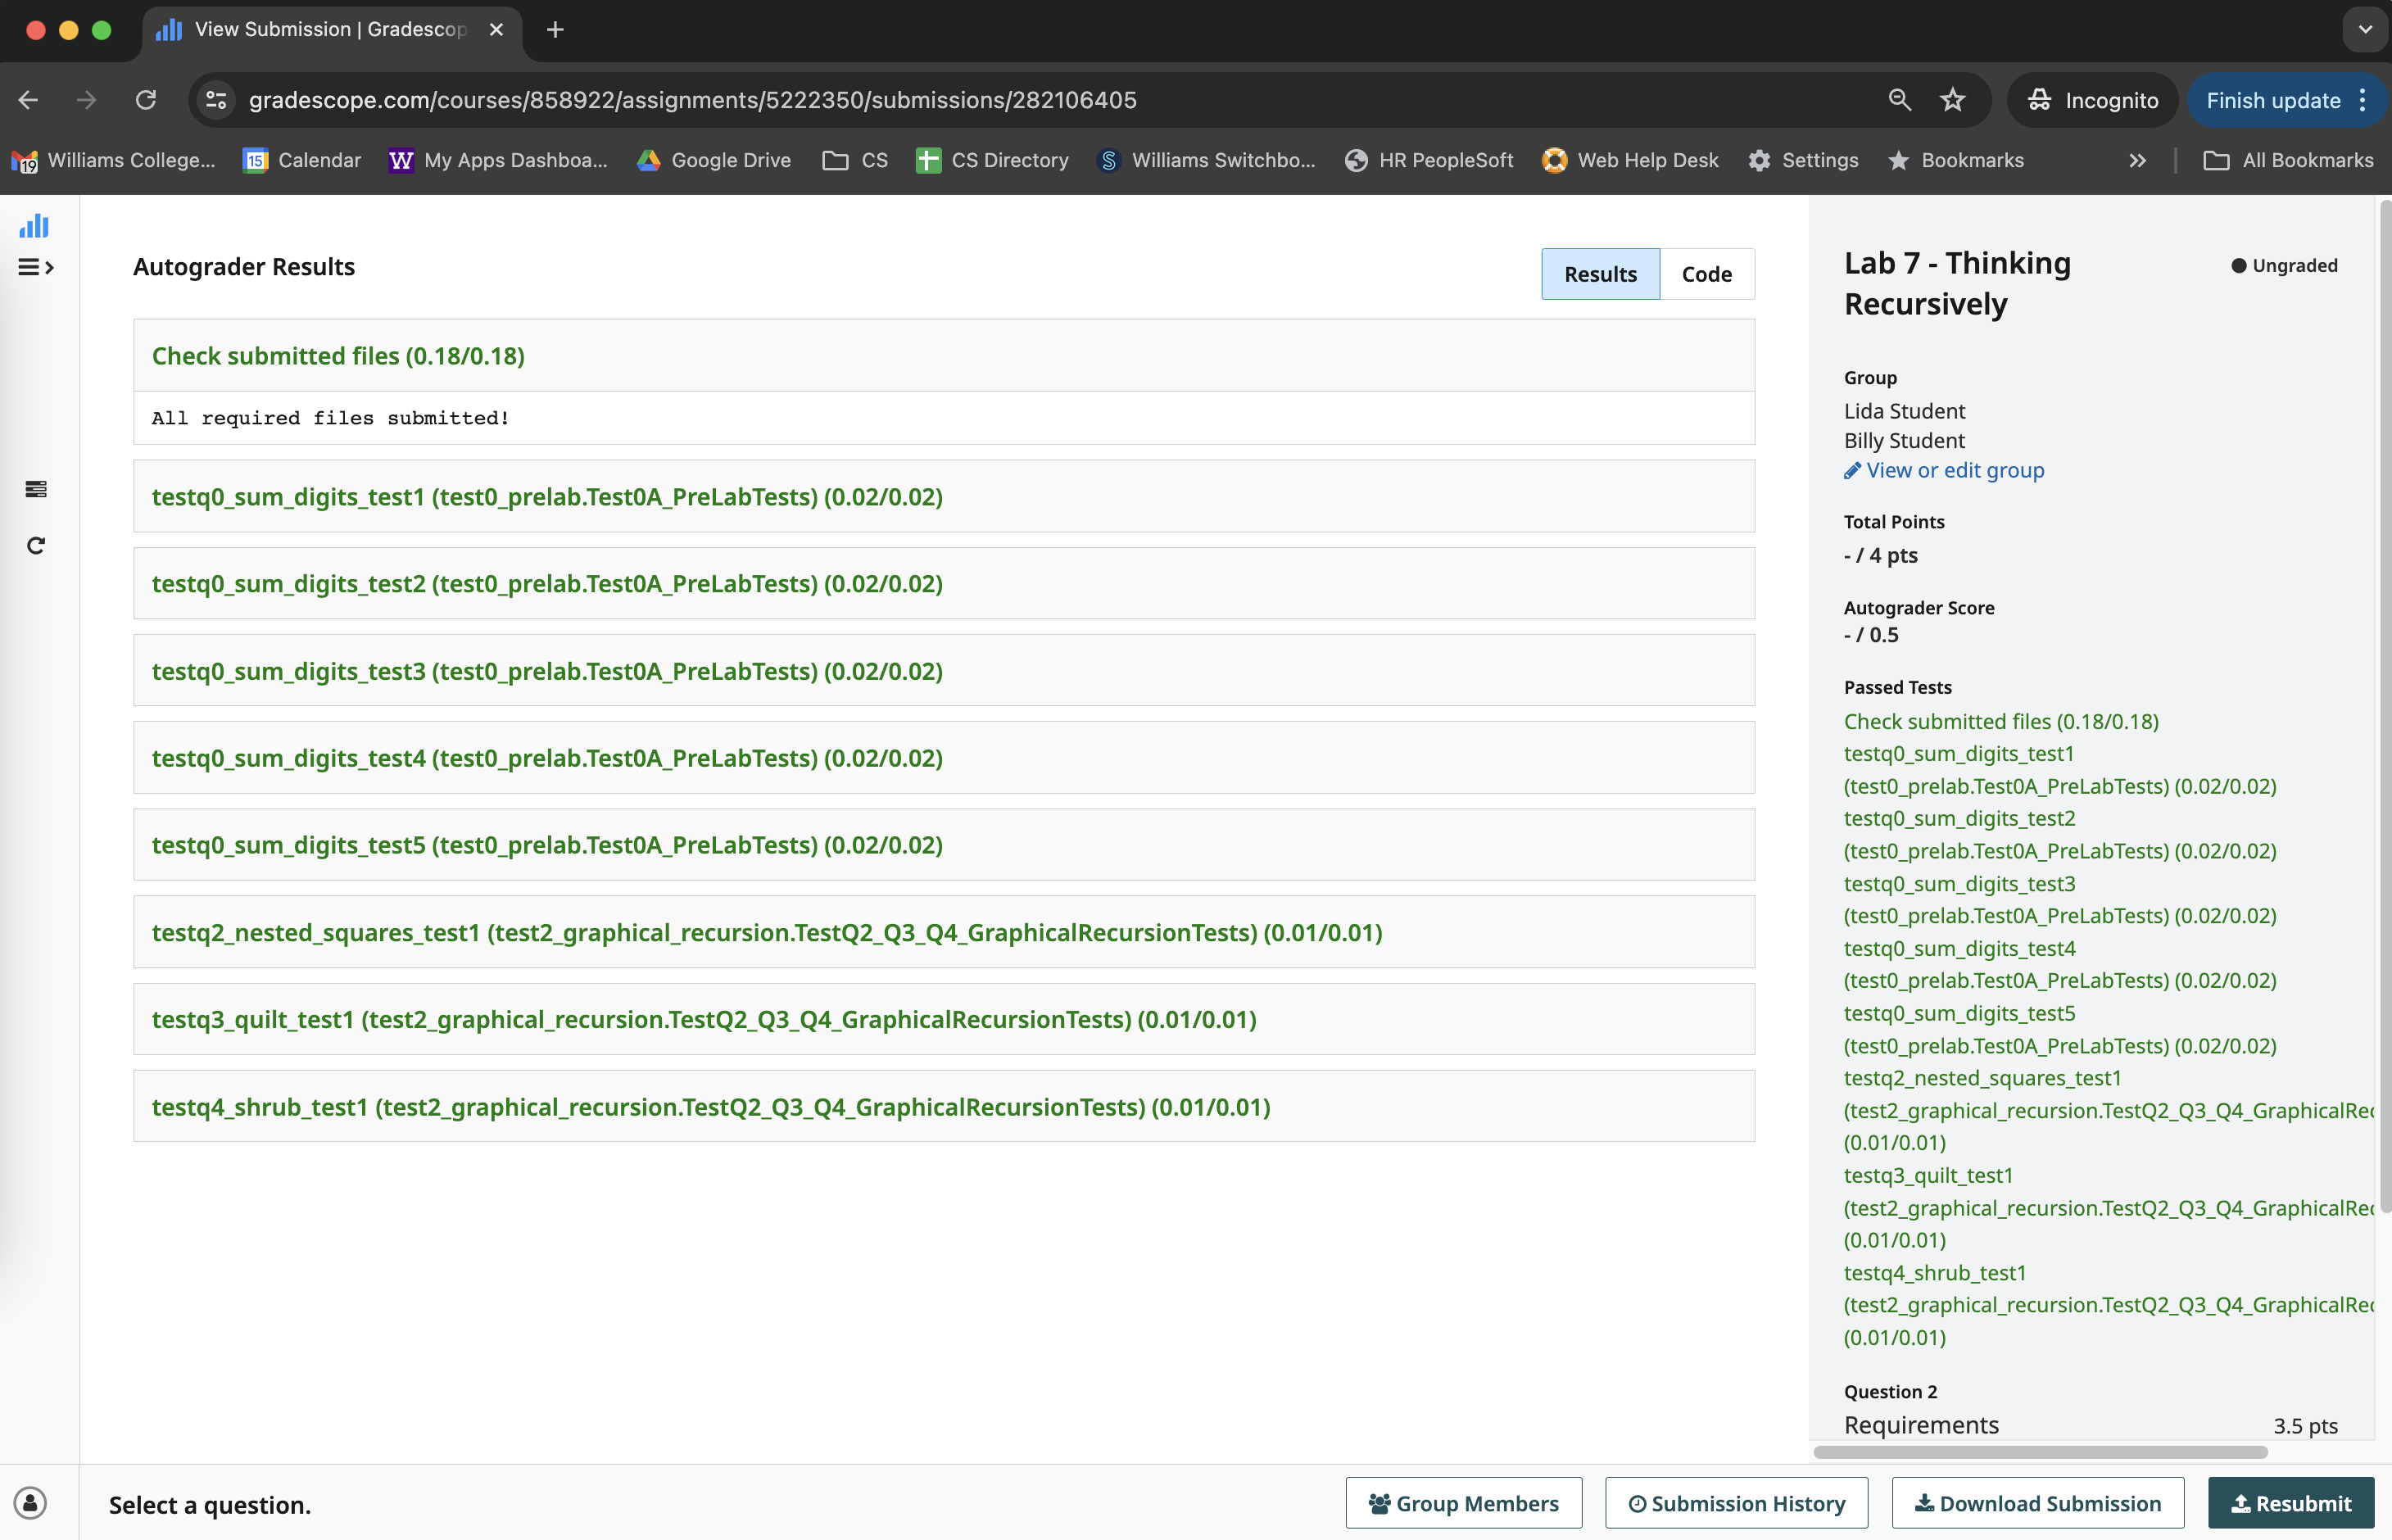
After successfully submitting your group assignment, you should see
both group members’ names in the right column, above the results from
the lab tests. (Here, the group members are “Lida Student” and “Billy
Student”). Congratulations on successfully submitting your lab!
 .
.