Lab 9 : Campus Paths
Objective
- Use Swift’s generic type features Implement a generic ADT
- Implement Dijkstra’s shortest path algorithm
- Design and implement a model suitable for finding shortest paths on campus.
Table Of Contents
Overview
To help visitors navigate the Williams campus you will build a route-finding app. It will generate directions for the shortest walking routes between two buildings, using your graph ADT to represent buildings and pathways on campus.
Part 1: Generics and Least-Cost Paths
Problem 0: Project Setup
You will continue using your GraphProjects workspace for this project. This project uses a number of additional targets, data files, images, and test files, which can be found in the CampusPaths project within the workspace. You should use the paths scheme and My Mac target when working on CampusPaths.
Problem 1: Make the Graph Generic
In CampusPaths, your mission is to find the shortest walking route between points on the Williams campus. A graph is an excellent representation of a map, and luckily you have already specified and implemented a graph. Unfortunately, your graph stores only Strings, whereas CampusPaths needs to store other data in the nodes and edges, such as coordinate pairs and physical distances. More generally, your graph would be much more useful if the client could choose the data types stored in nodes and edges…
Thus your first task is to convert the graph ADT to a generic class. Rather than always storing the data in nodes and edge labels as Strings, it should have two type parameters representing the data types to be stored in nodes and edges. Below, I’ll refer to these type parameters as N and E, but you may choose any names you like. Directly modify your existing classes in your Graph project — there is no need to copy or duplicate code.
When you add generic type parameters to a class, be sure to describe these type parameters in the class's comments so the client understands their purpose.
As usual, you should always include an abstraction function, representation invariant, and checkRep in any class that represent a data abstraction (ADT). Update these items as well. If you are still unsure how to express these items, please talk to us so that you can nail them down.
When you are done, your previously-written tests and SocialNetworks apps will no longer compile. Modify those apps to construct and use graph objects where the type parameters are instantiated with String. All code must compile and all tests must pass when you submit your lab. In particular, your test drivers for both previous graph apps must work correctly so we can test your code. Depending on your changes, some of your implementation tests may no longer be valid. Try to adapt your implementation tests to your new implementation, or discard them and write new ones: they should help you build confidence in your implementation. But, don’t overdo it: as with any testing, stop when you feel that the additional effort is not being repaid in terms of increased confidence in your implementation. Learning when to stop working on a given task is an important skill.
- When revising your
SocialNetworkscode, you will need to define an extension of yourGraphclass that only works on graphs withStringnodes and edges. You can declare such an extension with awhereclause as follows:
extension Graph where N == String, E == String {There is not much new code to write here, but details of type parameters can be a little tricky the first time you use them in Swift. Think carefully and plan ahead. I suggest completing your changes to Graph and GraphTests, and only then move on to GraphViz and GraphVizTests. Once those are working again, move on to SocialNetworks and SocialNetworksTests. Only move on to the next target once the earlier ones are working.
Ensure all of your implementation and specification tests for your existing graph projects pass before continuing to the next step.
Problem 2: Weighted Graphs and Least-Cost Paths
In a weighted graph, the label on each edge is a weight (also known as a cost) representing the cost of traversing that edge. Depending on the application, the cost may be measured in time, money, physical distance (length), etc. The total cost of a path is the sum of the costs of all edges in that path, and the minimum-cost path between two nodes is the path with the lowest total cost between those nodes.
Below you will build a edge-weighted graph where nodes represent locations on campus and edges represent straight-line walking segments connecting two locations. The cost of an edge is the physical length of that straight-line segment. Finding the shortest walking route between two locations is a matter of finding the minimum-cost path between them.
Dijkstra's algorithm
You will implement Dijkstra's algorithm, which finds a minimum-cost path between two given nodes in a graph with all nonnegative edge weights. Below is a pseudocode algorithm that you may use in your implementation. You are free to modify it as long as you are essentially still implementing Dijkstra's algorithm. Your implementation of this algorithm may assume a graph with Double edge weights.
The algorithm uses a priority queue. A priority queue stores elements that can be compared to one another, such as numbers. A priority queue has two main operations:
add: Insert an element.remove: Remove the least element. (This is sometimes called removeMin, for emphasis.)
For example, if you inserted the integers 1, 8, 5, 0 into a priority queue, they would be removed in the order 0, 1, 5, 8. It is permitted to interleave adding and removing.
    Dijkstra's algorithm assumes a graph with non-negative edge weights.

    start = starting node
    dest = destination node
    active = priority queue.  Each element is a path from start to a
             given node. A path's “priority” in the queue is the total
             cost of that path. Nodes for which no path is known yet are
             not in the queue.
    finished = set of nodes for which we know the minimum-cost path from
               start.

    // Initially we only know of the path from start to itself, which has
    // a cost of zero because it contains no edges.
    Add a path from start to itself to active

    while active is non-empty:
        // minPath is the lowest-cost path in active and is the
        // minimum-cost path to some node
        minPath = active.removeMin()
        minDest = destination node in minPath

        if minDest is dest:
            return minPath

        if minDest is in finished:
            continue

        for each edge e = ⟨minDest, child⟩:
            // If we don't know the minimum-cost path from start to child,
            // examine the path we've just found
            if child is not in finished:
                newPath = minPath + e
                add newPath to active

        add minDest to finished

    If the loop terminates, then no path exists from start to dest.
    The implementation should indicate this to the client.
There may be multiple weighted edges between two nodes. You must be sure that the pathfinding algorithm uses the least cost edge between two nodes if there are multiple edges.
Implementation
This part will make use of the new targets we have added to your project:
There is a new project in your workspace named CampusPaths. This is where you will add all new code for you Dijkstra’s algorithm and your app in Part 2. You will put all code related to Part 1 in
Sources/CampusPaths. The text-based UI will go inSources/paths/main.swift.There are two unit test targets in the
Testsdirectory:DijkstraTestsandCampusPathsTests. You’ll use DijkstraTests for the remainder of Part 1, and the other for the app-specific tests in Part 2.
These targets include some data files and starter code to help you get started.
Dijkstra’s algorithm may be most easily written in another Graph extension where the edge type is constrained to be Double. The node type should not be constrained so you can use your algorithm on different types of graphs (as long as they contain Double edge values).
We provide a PriorityQueue class in the starter code for you to use.
Problem 3: Testing Your Solution
You will follow our usual approach for specification testing your implementation: a test driver that interprets scripts that operate on graphs. You driver and tests will be stored in the DijkstraTests target. That target already includes several test scripts using the commands described below, as well as one small graph file.
The format for writing tests follows the usual specification/implementation structure, but with some details changed to accommodate changes to the graph and the data stored in it. You should write the majority of your tests as specification tests according to the test script file format defined below, specifying the test commands, expected output, and graph data in *.test, *.expected, and *.json files, respectively. The *.json files should be structured as previous graph files, except with double values for edge labels. For example:
{
  "nodes": ["A", "B", "C", ... ],
  "edges": [
            { "src": "A", "dst": "B", "label": 0.4 },
            { "src": "A", "dst": "C", "label": 0.2 },
            ...
          ]
}
As before, you should write a class DijkstraSpecificationTests to run your specification tests. The simplest way to do this is to copy your code from SocialNetworksSpecificationTests and extend it with the features noted below. There are ways to avoid duplicating code, but there are some subtle design issues that would need to be addressed.
If your solution has additional implementation-specific behavior to test, write these tests in additional unit test classes.
The specification tests do not directly test the property that your graph is generic. However, between the GraphViz, SocialNetworks, and Dijkstra tests, we’ll be using several different instantiations, so were are implicitly testing the generic behavior of your graph.
By now, you will almost certainly have a compile-time variable that controls how extensive your graph’s checkRep tests are. If you do exhaustive tests after ever graph operation with the full dataset, you could easily exceed the timeout, but these tests are also very useful while debugging and testing. Leave all the checks on during development and testing, then change the variable value and recompile to disable the expensive tests in the version you validate and submit for grading.
Test script file format
The test script file format for the DijkstraSpecificationTests uses the same commands and format as SocialNetworks, but with a few differences in arguments and output:
Edge labels are
Doubles instead ofStrings. If an edge label in a test script cannot be parsed as a number, the output is undefined. For ListChildren, the same rules as before apply for ordering output by nodes and edges, except that edges are now ordered numerically instead of alphabetically.LoadGraph is still in use, similar to the previous homework. The only difference is that the graphs loaded will have Double edge values. You may wish to write the JSON parsing code as an initializer in a Graph extension:
extension Graph where N == String, E == Double {
  convenience init(graphJSON json: [String:Any]) { ... }
}
The code will be quite similar to earlier initializers.
FindPath searches with Dijkstra’s algorithm instead of BFS and prints its output in the form:
path from NODE 1 to NODE N:
NODE 1 to NODE 2 with weight w1
NODE 2 to NODE 3 with weight w2
...
NODE N-1 to NODE N with weight wN-1
total cost: W
where W is the sum of w1, w2, ..., wN-1.
In other words, the only changes in output are the way the edge labels are printed and the addition of a "total cost" line at the bottom. The output should remain the same as before when no path is found or the nodes are not in the graph: in particular, do not print the "total cost" line in those cases. Also as before, underscores in node names are replaced by spaces for this command.
If there are two minimum-cost paths between NODE 1 and NODE N, it is undefined which one is printed.
For readability, the output of ListChildren, AddEdge, and FindPaths should print numeric values with exactly 3 digits after the decimal point, rounding to the nearest value if they have more digits. The easiest way to specify the desired format of a value is using String initializers that format data. For example, you could create the String "weight 1.760" by writing:
String(format: "weight %.3f", 1.759999)In FindPaths, the total cost should be computed by summing the actual values of the individual weights, not the rounded values. Rounding should only be done when values are printed.
A path from a node to itself should be treated as a trivially empty path. Because this path contains no edges, it has a cost of zero. (Think of the path as a list of edges. The sum of an empty list is conventionally defined to be zero.) So your test driver should print the usual output for a path but without any edges, i.e.:
path from C to C:
total cost: 0.000
This applies only to nodes in the dataset: a request for a path from a nodes that is not in the dataset to itself should print the the usual "unknown node C" output.
Several sample test files demonstrating the changes in format are provided in the files you copied to set up this part.
Part 2: CampusPaths
You will design the data model and text-based UI for much of this app. You should continue to practice modular design and writing code for reuse. This part contains one “problem” for each logical component you will write, but the order of the problems is not meant to suggest an order of implementation. You will certainly want to design the whole system before attempting to implement any part. As always, you should also develop incrementally, which may mean repeatedly writing a bit several parts and verifying that they work together. Think carefully about what role each class you design will play.
Problem 1: Model-View-Controller Design
Create a new file
As you design and implement your solution, record which parts of your code belong to the model, to the text-based UI, or none of the above inCampusPaths/README.mdin your project.README.md. Be sure to list ALL structs/classes you write for the lab. This should just be a list, with one sentence describing the role of each struct/class. Do this as you go – it is intended to avoid writing classes that are coupled too tightly, not cohesive, etc.
Model Reminders
Avoid the temptation to create an oversized "god class" that does everything for the model. The model may contain multiple structs/classes, and the controller can interact with multiple classes in the model. Most of the time, any class that exists solely to represent data is part of the model. For this assignment, you will likely choose to have one central model class that manages the graph and does most of the heavy lifting, but you will likely also want some smaller objects that encapsulate related data. Some of these objects might be returned to the controller so it can access their data directly, avoiding the "god class" scenario; others might be used only internally within the model.
Your model should be completely independent of the view (UI), which means it shouldn't know or decide how data is displayed. The model does know something about what data and operations the application needs, and it should provide methods to access them; however, it shouldn't return strings tailored to a particular view and definitely should not print anything. Imagine replacing your GUI with a voice-based system and ask yourself: is my model reusable with this new view?
On the flip side, a client (such as the view) doesn't know anything about how the model stores data internally. Someone writing a view for your application should only know that the model somehow stores information about buildings and paths on campus and should only interact with the data at this level. In other words, the public interface of the model should give no indication that this data is represented internally as a graph. Revealing that detail publicly means the model implementation can no longer change without potentially breaking view code. Imagine changing your model from storing a graph internally to connecting to a web service to obtain directions — does your model’s client code (controller/view) still work?
Problem 2: The Data
We provide three data files for you to use. They are in the Data folder inside the CampusPaths target in your project
They contain the following information:
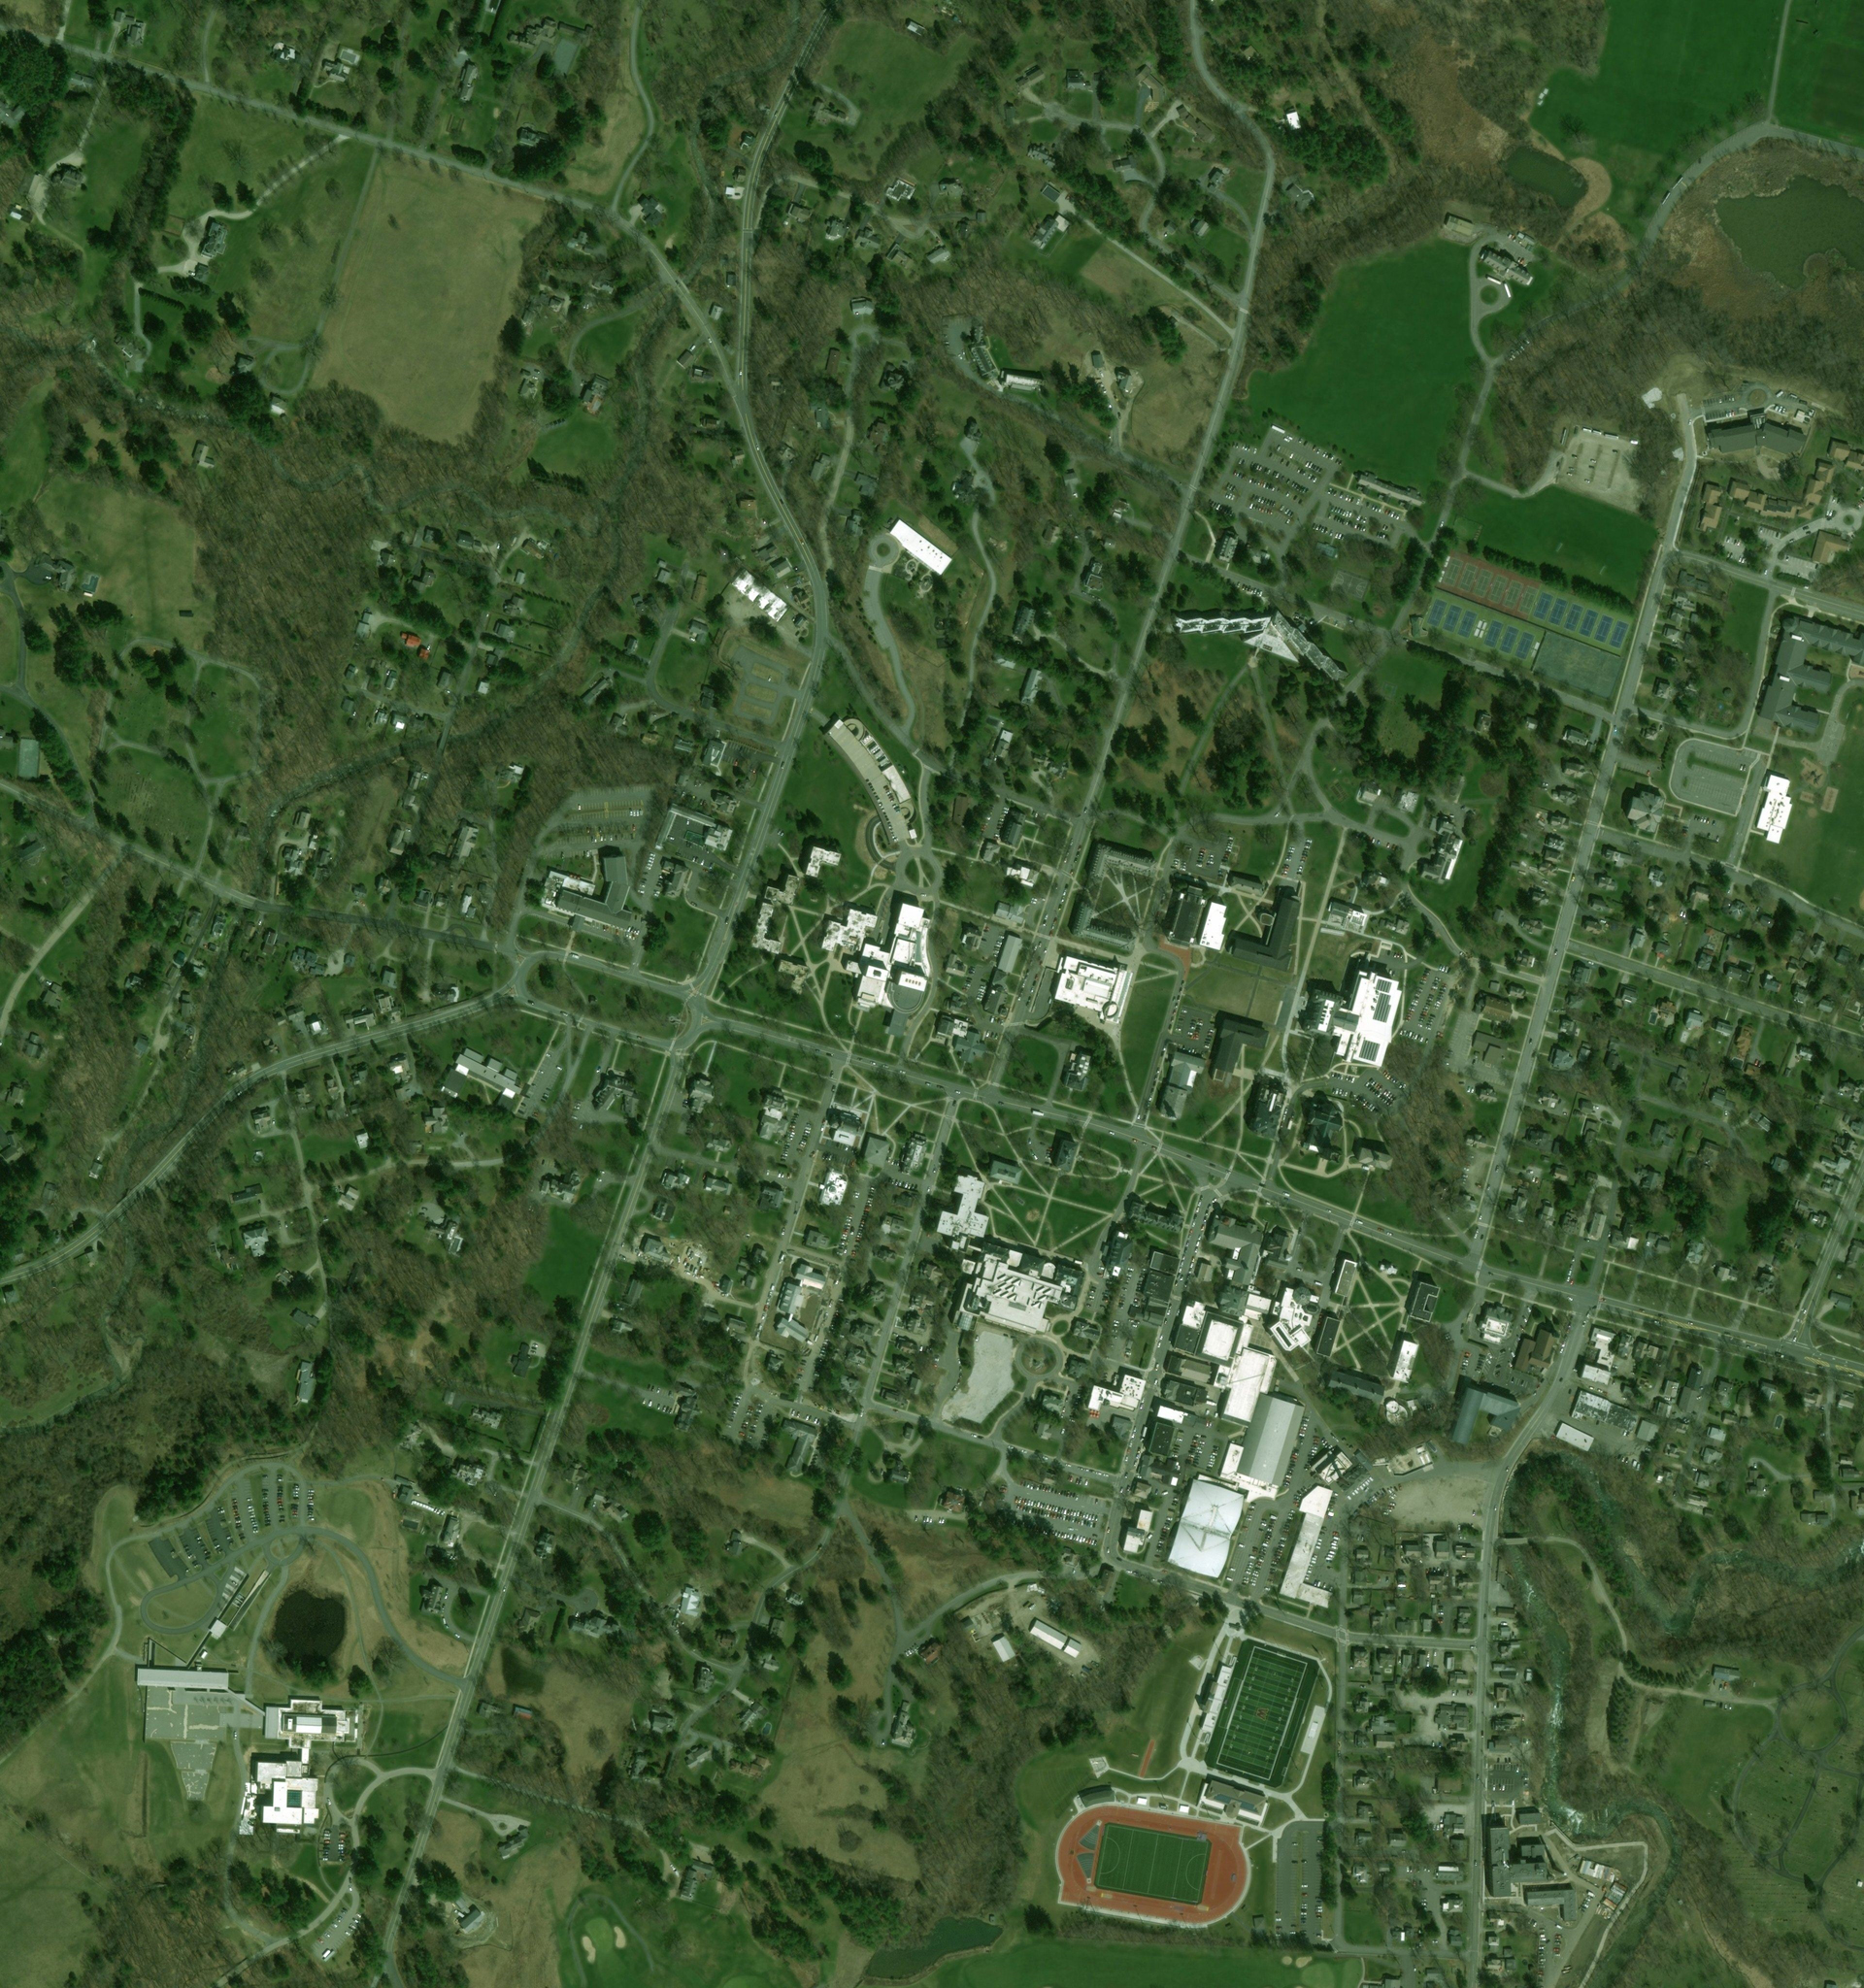
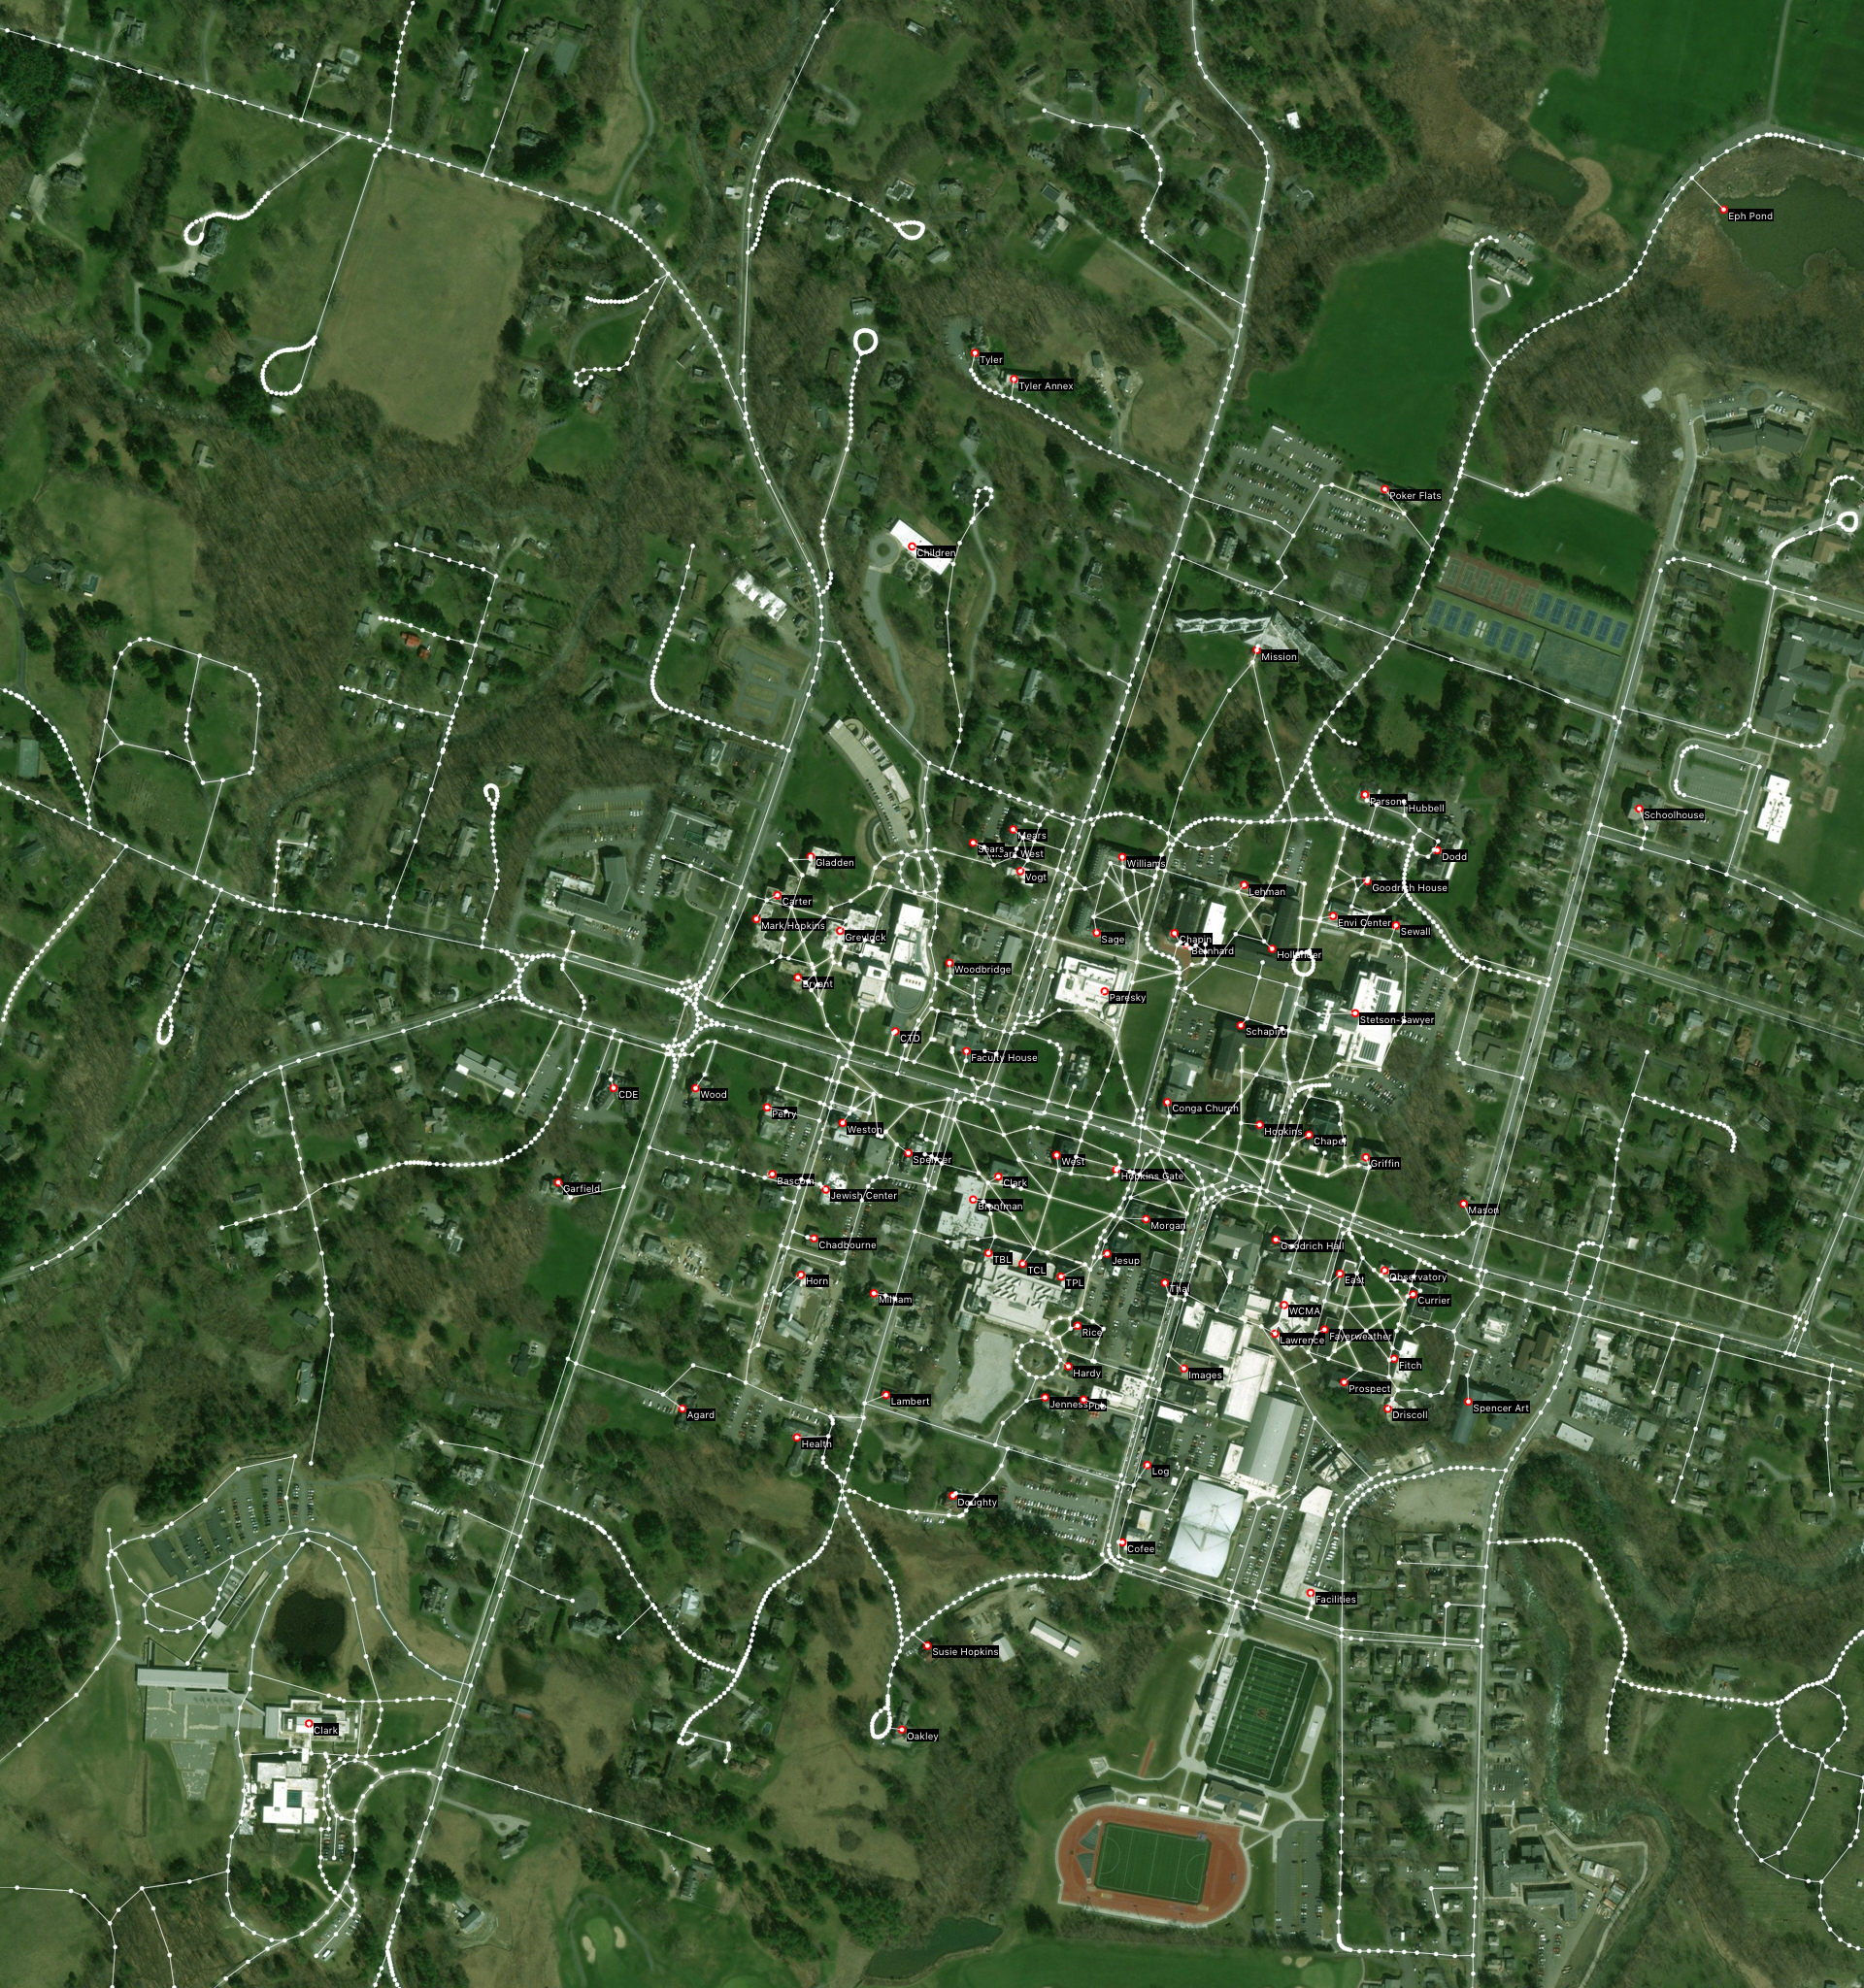
WilliamsCampus.jpg: a satellite image of campus. Here is a second version of that image, but with all paths and buildings highlighted. You will not directly use this image in your program but can use it to understand what the data represents and to verify your path output.
campus-buildings.json: a list of (most) buildings on campus. The JSON-encoded data has the following format:{ "buildings": [ { "abbrev": "CTD", "name": "'62 Center for Theatre and Dance", "location": { "x": 922.3237, "y": 1062.5458 } }, { "abbrev": "...", "name": "...", "location": { "x": ..., "y": ... } }, ... ] }where abbrev is the abbreviated name of a building, name is the full name of a building, and the location (x,y) is the location of the building in the image
WilliamsCampus.jpg. There may be spaces in the long name and/or abbreviation of a building, and the x and y values for locations should be treated asDoubleswhen you process the JSON data.campus-paths.json: straight-line segments of walking paths. For each endpoint of a path segment, there is a line in the file listing the coordinates of that point inWilliamsCampus.jpg, followed a list of endpoints to which it is connected with a path segment. Each endpoint also includes the distance of the segment between them in feet. Thus, the structure is as follows:{ "paths": [ { "start": { "x": 1347.3946, "y": 1119.3502 }, "ends": [ { "end" : { "x": 1351.3114, "y": 1118.5894 }, "feet": 11.4604 }, { "end" : { "x": 1343.9440, "y": 1120.3645 }, "feet": 10.3391 } ] }, { "start": { "x": 1060.0288, "y": 1415.9501 }, "ends": [ { "end" : { "x": 1067.5360, "y": 1418.9424 }, "feet": 23.2319 } ] }, ... ] }Some endpoints are building locations and will match the coordinates of an entry in
campus-buildings.json, but most are not.(Paths were extracted from the OpenStreetMap database, with some post-processing to convert them into a more readily used form. OpenStreetMap is available on the web, and the query I used to get the data for campus is: http://overpass-api.de/api/interpreter?data=[out:json];(way[“highway”](42.702545,-73.216439,42.721712,-73.195589);node(w););out;. Similar queries can fetch path data for any where you’d like.)
Problem 3: The Model
As described above, the model handles the data and contains the major logic and computation of your program. For this assignment, a key function of the model will be finding the shortest walking route between buildings. You will use your Dijkstra's algorithm implementation.
Problem 4: Testing You Model
As usual, your tests should be organized into specification and implementation tests for both the model and the UI.
It might seem annoying to have to write another test driver for this part, but remember: you should strive to automate all testing of each component. The good news is that once you complete this testing, writing the command-line app is very straightforward because you have already completed virtually all functionality.
You will specify the commands for your specification tests to run in *.test files with a similar format to previous weeks and Part 1 that has been tailored to the specifics of Part 2.
Each input file has one command per line, and each command consists of whitespace-separated words, the first of which is the command name and the remainder of which are arguments. Lines starting with # are considered comment lines and should be echoed to the output when running the test script. Lines that are blank should cause a blank line to be printed to the output.
The behavior of the testing driver on malformed input command files is not defined; you may assume the input files are well-formed.
To save time, we provide the skeleton of an appropriate test driver in CampusPaths/Tests/CampusPathsTests/SpecificationTests.swift and also several sample test files.
You will need to modify SpecificationTests.swift in four places to enable to create and interact with your campus maps model. The test driver initializes your model data structures and operates on them. The supported commands this week are the following:
Command:
BuildingsLists all buildings in the form
abbreviated name: long name, one per line. Buildings are listed in alphabetical order of abbreviated name.Buildings: Agard: Agard House Bascom: Bascom House ...Command:
Route abbrev_1 abbrev_2Prints directions for the shortest route between them. Abbreviations may have spaces in them. When specifying, abbrev_1 and abbrev_2 spaces will be replaced by
_.Route directions start with:
Path from Building_1 to Building_2:where Building_1 and Building_2 are the full names of the two buildings specified by the user. Route directions are then printed with one line per path segment in the following form:
Walk dist feet direction to (x, y)where dist is the length of that segment in feet, direction is a compass direction, and (x, y) are the pixel coordinates of the segment endpoint. Finally, the route directions end with
Total distance: x feetwhere x is the sum of the (non-rounded) distances of the individual route segments.
Distances and coordinates should be rounded to the nearest integer. (Hint: see
Double’s rounded() method).Each compass direction is one of E, NE, N, NW, W, SW, S, or SE and can be determined by computing the angle to get from the start point \((x_0, y_0)\) to the end point \((x_1, y_1)\). If our points were in the standard Cartesian coordinate system, we could simply compute the arctangent for those points:
\[ \arctan \frac{y_1 - y_0}{x_1 - x_0} \]
However, recall that \(y\) coordinates increase as we go down rather than up in a view. This is opposite from standard Cartesian coordinates. To accommodate that difference, we must adjust the above formula by negating the change in \(y\) values:
\[ \theta = \arctan \frac{y_0 - y_1}{x_1 - x_0} \]
Or in Swift:
let theta = atan2(y0 - y1, x1 - x0)You can then map \(\theta\) to a compass direction using the following rules:
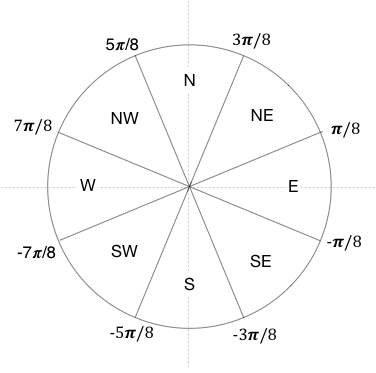
Points that fall exactly on a boundary between sectors should be given a single-letter direction (N, S, E, or W).
Finally, if one of the two buildings in a route is not in the dataset, the program prints the line
Unknown building: [abbrev]instead of any information about a path (there should be no line starting “Path from...”). If neither building is in the dataset, the program prints the line twice, once for each building. You may assume there is a route between every pair of buildings in the dataset; if not, the behavior is undefined.
Model Implementation Tests
Additionally, you should write implementation tests for every struct/class that is not part of the view or controller. You should also include implementation tests for important aspects of the view and controller that can be unit tested reasonably. You can skip parts that are not easily automated because they involve user interaction of complex displays, and avoid repeating cases that are covered by the specification tests.
Problem 5: Text-Based UI
These are the requirements for the text user interface, which should be written in Sources/paths/main.swft. Your program should begin each prompt with a blank line followed by the line:
Enter an option ('Help' to see the menu): Each prompt should end with a single space and no newline, so the user enters their input on the same line as the prompt. Each line of user input that your program reads from the standard input should be one of the following:
Buildings: This command should list all buildings in the exact same format as the unit tests above.Route: This command then prompts the user for the short names of two buildings, and then prints the path between those buildings. The prompts are of the form:Abbreviated name of starting building: Abbreviated name of ending building:There should be exactly one space after each prompt, to separate the user input from the output of the program. The user should input their desired shortName on the same line as the prompt. Your program should use Dijkstra’s algorithm to find the shortest path between those two buildings, then print the path out in the exact same format as the unit tests above.
Help: This command should print a menu that describes all the commands available in your application. The exact format is up to you.Quit: This command should quit the application. Exit gracefully by having your main code run to completation. Do not callabort(),exit(), etc.
Best Coding Practices
Remember to practice good procedural decomposition: each method should be short and represent a single logical operation or common task.
Store your data in appropriate types/structs/classes. In particular, you should not pack together data into a
Stringand then later parse theStringto extract the components.Remember that your graph should be completely hidden within the model. Classes that depend on the model (namely, the UI) should have no idea that the data is stored in a graph, not even from the class documentation. If you decided later to switch to a different graph ADT or to do away with the graph altogether (for example, by making calls to the Google Maps API to find paths), you want to be able to change the model without affecting the rest of the code, whose job has nothing to do with how the data is stored or computed.
As usual, include an abstraction function, representation invariant, and checkRep in all classes that represent an ADT. If a class does not represent an ADT, place a comment that explicitly says so where the AF and RI would normally go. You very well may find that you have more non-ADT classes on this assignment than in the past.
What To Turn In
Be sure to submit everything in the following checklist:
Part 1
GraphADT and SocialNetworks:
- All code and unit tests, updated for your generic graph implementation.
CampusPaths:
- All code and unit tests for Dijkstra’s algorithm.
Part 2
CampusPaths:
- All code and unit tests for your graph extensions and other model classes, as well as your campus paths app.
- Be sure any
extensions toGraphare documented according to our usual expectations for ADTs. CampusPaths/README.mdwith your answer to Question 1 above.
Grading Guidelines
This class emphasizes both program correctness and best practices, including programming style, documentation, specification, sound design principles, testing methodology, etc. Grading will reflect both of these emphases. There is, of course, some subjectivity when evaluating design and specification decisions, but your choices should follow the basic philosophies and methodologies we have been exploring. Labs will be graded on the following scale:
A+: An absolutely fantastic submission of the sort that will only come along a few times during the semester. Such a submissions reflects substantial effort beyond the basic expectations of the assignment.
A: A submission that exceeds our standard expectation for the assignment. The program must reflect additional work beyond the requirements or get the job done in a particularly elegant way.
A−: A submission that satisfies all the requirements for the assignment — a job well done.
B+: A submission that meets the requirements for the assignment, possibly with a few small problems.
B: A submission that has problems serious enough to fall short of the requirements for the assignment.
C: A submission that has extremely serious problems, but nonetheless shows some effort and understanding.
D: A submission that shows little effort and does not represent passing work.