Set Up Your Windows PC (Non-Linux Version)
Note
These instructions are for those that run into trouble with our initial set up. This version uses different software that is more-or-less the same for our purposes, but that may be easier to install on your Windows computer.
Throughout the semester, you should prioritize using the computers (in TCL 217A and TCL 216) to work on your lab assignments. All the utilities you need have already been installed on them, and they have been set up so students do not face any platform-dependent issues. However, you may also work on your personal computer and, indeed, must do so during the first week.
This document gives you instructions on how to set up your personal Windows computer.
If you face any problems, please reach out to the CSCI 134 staff before your first lab is due.
Note
Each person’s computer is different, and while these instructions work for most of them, there will inevitably be some unique issues and quirks that you may experience and learn how to workaround. If you encounter any such issues, please drop us a note.
Step 0. Verify Windows version
You must Windows 10 or later installed. If you have an older version, you need to upgrade it (for free).
You may wish to apply an updates to Windows before proceeding to ensure you have the
latest version.
Step 1. Install the Atom Text Editor
Install the Atom text editor. Download it from https://atom.io/ and follow their installation steps.
This will place a shortcut for launching Atom on your Desktop and then launch the editor.
It may ask whether you want to “Register as default atom:// URI handler?” – just click “No, Never”.
We won’t use Atom quite yet, so you can just close the program for the moment.
Step 2. Install Python
Install Python from the Windows Store by visiting the Python 3.9 for Windows page.
Proceed to install with the default options for any choices you have.
Step 3. Install the Git Source Code Control System
We will use Git to manage your source code for the labs, by downloading and running the Git for Windows Installer.
Installing Git can be straightforward, but the installer will present you with many options you can configure. Simply stick with default option, except for two specific features:
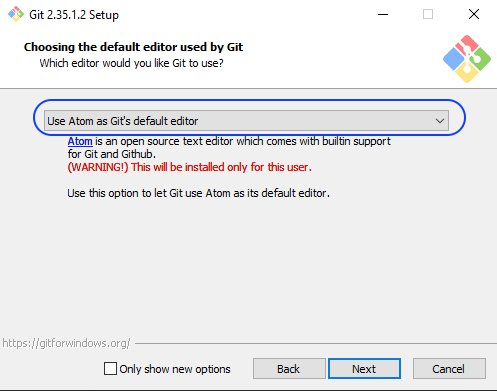
When you see the following dialog box to set Git’s default editor, choose “Use Atom as Git’s default editor” from the pop-up menu before continuing:
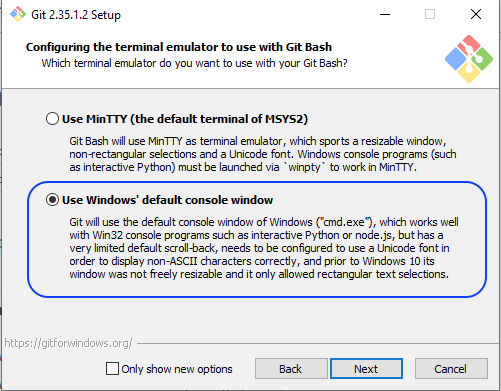
When you see the following dailog box to set the terminal emulator for Git Bash, chose “Use Windows’ default console window”:
The installer may open a web page containing “Release Notes” when it finishes. You can close that page.
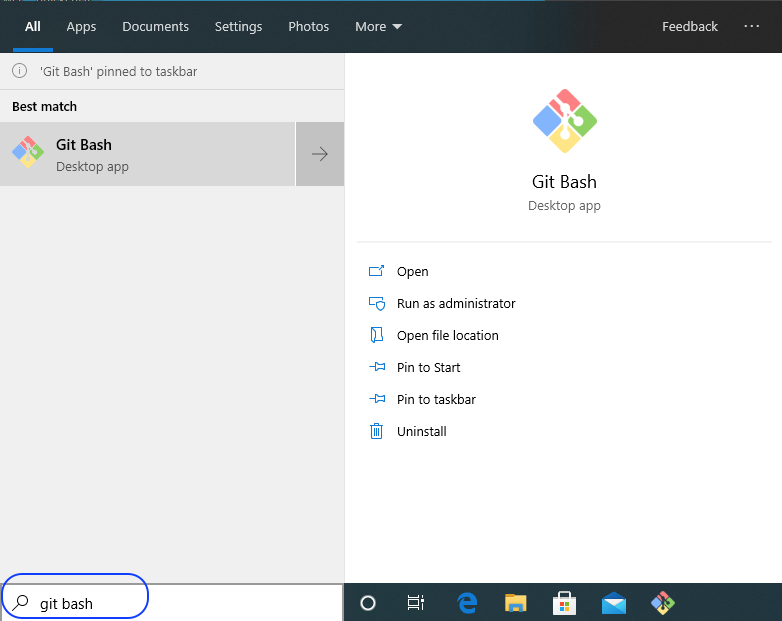
You can now launch your Terminal program by searching for “Git Bash” in the Windows search bar and opening that program:
You will see a window appear that looks like the following:
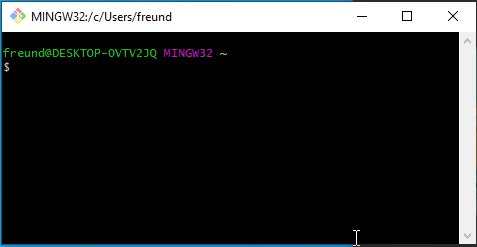
Below, we will provide you commands to type into this window to configure our software, run programs, and so on. Whenever you wish to work on labs in this class, your first step will be to launch “Git Bash”, which we refer to as “the Terminal” in most of our documents.
Step 2. Establish your CS credentials
Computer Science runs its own network of servers, with access limited to students with CS “credentials”. These credentials will be sent to you via email (with the Subject Line “Williams Computer Science Account Information”), and you are expected to change your password by following the instructions in that email. Notice that your CS username is slightly different from William’s username. Sharing your CS credentials with others is violation of the Honor Code.
To verify your credentials, type the following into the Terminal at the $ prompt, replacing
YOUR-USERNAME with your CS username.
ssh YOUR-USERNAME@lohani.cs.williams.edu whoami
You may get the following message back:
The authenticity of host 'lohani.cs.williams.edu' can't be established.

  ECDSA key fingerprint is ....

  Are you sure you want to continue connecting (yes/no/[fingerprint])?
This is normal whenever you access a machine for the first time. If this happens, type yes, and press return/enter.
You will be asked for your CS password: provide it. Note that for security reasons, you will not see anything you type (or the keyboard cursor move). After you enter, if the server prints out your CS username, then your credentials are working correctly. If you have trouble with establishing access, please email csaccounts@cs.williams.edu.
Step 3. Configure Git and Download Python Packages
Verify Git was successfully installed by typing the following the Terminal window:
git --version
It should report a version of 2 or later.
Next, you should configure git with your email and username. Execute
the following commands in the Terminal, replacing YOUR-WILLIAMS-ID@williams.edu with your Williams email address
and YOUR-CS-USERNAME with your CS user name.
git config --global user.email 'YOUR-WILLIAMS-ID@williams.edu'
git config --global user.name 'YOUR-CS-USERNAME'
git config --global push.default simple
git config --global pull.rebase false
git config --global core.editor "atom --wait"
At this point, we can also use the pip3 package installer to install Python packages that we will need this semester.
Run the following installation commands in the terminal to do that:
pip3 install jupyterlab
pip3 install matplotlib
This may take a minute or two. You may get some warnings – you can ignore them.
Step 6. Setup CS134 Folder and Clone the Lab 1 Repository
Now are you ready to create your CS134 directory where you can put all of your work during the semester. To do that:
Type the command
mkdir cs134(short for make directory). If you then run the commandlsto list the contents of your current directory, you should see the newly created cs134 folder.We can navigate into the folder by running
cd cs134(short for change directory). Since this is an empty folder right now, if youls, it will not show any contents.Now that you have created your cs134 folder, this is where you should always navigate to before you clone all your lab files.
To ensure that git can securely connect to the CS server, execute the following commands in the Ubuntu terminal:
curl -k https://www.cs.williams.edu/~cs134/evolene.pem -o ~/cs134/evolene.pem
git config --global http.sslCAInfo ~/cs134/evolene.pem
The above command downloads the certificate for evolene and ensures that git uses it whenever we exchange information with the server. Do not change or move the file
evolene.pem, or you will find you will no longer be able to connect to the server.Now we are ready to clone a test repository from Evolene. To clone you repository, type the following command, replacing
22xyz3with your CS username.git clone https://evolene.cs.williams.edu/cs134-labs/22xyz3/lab01.git
Here,
evolene.cs.williams.eduis the full name of the git server dedicated to holding our collective work. Thecs134-labsreference is the CS134 lab directory on that server, andlab01.gitis the name of the repository holding the starter files. It is the folder that contains all of your repositories on the server.You will be asked for your CS username and password.
You can now check that the folder has been created by running the
lscommand.
Step 7. Explore Your Repository
Use the command
cd lab01to navigate into the folder and explore its contents. Runlsto list the files that have been downloaded. You should see the filesAboutMe.txt,GradeSheet.txt,README.md, andhello.py.Whenever you begin a session of work, you should make sure you get the latest copy of your work. This is called pulling the repository from the server. You should:
git pull
Since we just cloned the repository, it’s unlikely that anything is out-of-date. Still, we always perform this simple check.
Before continuing with Lab 1, we need to tell you how to open a file like
hello.pyusing Atom. First, inside your terminal, type the following command to open a Windows Explorer Window showing the contents of your “home” folder:cd ~ explorer .You should see your
cs134folder inside that new window. You may wish to drag that folder and drop it between other folders in your quick access panel on the left side of the exporer window. That way you can find the folder easily in the future: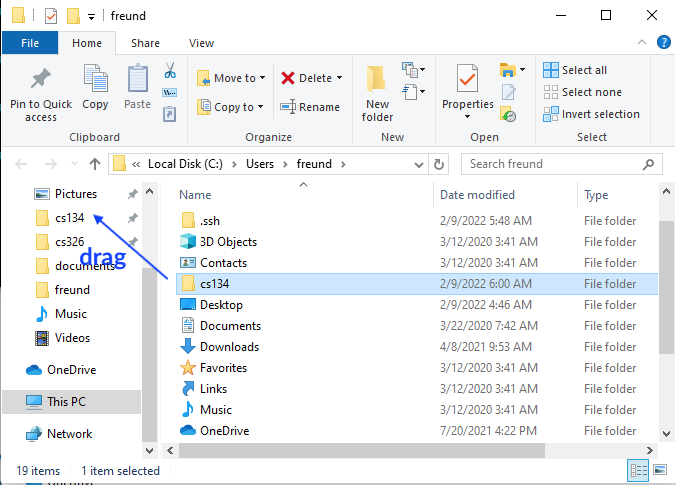
Now, open that folder, and then the
lab01folder inside it. Right click onhello.py, selectOpen with>Choose another app>More apps>Atomand checkAlways use this app to open .py filesto make Atom the default for.pyfiles.One last step and you’ll be ready to write some code… return to your Terminal window run the following command so that you are back in your
lab01directory:cd ~/cs134/lab01Type
lsto verify you can seehello.pyand the other files in that directory.
Back to Lab 1!
You’re ready to begin programming. Please continue with the Hello and Goodbye exercise from Lab 1.