Lab 8 : Utter!
Objective
- To develop a iOS app utilizing:
- seques between a number of view controllers;
- network communication and multithreading; and
- several auxiallary data structures to store the model.
- To gain experience using many new Foundation and UIKit classes.
Table Of Contents
Quick Links
Here are links to the specs for many of the classes you’ll be using:
- Foundation and UIKit:
- UtterKit:
Overview
This week you will hone your iOS UI development skills by extending the Utter! example from lecture with a number of additional features. The resulting app will include a number of MVC instances, custom controllers, and internal data models. We provide a list of required features for your app but leave many design, implementation, and user interface details up to you. As such, plan ahead and do not start implementing UI components and ADTs until you have a clear design in mind.
Problem 0: Project Setup
Clone the repository for this project, which comes with a workspace containing the
Uttercode from lecture, theUtterKitframework project, and also frameworks from Twitter itself.In your
AppDelegateclass, modify the delegate method called immediately after launching to set up UtterKit. Eventually this step will authenticate the app with the Twitter servers, but until you have the necessary API key and secret to do that, just start UtterKit with no keys. That will cause it to use some previously-downloaded canned data:func application(_ application: UIApplication, didFinishLaunchingWithOptions launchOptions: [UIApplicationLaunchOptionsKey: Any]?) -> Bool { // Run with the canned data (desribed below): UtterKit.start() // Run with a valid key to connect to Twitter: // UtterKit.start(withConsumerKey:"xxxxx", consumerSecret:"yyyyy") return true }You can grab a pair of keys from this Google Sheet – please just enter your name for the row you use so that I can keep track of which keys are in use. You can also create a developer account at Twitter and register a new app to acquire your own keys if you like.
Also
import UtterKitin that file. You will need to add that import in any file that uses UtterKit.You must also configure your app to allow plain-text http requests and to perform the authentication steps. We’ve done this with XCode’s “p-list” editor, but it is also possible to do it by directly editing xml. To do it that way, control-click on your app’s
info.plistand select “Open As -> Source Code”. You should see xml code similar to the following:<?xml version="1.0" encoding="UTF-8"?> <!DOCTYPE plist PUBLIC "-//Apple//DTD PLIST 1.0//EN" "http://www.apple.com/DTDs/PropertyList-1.0.dtd"> <plist version="1.0"> <dict> <key>CFBundleDevelopmentRegion</key> <string>$(DEVELOPMENT_LANGUAGE)</string> ... </dict> </plist>Immediately before the line
</dict>at the bottom of the file:<key>NSAppTransportSecurity</key> <dict> <key>NSAllowsArbitraryLoads</key> <true/> </dict>
Problem 1: Required Tasks
Enhance Utter! from lecture to highlight (in a different color for each) hashtags, urls, and user screen names mentioned in the text of each Tweet (these are known as “mentions”). Note that mentions are already located for you in each Tweet by Twitter and show up as
[Mention]sin theTweetclass in the UtterKit framework. You should familiarize yourself with the UtterKit documentation for these classes before writing any code.See the General hints and hints on NSAttributedStrings.
When the user touches a Tweet, segue to a new
UITableViewControllerthat has four sections listing the “mentions” in the Tweet: images, hashtags, users, and urls. The first section displays (one per row) any images attached to the Tweet (found in themediaproperty in theTweetclass). The last three sections list the items described in the previous task (again, one per row).See hints on UITableViewControllers and Showing Mentions and Images.
Here are two examples of the detail view to make it more concrete:
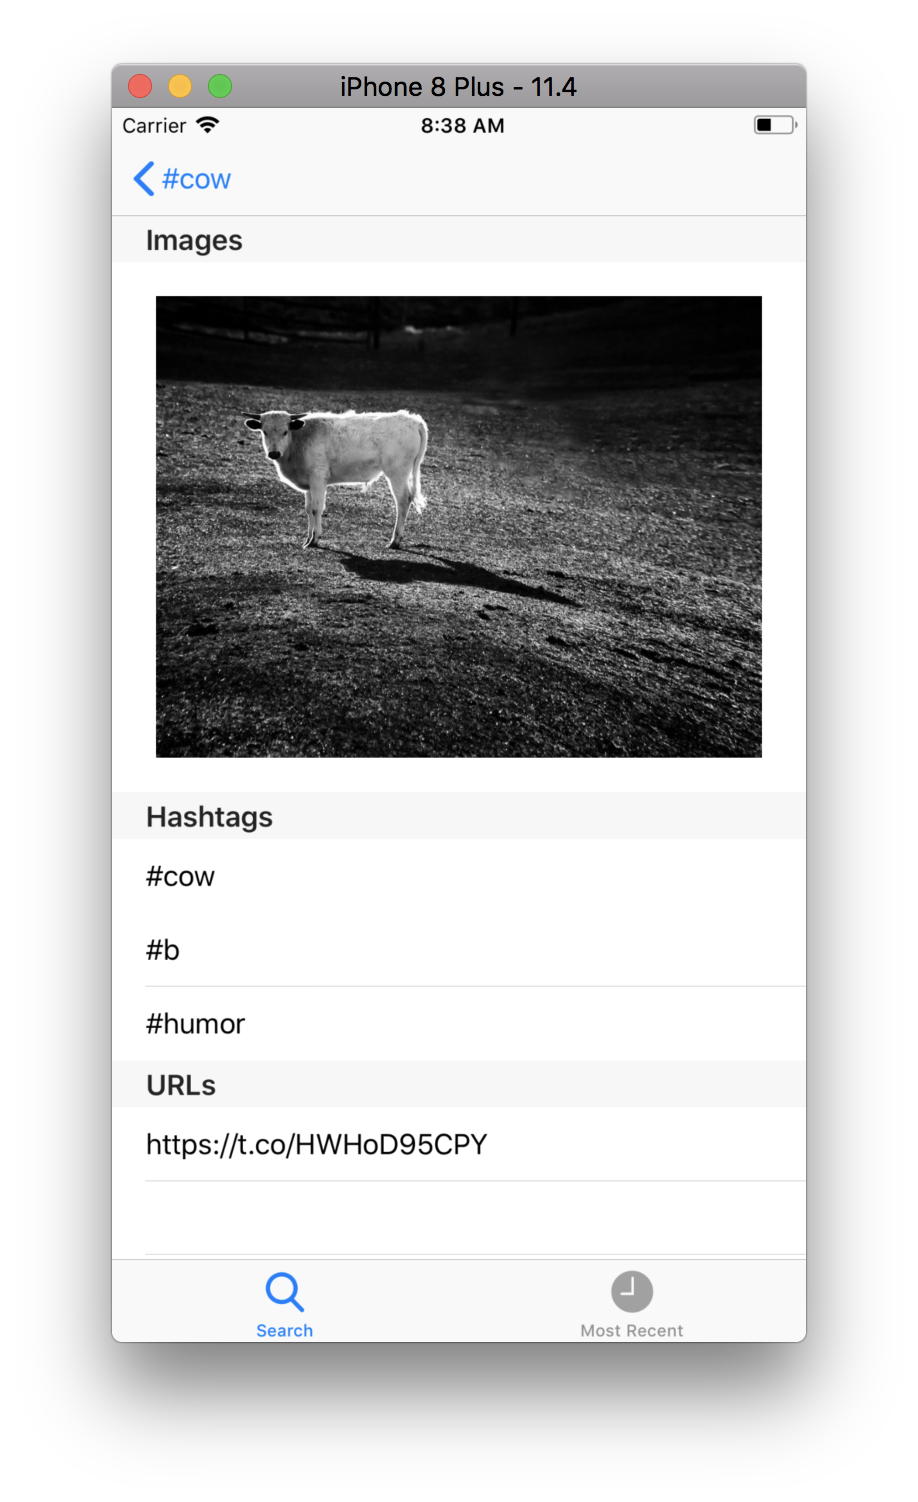
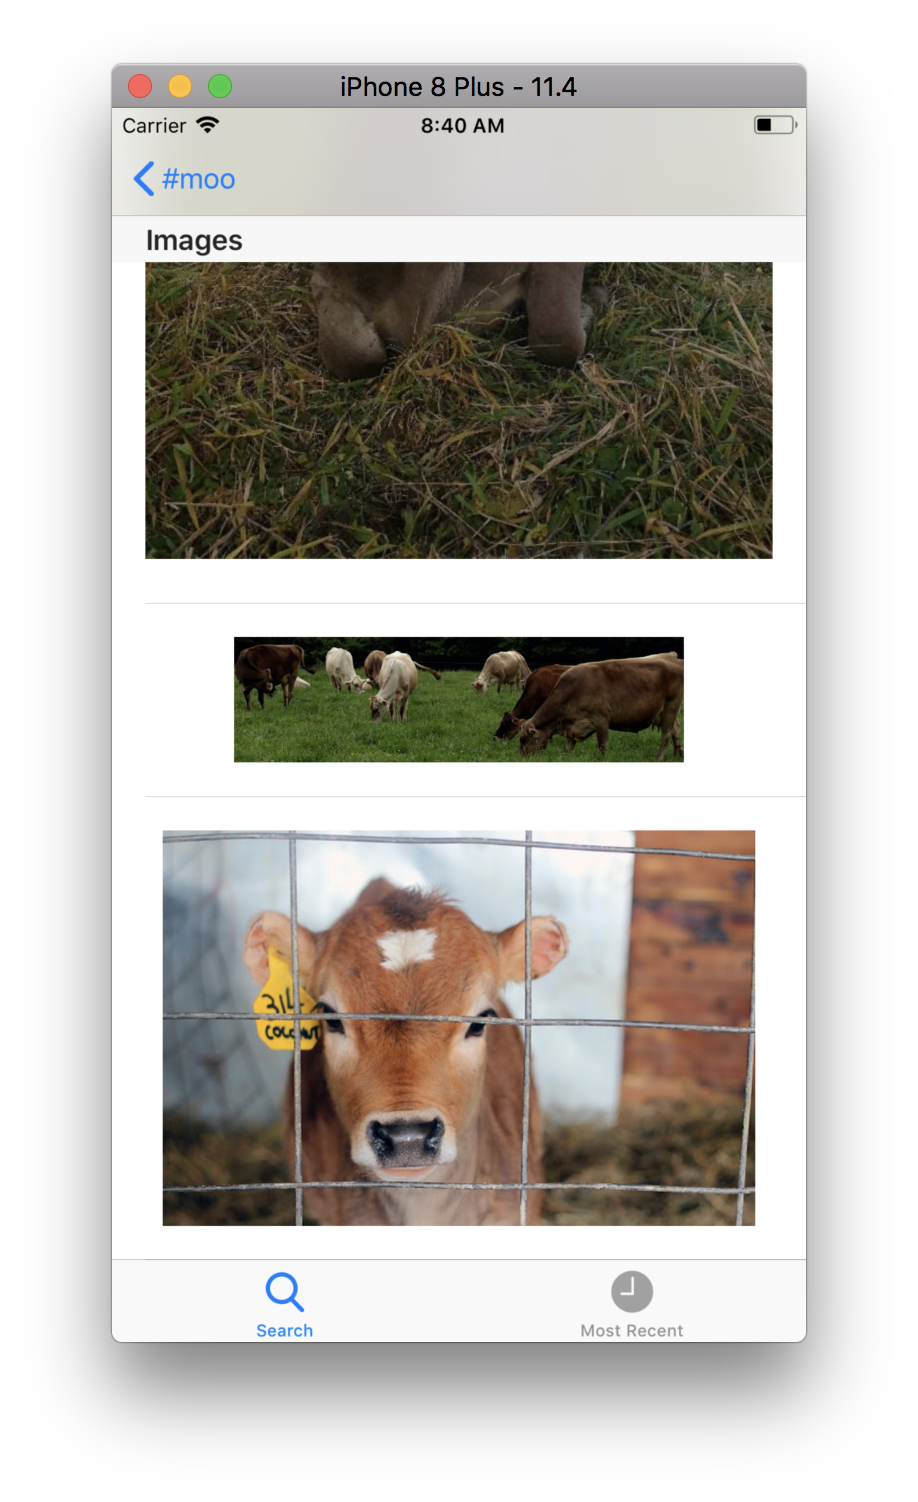
Each section in the mentions table view should have an appropriate header, but if a section has no items in it, there should be no header visible for that section.
Images in the table above should be shown in their normal aspect ratio and should use the entire width of the table view. (You may add a standard surrounding border if you like).
If a user touches an entry for a hashtag or a user in the mentions table view, segue to show the results of searching Twitter for that hashtag or user. It should be searching for hashtags or users, not just searching for a string that is the name of the hashtag or user (e.g. search for “#williams”, not “williams”). The view controller to which you segue must work identically to the main Tweet-viewing view controller (
TweetTableViewController).If the user touches on a mentioned url in your newly created view controller, you should open up that url in Safari.
See hints on Safari.
If the user touches on an image in your newly created view controller, segue to another new MVC that lets the user scroll around and zoom in on the image. When the image first appears in this new MVC, it should display zoomed (in its normal aspect ratio) to show as much of the image as possible but with no “whitespace” around it. The user can then scroll around and zoom from there. Note: My ImageViewController’s zooming code has a small bug in it — don’t worry about the zooming behavior.
See hints on Viewing and Zooming Images.
Keep track of the most recent 100 Twitter searches the user has invoked (by any means) in your application. Add a
UITabBarControllerto your application with a tab for searching (i.e. the functionality above) and a second tab showing these most recent search terms in a table view. The history should be case-insensitive with the most recent first. Also, no term should appear more than once in the history. When a user touches on a search term in this tab, segue (but stay in that same tab) to show the most recent Tweets matching that search term. Store these most recent search terms permanently so that your application doesn’t forget them if it is restarted.See hints on Search Term History.
You must not block the main thread of your application at any time.
See hints on Multithreading.
Your application must work properly in portrait and landscape on any iPhone. (This is an iPhone-only application).
Design and Implementation Hints
General
Examine the
UtterKitdocumentation before writing any code. The code is provided if you are curious, but you should be able to use the framework using only its public API. The only method you’ll ever need to call in the entire framework isfetchTweets. Beyond that, you will only access public properties out of theTweet,MediaItemandUserdata structures. You can completely ignore non-public parts of theUtterKitframework.The UtterKit data structures provided are
CustomStringConvertible, so you can print them out withprint. This might be helpful for debugging purposes. Many are alsoEquatableso that you can compare instances of those data structures in unit tests.(Minor) Caveat: Twitter may not always report every single mention (especially url mentions at the end of a tweet). As long as 90+% of the mentions are showing up in your UI, you are probably doing it right.
Be sure to understand the
UIViewControllerlifecycle, and the methods reflecting transitions:viewDidLoad,viewDidAppear, etc.Think about the titles of your MVCs (i.e. what appears in the navigation bar of a navigation controller when each MVC is being shown).
NSAttributedStrings
Most
UIKitclasses (likeUILabelandUIButton) have a propertyattributedTextwhich lets you set and get its text using anNSAttributedString(or, more likely, anNSMutableAttributedString).Here is a brief tutorial on attributed strings in Swift that may be useful.
Make sure you do not “break” the feature that currently exists in
Utterwhereby it shows Tweets using the preferred body font style (and thus the text in the Tweets can be made larger or smaller by the user in Settings).When indexing into an
NSAttributedStringcreated for a Tweet, you will want to use thensrangeproperty ofUtterKit.Mention(sinceNSAttributedStringindexes into an underlyingNSString, not an underlyingString).
UITableViewControllers
To add a
UITableViewControllerto your storyboard, just drag one out of the Object Palette and change its class to be a custom subclass ofUITableViewControlleryou create using “File → New → File…”.Your new “mentions” (and images) MVC has different “kinds” of things in each section. You might be tempted to deal with this with large if-then or switch statements in your
UITableViewDataSourceand navigation methods. However, a more appropriate approach is to create an ADT for yourUITableViewController– that is, a model class – that encapsulates the data (both the similarities and differences) in the sections. For example, such a data structure would enable you to write yourUITableViewController’snumberOfSections,numberOfRowsInSection, andtitleForHeaderInSectiondelegation methods as “one-liners”.When designing this data structure, don’t forget about Swift features like enums. Use Swift to its fullest.
Test your data model thoroughly before integrating it into the UI. See Testing below for hints on how to do this effectively.
Showing Mentions and Images
You will almost certainly need two or more
UITableViewCellprototypes in your storyboard. Give them different identifiers and dequeue an appropriate one incellForRowAt.Your new view controller’s row heights don’t need to be “estimated” like the row heights of the
TweetTableViewControllercontroller because you have very few rows and performance is not a consideration. Instead you will likely want to just implement theUITableViewDelegatemethodheightForRowAtto determine the appropriate height of each row. (See next two hints.)For your rows that contain an image, you’ll have to figure out an appropriate height depending on its aspect ratio and table width. For the other rows in your table, you can just let them automatically compute their own height by returning the constant
UITableViewAutomaticDimensionfromheightForRowAt.You can get the aspect ratio of an image in a Tweet without having to actually fetch the actual image from its url. See the
MediaItemclass in the UtterKit framework provided.One nice feature of your application is that if the user wants to zoom in on a Tweet’s image a bit without clicking on it to segue to the detailed image viewing MVC, the user can simply rotate the device to landscape. If you implement things properly, you’ll get this feature “for free” (i.e. no code required).
Safari
If you have a
URLnamedurl, you can open it in Safari like this:UIApplication.shared.open(url).Note that you will not need a segue in this case. I suggest defining the
tableView(tableView:, didSelectRowAt:)delegate method in your table view controller for this part.
Viewing and Zooming Images
The project includes your
ImageViewControllercode, augmented with support for the autozooming-to-fit behavior outlined above. You should not need to modify it - just create a view controller with that as its class and drag a scroll view out to connect to itsscrolleViewoutlet.UIKit likes to use translucent Tab Bars and Navigation Bars, so even if you zoom properly, some of the image may drawn beneath those items. This is fine. Those objects have “Translucent” properties you can uncheck in Interface Builder if you’d like to have opaque bars. In that case, no part of the image will ever be put under those components.
Optional: It would be great to make that autozooming-to-fit behavior continue to happen whenever the MVC’s view’s geometry changes until the user explicitly zooms with a gesture (there is a delegate method to find out when that occurs). That way it will autozoom-to-fit as the user rotates their device but not when they are actively changing the zoom scale themselves.
Search Term History
Note: I decided to add my
SearchHistoryto the starter project. It implements the functionality described in the next two items – feel free to use it for this part so you can focus on the other aspects of the lab.You program should maintain a single, global “truth” for the most recent search terms and, since you have to store them in
UserDefaultsto make them persistent anyway, you can make the persistent data stored viaUserDefaultsbe that truth. You will need to interact with history information in several places. To facilitate those interactions, you should define a small data structure that encapsulates storing and loading fromUserDefaults. You can then use that abstraction throughout your application.One simple way to do case-insensitive comparison is to convert everything to lower case with
String.lowercased()before comparing.
You can assume my code is correct. Unit test your history abstraction thoroughly before integrating it into the UI.
Multithreading
Data(contentsOf:)blocks the thread it is called from when invoked with a network url. Thus you cannot call it from the main thread.You cannot make any calls into UIKit from any thread other than the main thread. Be careful not to “accidentally” do this by calling some method which subsequently calls a method in UIKit. If you call a method from UIKit (directly or indirectly) off the main thread, your UI will fail in unpredictable ways.
The
fetchTweetsmethod can execute its handler off the main thread, so UIKit methods should no be called from the result handler you pass to it.Remember that the cells of a
UITableVieware only created for visible cells and they are reused as data comes on screen and goes off screen.If you are fetching in a thread other than the main thread and then get the result and then want to ask the main queue to do something with that result, you’d better be sure nothing has “changed” while the network call was going on (especially note this with respect to the Hint immediately above this one).
It is sometimes useful during testing to insert long delays for network downloads to ensure your code works properly. While not the most robust way, one way to do this is to use
sleep(n)to pausenseconds. For example, a strategically placedsleep(5)in your code to fetch an image can help you verify that the app does not hang during long downloads. Be sure to remove anysleeps — or use a “debugging” flag to turn them off — before submitting.
Problem 2: Testing
You are responsible for specification and implementation testing of your code. We suggest several strategies below.
Specification Tests
Recall that these tests should validate your code against the specification, both at the level of units and at the level of the whole system.
Data abstractions
There are at least two one internal data structures with clearly defined specifications: 1) the model for the details view table and ~2) the search history~. The specifications for both of these should be documented and the implementations tested via unit tests. When designing an app like Utter!, it is useful to be able to use some small data sets to avoid relying on the Twitter universe to provide effective, comprehensive, and reproducible test data. UtterKit is designed to provide such “canned” test data, as described below.
The Utter project does not have an existing unit test target for you to use. To add one: 1) Select the Utter Project in the Project Navigator. 2) Then chooise “File -> New Target…” from the menu bar. 3) Choose “iOS Unit Testing Bundle” and click “Next”. 4) In the dialog box that pops up, name the product “UtterTests” and be sure the target to be tested is “Utter”. 5) Click “Finish” and you will then have a unit testing bundle similar to all the ones we’ve previously used.
UI components
UI behavior is more difficult to specification test automatically, but you should still strive for a systematic testing strategy. You may follow the approach from last week to do this: For each of the required UI tasks, design a short sequence of steps to validate the behavior of your app on the provided sample data. That is, starting at launch, what do you touch, drag, zoom, etc. to demonstrate the required feature is correct, and what is the expected outcome of those steps?
For some required tasks, you may wish to have multiple tests. Others – like not blocking the UI thread – may be hard to test like this. You can skip that one and other similar requirements. These “use case” test scripts help you specify the overall behavior of the system and ensure you have completed all features, reproduce problems if they arise, and that you have not regressed after making changes.
Keep in mind that a good specification test should work on any Utter! app that meets the requirements, and not just yours. You may wish to design these scripts even before you begin coding. You can assume your internal ADTs works properly when writing them to avoid unnecessary duplication of tests.
- Add appropriate test scripts for the required task to an
Utter/README.mdfile. (Keep them short so they are not a burden to run!)
Regressions
Also, any time you identify a defect in your app’s behavior, write the sequence of steps that led the problem before changing any code. When the code has fixed, note what was changed.
- Also add any additional specification tests you design in response to specific bugs you detect during development and what changes were performed. (Again, keep this short and to the point.)
Implementation Tests
Additionally, you should write implementation tests for any parts of the code that are not directly tested by the specification tests. This includes any important aspects of you data structures or controllers that can be unit tested reasonably. Depending on your code, there may be little to do in this category.
Canned Data
UtterKit enables you to create and use canned data during testing in two ways:
UtterKit.createFakeTweets()returns an array of pre-defined “fake” Tweets for you to use in your unit tests. The data for the tweets is in the workspace fileUtterKit/UtterKitt/FakeTweets.jsonif you’re curious.Calling
UtterKit.start()without any arguments configures the framework to return the “fake” Tweets for any request. However, you will get real, previously-downloaded data for a few terms:@BarackObama@realDonaldTrump@taylorswift13#cow#swift#williamspurplecowberkshires
For these terms, I downloaded tweets once per minute for 15 minutes. (The tweets are a couple years old at this point but are still fine for our purposes.)If you search for any of them, you can refresh 15 times before running out of real data and reverting to the fake tweets.
Best Coding Practices
The coding in this lab is more focussed on UI design and less on sophisticated data abstractions, but follow all of the best practices regarding abstraction, decomposition, documentation, etc.
Of particular note, give solid thought as to what constitutes the public API of all classes/structs, including UI elements. Make all non-public API elements private.
As usual, include an abstraction function, representation invariant, and checkRep in all classes that represent an ADT. You very well may find that you have more non-ADT classes on this assignment than in the past.
Extensions
There are lots of ways to extend this project. Here are a few ideas:
In the Users section of your new
UITableViewController, list not only users mentioned in the Tweet, but also the user who posted the Tweet in the first place.If you have built a good internal data structure for your section data, hopefully this is just a matter of enhancing an init() method for that internal data structure.
When you click on a user in the Users section, search not only for Tweets that mention that user, but also for Tweets which were posted by that user.
You will want to familiarize yourself with the “operators” in Twitter search queries.
The UI of this application can get very deep into a UINavigationController stack as you chase mentions down. Add a feature to the UI that allows the user to pop all the way back to the rootViewController of the UINavigationController at any time.
The “pop back” UI should obviously not appear when you are at the root view controller.
Instead of opening urls in Safari, display them inside your application by segueing to a controller instead. You’ll have to provide at least a little bit of “browser control” UI to go along with it (e.g. a “back button”). Remember that UINavigationController can display buttons at the bottom as well via the toolbarItems method in an embedded MVC.
Check out the documentation for UIWebView or SFSafariViewController.
Make the “most recent searches” table be editable (i.e. let the user swipe left to delete the ones they don’t like).
When you create a
UITableViewControllersubclass, the template will include some methods to help with this.Anything else you can think of.
Add a brief description of any extras to your README.md file so we know what to look for.