Lab 7 : Photomosaics
Objective
- Implement a data structure that uses delegation and a small hierarchy of related classes.
- Create an iOS app with multiple MVCs.
- Install and run an app an actual hardware device.
Use several new UI components and APIs:
- UISplitViewController
- UIImageView
- UIBarButtonItem
- UIAlertController
- UserDefaults
- Photo Library and camera API.
Table Of Contents
Partners
You’ll be working with a new partner for this project.
Before Lab
Read this handout completely.
This app builds on many existing components. Be sure to think about how they fit together. Some parts may not require very much code, but a good design will be essential. It will be useful to sketch out designs for the
FeatureVectorandPhotomosaicclasses for Problem 1 before lab.
iPhones and iPads
This handout includes instructions for how you and your partner can load your app onto a real device. Feel free to experiment with that if you’d like.
Overview
Here are three images of my favorite dog. If you squint a bit, they may look the same, but they are quite different if you look carefully. (Clicking on an image brings up a full scale version.)

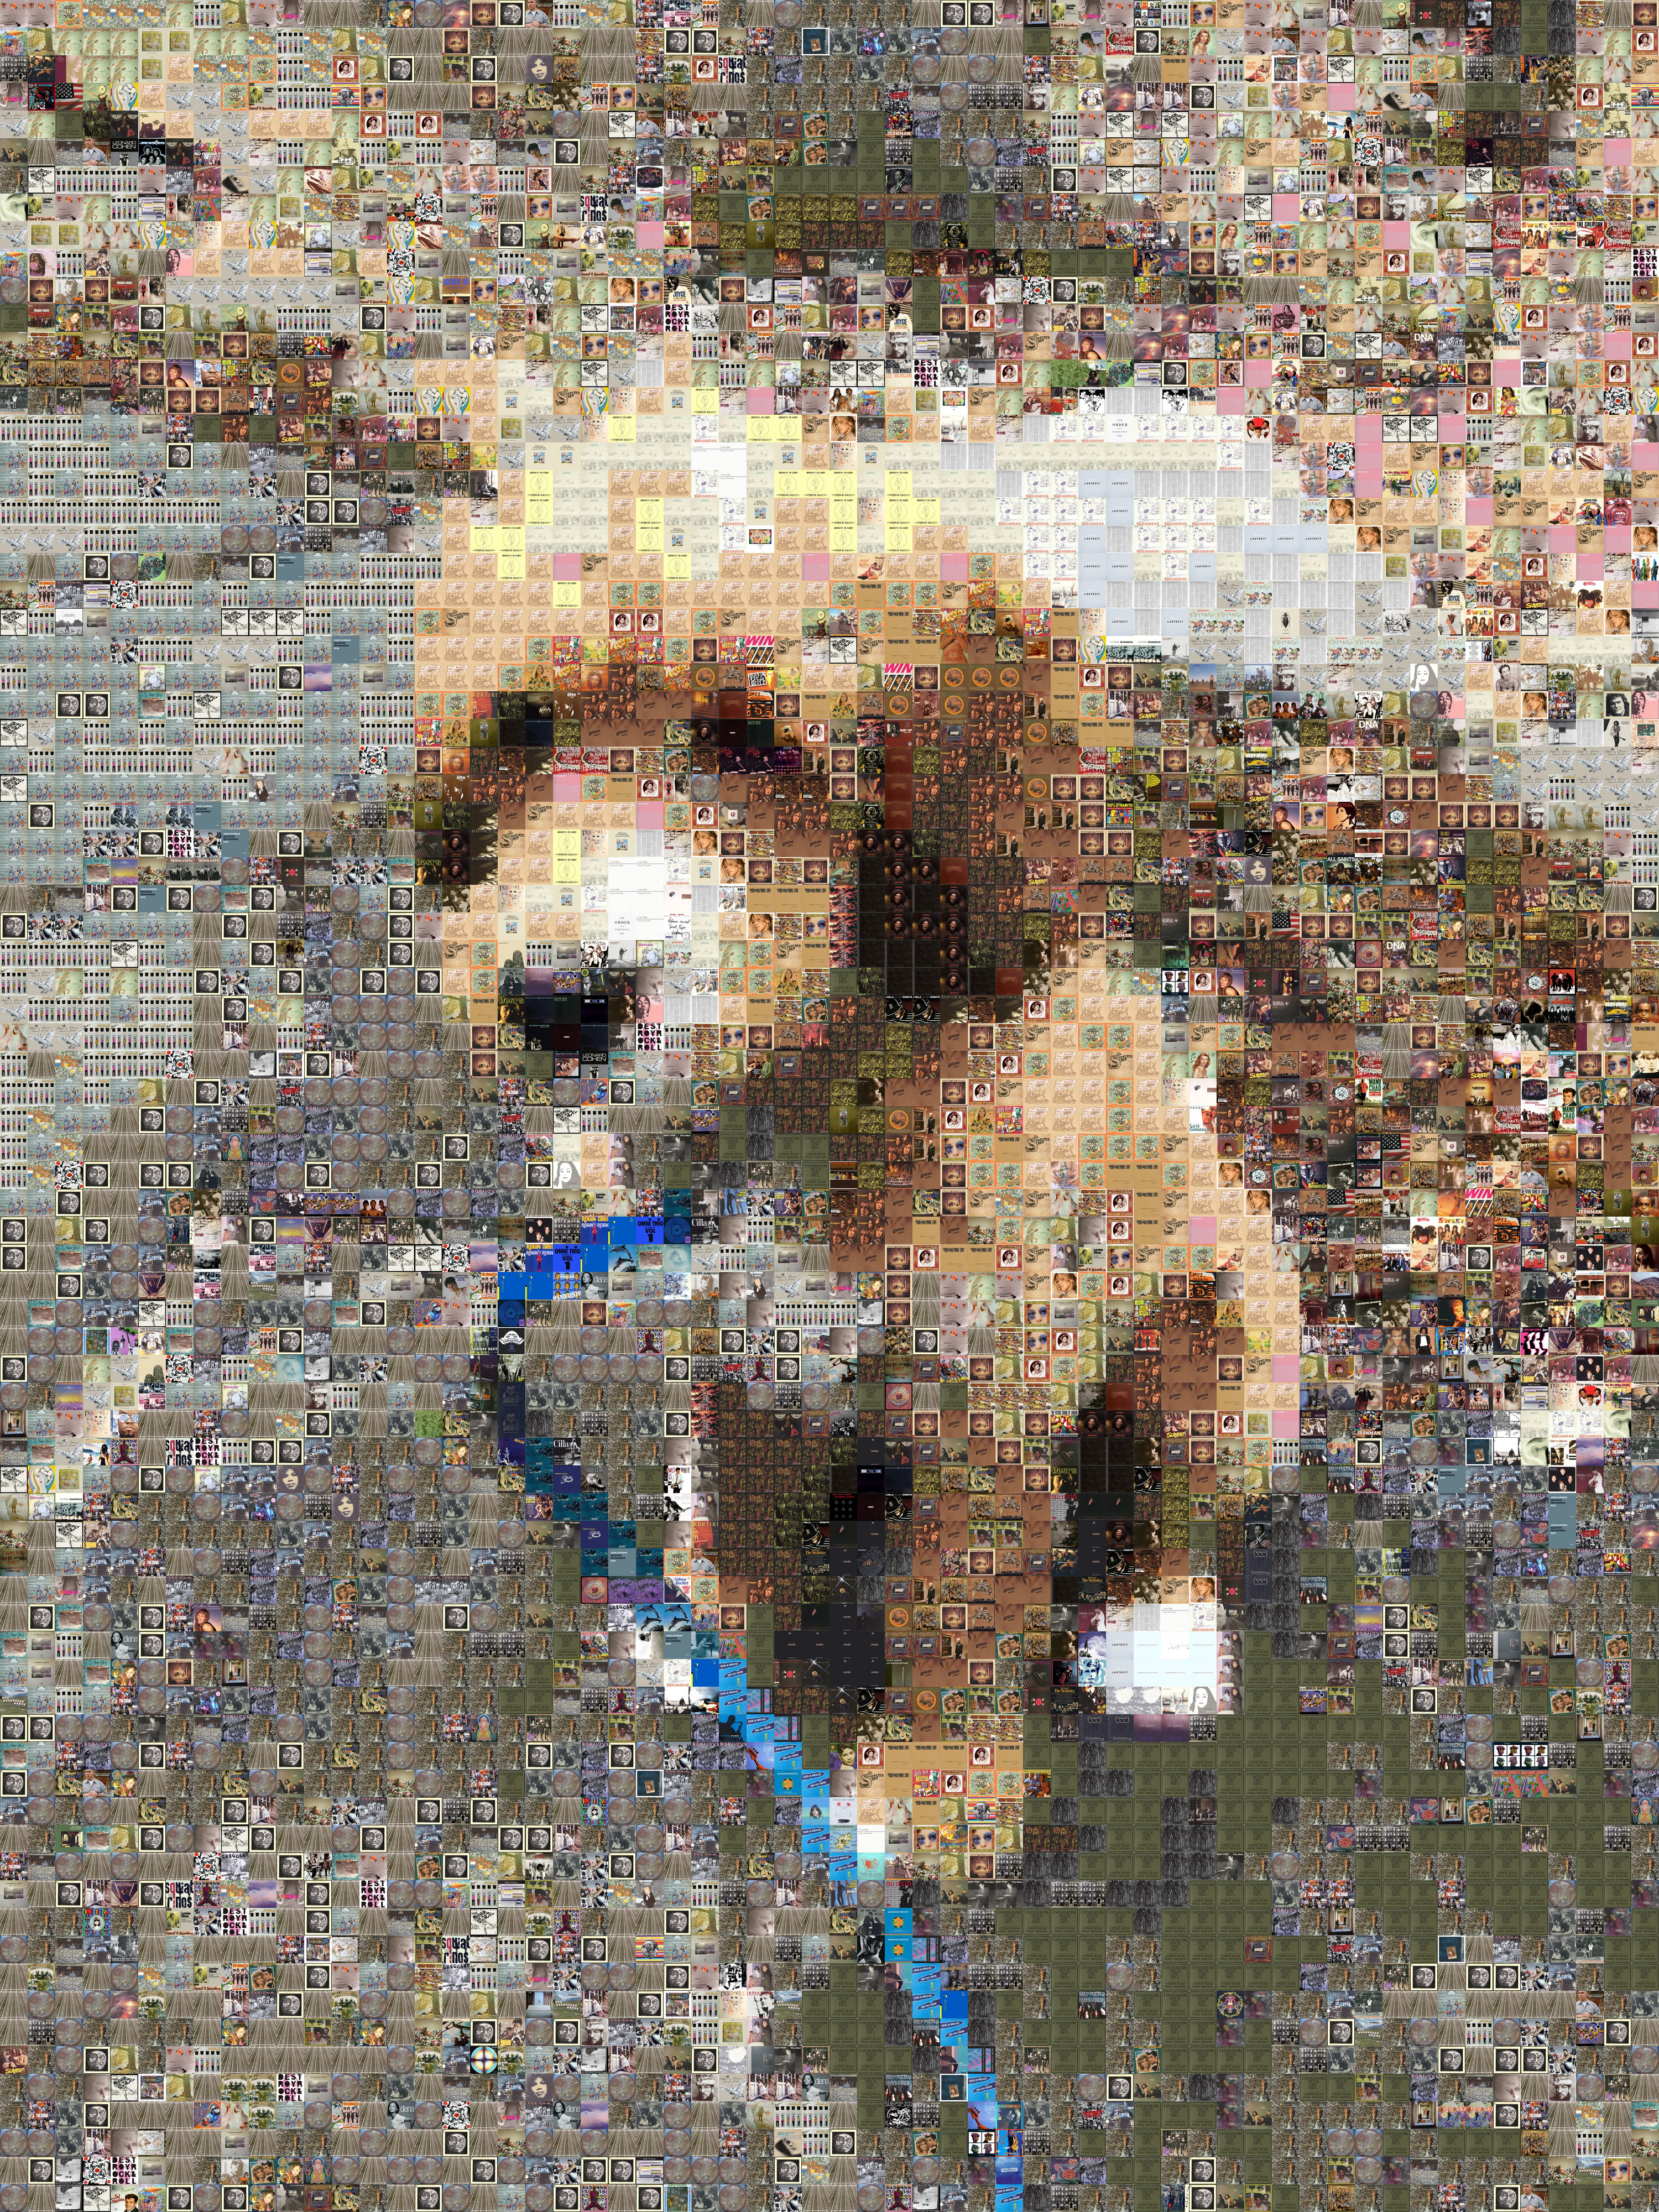
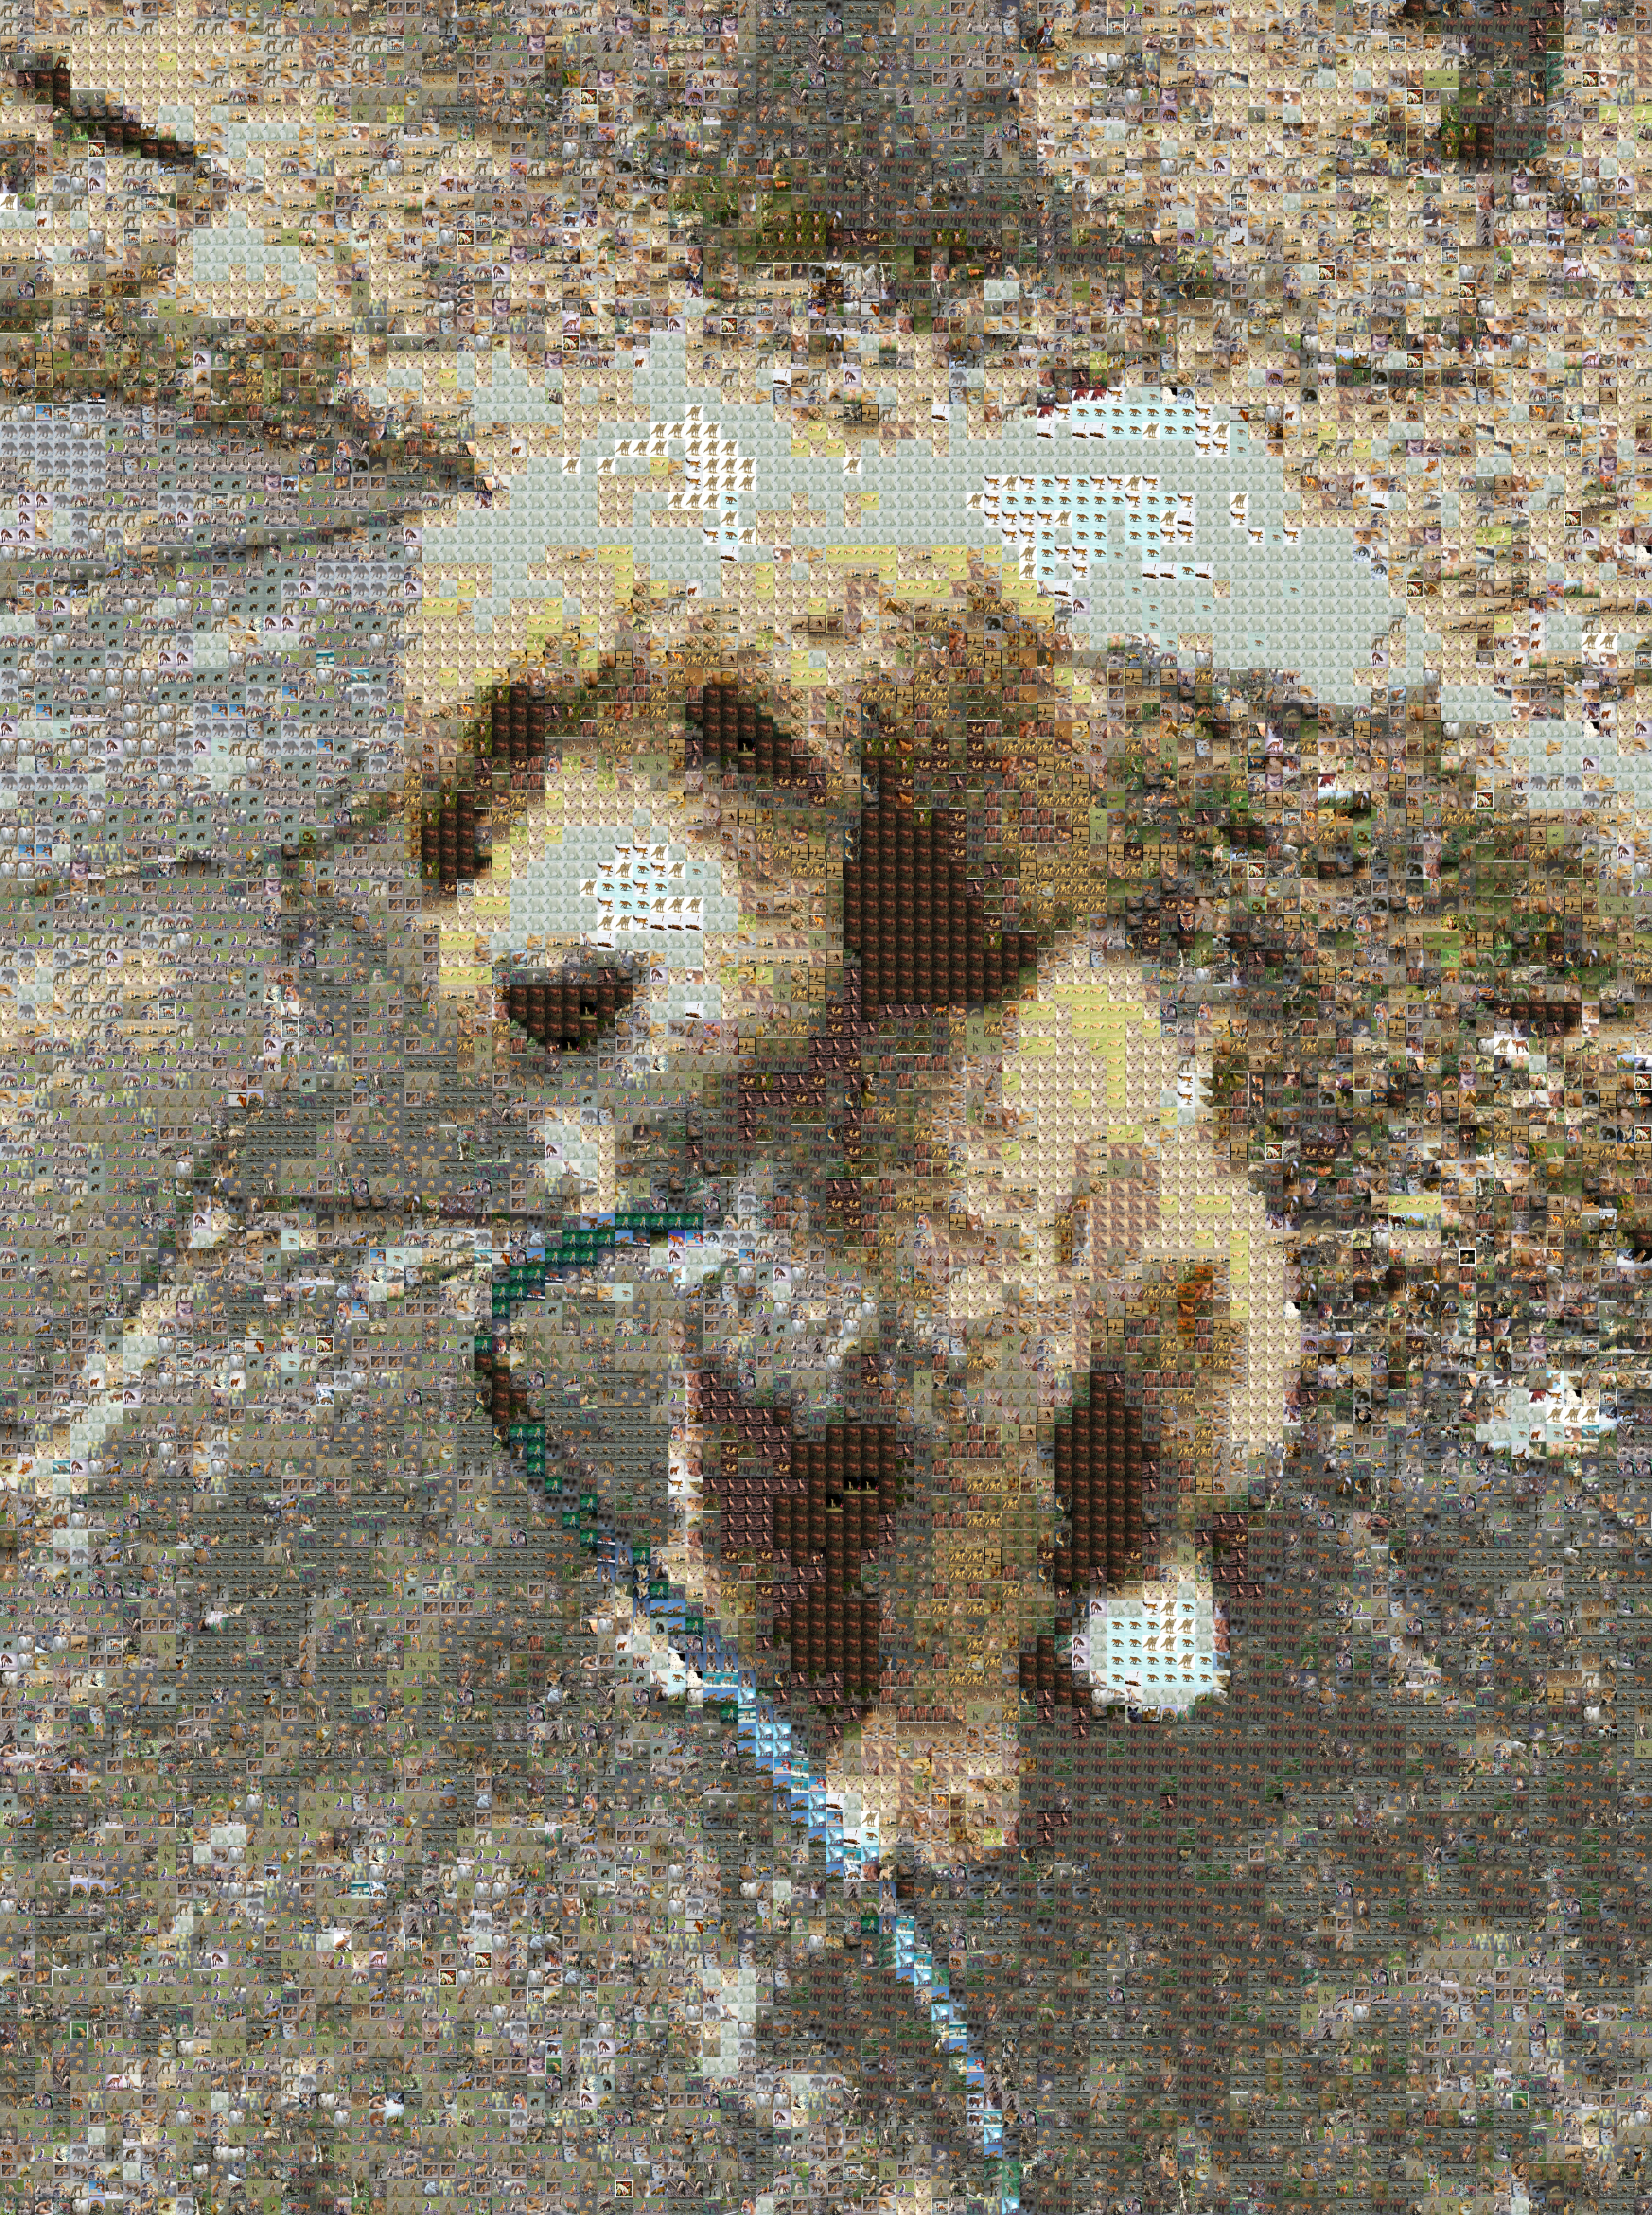
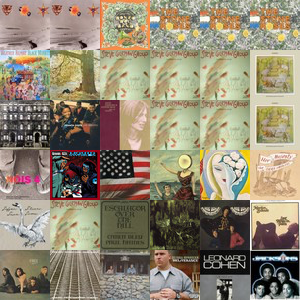
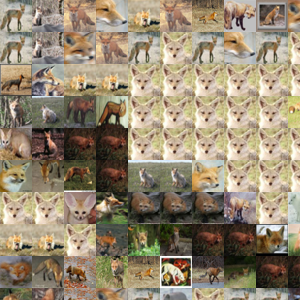
The second and third are Photomosaics of the first. A photomosaic is created by partitioning an image into small tiles and then replacing each tile with a photo that resembles it. For the middle image, each tile is replaced by the cover art from one of 1,000+ music albums that most closely matches the original tile. For the third, the replacement photos are drawn from a collection of 500 pictures of foxes. If we zoom in on the top-left corner, we can see the mosaics in more detail:

You will build a photomosaic generator iOS app this week. Before diving into the design and implementation plan, a little background…
Photo Similarity
The basic question we need to address to create photomosiacs is, given a target photo (or a small part of a photo) and a collection of candidate replacements, which replacement is most similar to the target?
We first develop a notion of similarity for black-and-white photos, which we represent as two-dimensional arrays of pixels. Each pixel has an intensity between 0 (black) and 255 (white). Given two \(n \times n\) pixel arrays, we would like to compute a similarity score in the range 0 to 1, where 0 indicates that the two photos are identical, and 1 indicates that the two photos are as different as possible. (We could pick any range for similarity scores, but sticking to values between 0 and 1 is convenient and somewhat standard.) One simple way to compute photo similarity is to compute the similarity between each corresponding pair of pixels and then average those similarities. Give arrays \(p_1\) and \(p_2\):
\[ Similarity(p_1, p_2) = \frac{\sum\limits_{x,y \in [0,n)} \left| \frac{p_1[x][y] - p_2[x][y]}{255} \right|}{n^2} = \frac{\sum\limits_{x,y \in [0,n)} \left|\ p_1[x][y] - p_2[x][y]\ \right|}{255 \cdot n^2} \]
We divide by 255 to normalize to the [0,1] range. This metric and produces good results, but takes \(O(n^2)\) time and is not scalable enough for producing photomosaics like the ones of Wally above, which require millions of similarity tests. To make the similarity computation more tractable, we will use a strategy where we pre-compute a summary for each photo by extracting one or more key features and then base similarity on how similar those features are. For black-and-white photos, we can begin by extracting a single feature from each photo, namely the average pixel intensity over the whole photo:
\[ Feature(p) = \frac{\sum\limits_{x,y \in [0,n)} p[x][y] }{255 \cdot n^2} \]
We again normalize features to be in the range 0 to 1.
To compute the similarity of \(p_1\) and \(p_2\), we then just compute the difference between the extracted feature:
\[ Similarity(p_1, p_2) = | Feature(p_1) - Feature(p_2) | \]
Note that computing the features of an $n n photo is still \(O(n^2)\), that cost is only paid once. All subsequent similarity tests are \(O(1)\).
Quadrants and Feature Vectors
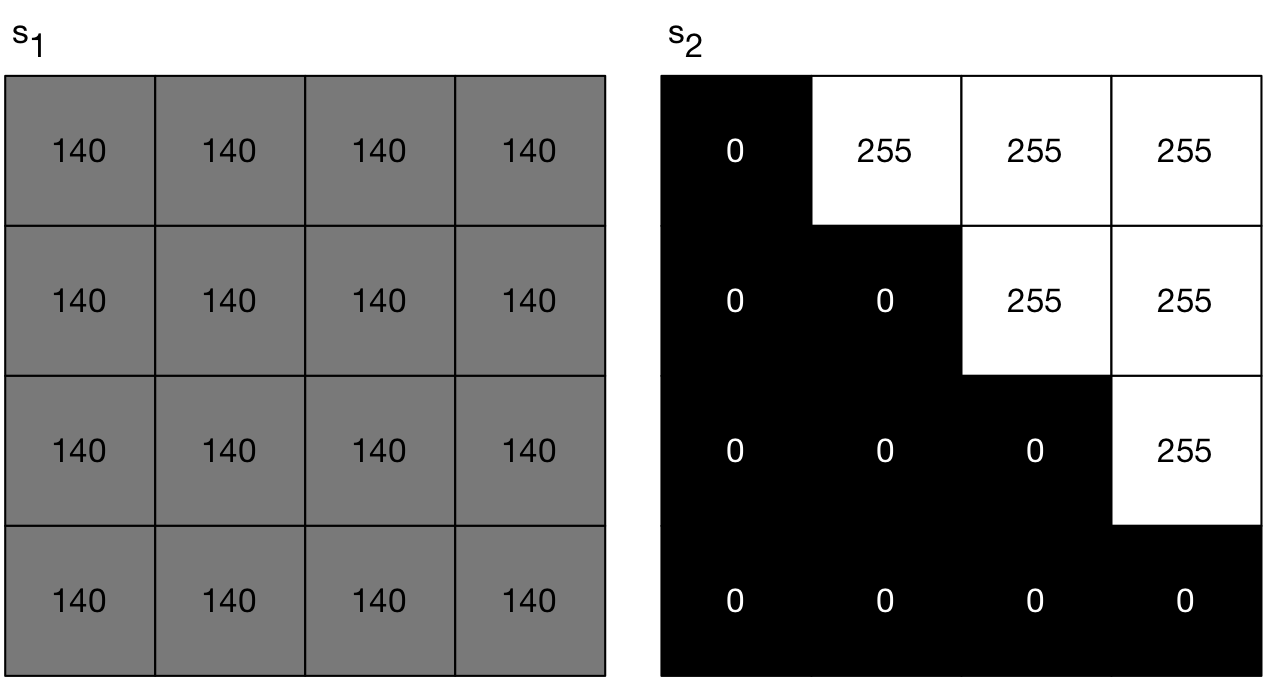
The above single-feature similarity metric works, but it does not produce great results because it is fairly course. For example, the following three 4x4 photos all have the same average intensity of 0.62:
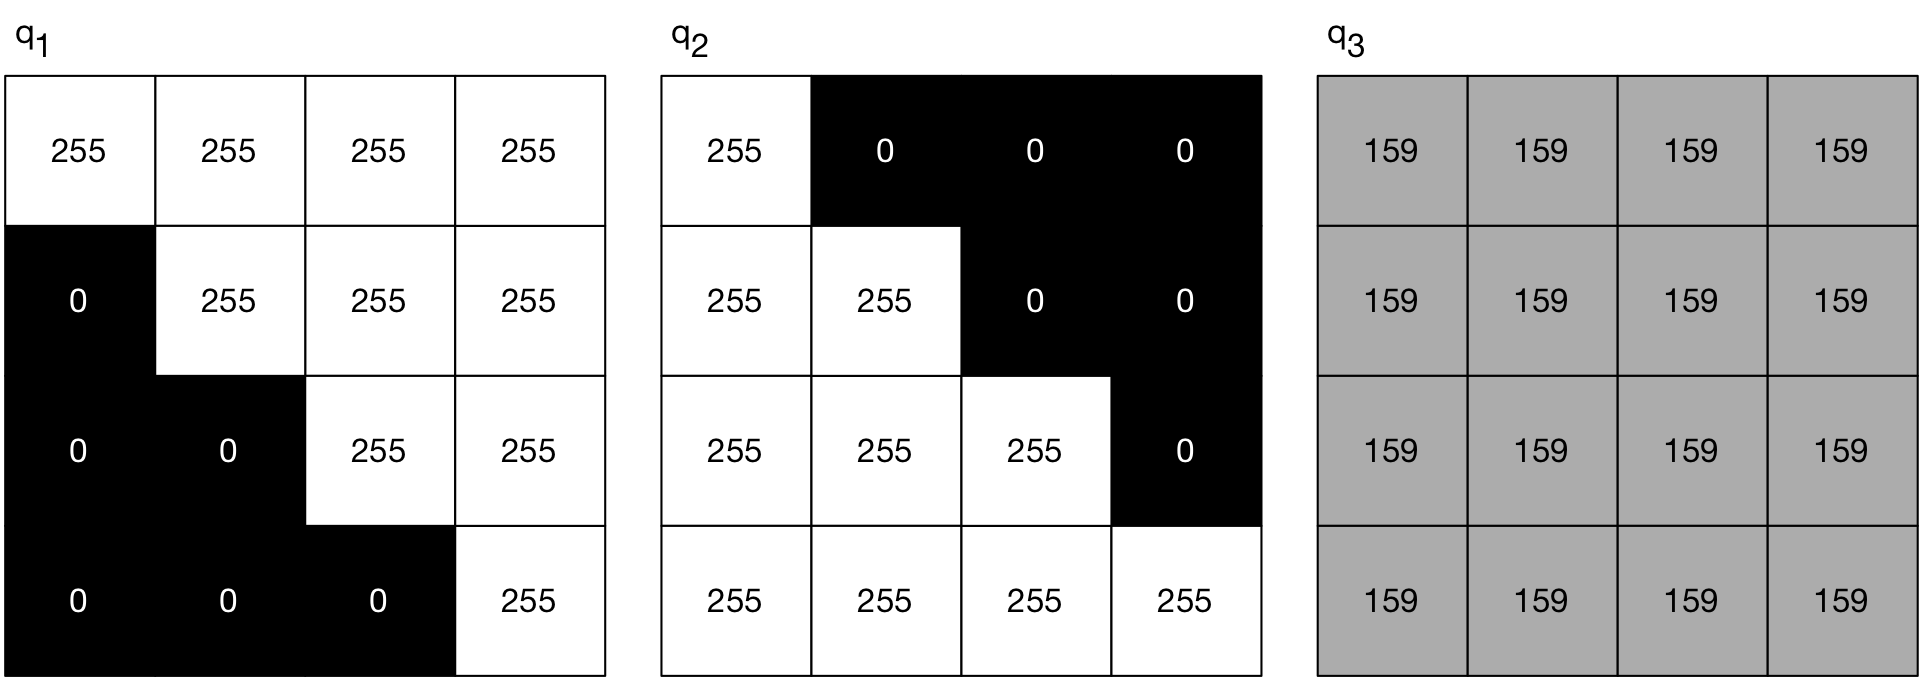
If we were to use those three photos as candidate replacements for \(s_1\) below, which has average intensity 140/255 = 0.55, they would all have a similarity score of \(0.07\) and thus be considered equally good choices, even though we can see that \(q_3\) is the “best” match. Similarly, \(q_1\), \(q_2\), and \(q_3\) are all equally similar to \(s_2\), but \(q_1\) definitely seems like the best option.
To regain some of the precision lost by using feature extraction, we can extract not just one feature but four from the photos, each representing the average pixel intensity for one quadrant of it. For the above photos, we would get the following features, which we write as the feature vectors shown below the images:
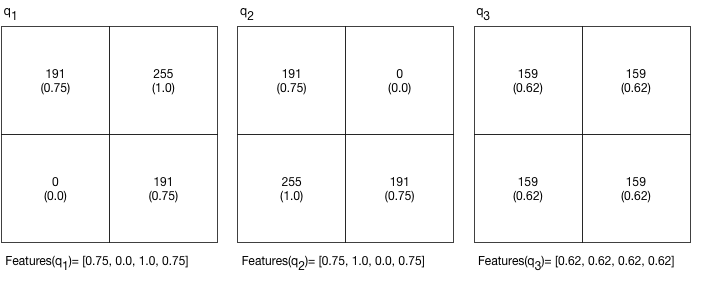
We order the four features within the vectors as follows: [top-left, bottom-left, top-right, bottom-right].
We then define the similarity of two photos to be the “distance” between their feature vectors. There are several ways to define distance: average point-wise difference, least squares, Euclidean distance, etc. We’ll stick to the average point-wise difference since it is relatively simple and produces decent results. Given \(Features(p_1) = [u_1, \ldots, u_k]\) and \(Features(p_2) = [v_1, \ldots, v_k]\), the “average point-wise difference” similarity of \(p_1\) and \(p_2\) is:
\[ Similarity(p_1, p_2) = \frac{\sum\limits_{i \in [0,k)} \left| u_i - v_i \right|}{k} \]
Let us now consider \(s_1\). We can compute \(Features(s_1) = [ 0.55, 0.55, 0.55, 0.55 ]\). From this,
\[ \begin{array}{rclclcl} Similarity(q_1, s_1) &=& \cfrac{|0.75-0.55| + |0.0-0.55| + |1.0-0.55| + |0.75-0.55|}{4} &=& \cfrac{0.20 + 0.55 + 0.45 + 0.20}{4} &=& 0.35 \\ Similarity(q_2, s_1) &=& \cfrac{|0.75-0.55| + |1.0-0.55| + |0.0-0.55| + |0.75-0.55|}{4} &=& \cfrac{0.20 + 0.45 + 0.55 + 0.20}{4} &=& 0.35 \\ Similarity(q_3, s_1) &=& \cfrac{|0.62-0.55| + |0.62-0.55| + |0.62-0.55| + |0.62-0.55|}{4} &=& \cfrac{0.07 + 0.07 + 0.07 + 0.07}{4} &=& 0.07 \end{array} \]
And we are left with \(q_3\) being the most similar, as we would like. For \(s_2\), we can determine that \(q_1\) is the closest:
\[ \begin{array}{rclcl} Features(s_2) &=& [ 0.64, 0.0, 1.0, 0.64] \\[2ex] Similarity(q_1, s_2) &=& \cfrac{0.11 + 0.0 + 0.0 + 0.11}{4} &=& 0.05 \\ Similarity(q_2, s_2) &=& \cfrac{0.11 + 1.0 + 1.0 + 0.11}{4} &=& 0.55 \\ Similarity(q_3, s_2) &=& \cfrac{0.02 + 0.62 + 0.38 + 0.02}{4} &=& 0.26 \end{array} \]
We could further divide photos into more quadrants (say, 16 or 64) to obtain even more accurate similarity measures, but at the cost of more computation. Your photomosaic app will allow to experiment with this tradeoff in various ways.
Color Images
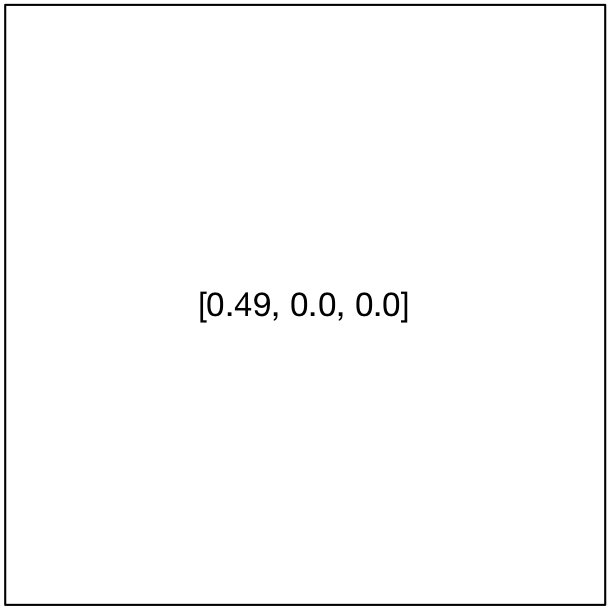
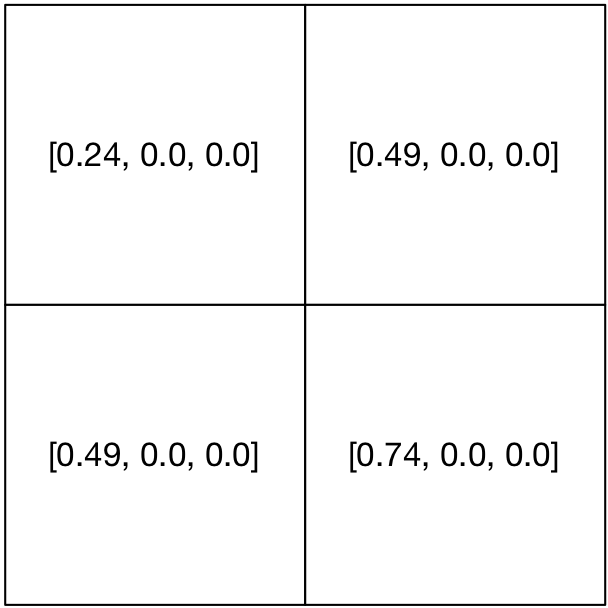
For color images, each pixel contains a value for each of the three color channels (red, green, and blue). If we average over an entire photo, we are left with a feature vector \([R,G,B]\) containing three measures. The middle image below shows the average intensities for the photo on the left. If we divide the photo into quadrants, as shown on the right, we obtain a feature vector with 12 values: \([0.24, 0.0, 0.0, 0.49, 0.0, 0.0, 0.49, 0.0, 0.0, 0.74, 0.0, 0.0]\).

Photomosaics
Once we know how to compare photos, the algorithm for generating a photomosaic is straightfoward. Note that we only compute the feature vector for each \(p_i\) only once.- Inputs: a target photo and collection \(\{ p_1, \ldots, p_k \}\). Assume each \(p_i\) is \(n \times n\) pixels.
- Extract the feature vector for each \(p_i\).
- Divide the target photo into \(n \times n\) tiles.
For each \(tile\):
- Extract feature vector for \(tile\).
- For each photo \(p_i \in \{ p_1, \ldots, p_k \}\):
- Compute \(Similarity(tile, p_i)\), keeping track of the most similar to \(tile\).
Generate an output photo where each tile of the target photo is replaced by its most similar from the collection.
As in previous weeks, we first discuss the model and algorithmic details of making photomosaics (Problem 1), followed by an overview of how to build an app using that model (Problem 2). We also discuss aspects of testing this sort of app (Problem 3).
Problem 0: Project Set Up
p We have set up an initial project for you to use, so you need only clone the provided repository to begin working this week. See Step 1 of the Implementation Plan for more details on the organization of this project.
The project is initially set up so that the Photomosaics app presents a PhotoCollectionViewController that shows all of the images from the swatches photo collection. Run this project to verify that a collection of small color swatches appear after launching. (You can view other photo collections by changing the PhotoCollectionViewController.photoCollectionToLoad constant.)
The project this week leverages a number of utility classes and structures we provide. Be sure to consult the Documentation as you read through the discussion, and read the code where necessary. Here’s a complete list of all classes and structs in one place:
- Basic Geometry
- Pixels and Photos
- UI
Problem 1: Creating Photomosaics
Your first task will be to design and build the photomosaic generator engine. Building an app on top of it will be described below.
Photos and PhotoSlices
UIKit represents images as UIImages, but that representation is not ideal for us because we cannot readily access the underlying color data. Moreover, UImages are designed on top of the Core Graphics geometry classes that use a real-valued Cartesian coordinate system. Our life will be much simpler if we think of images as two-dimensional arrays of color values. To this end, we provide a Photo class representing an image as a 2-D array of Pixels, where each Pixel contains the RGB values for one pixel in the photo. (Pixels also include a computed property intensity that translates any RGB color into a grayscale intensity, which will be useful when working with black and white photos.) Photos are defined in terms of Point, Size, and Rect, which are analogous to CGPoint, CGSize, and CGRect, but are restricted to the integer Cartesian coordinate system. Here is an example of using a Photo:
let image = UIImage(...)
let photo = Photo(image)

//Note: we use photo[x,y] -- NOT photo[x][y]
let topLeftPixel = photo[0,0]
print("topLeft color is: \(topLeftPixel)")

let bottomRightPixel = photo[photo.size.width-1, photo.size.height-1]
print("Red Value: \(bottomRightPixel.red)")
Our program will often need to examine the pixels within only a small rectangular region of a large Photo. We provide a PhotoSlice class to do this. Given a photo and a rectangular region within its bounds, a PhotoSlice provides a read-only view to the pixels within that region. PhotoSlices offer several benefits to the client:
- They can ensure that they are accessed only within the delineated rectangle.
- They can access the underlying
Photo'spixel array efficiently and without copying any of the data. - They enable us to define conceptually simple operations, such as dividing a photo into small tiles, in a relatively straightforward way.
Aside: Providing read-only views of part of a data structure is a common idiom found in many languages and libraries. For example, Swift provides an ArraySlice to provide efficient read-only access to part of an array, many Java collection classes can create slices of their internal data, etc.
A photo’s asSlice property gives us a slice representing the whole photo. Smaller slices can be created using the subscript operator with a rectangle, as shown in the following example:
let bigSlice = photo.asSlice

let bigBounds = bigSlice.bounds
let topHalfBounds = Rect(x: bigBounds.minX,
                         y: bigBounds.minY,
                         width: bigBounds.width,
                         height: bigBounds.height / 2)
let topHalfSlice = bigSlice[topHalfBounds]

for x in topHalfSlice.minX..<topHalfSlice.maxX {
  for y in topHalfSlice.minY..<topHalfSlice.maxY {
    let pixel = topHalfSlice[x,y]
    ...
  }
}
Photomosaic
You will define a Photomosaic to create a photomosaic from a photo. In order to be as flexible as possible, your Photomosaic will employ a general algorithm for creating the photomosaic and delegate several specific tasks to other objects provided by the client.
PhotoCollection: One delegate will be a PhotoCollection object that provides a way to iterate over a database of candidate replacement photos. This class has been already written. It loads a collection of photos from a folder in your compiled app’s resources folder. Your project is configured to copy the Photomosaic/Photo Collections folder into that section. You are free to add more collections to that folder if you like. (See below.) The PhotoCollection documentation illustrates how to create and use a PhotoCollection.
FeatureExtractor: A second to delegate object will be responsible for extracting photo features that will be used to measure similarity. This object should implement the FeatureExtractor protocol:
/**
 A general interface for translating part of a photo into
 a feature vector summarizing properties of it.
 */
public protocol FeatureExtractor {

  /**
   Computes the feature vector for a photo slice.  The meaning
   and size of the feature vector is defined by each individual extractor.

   - Parameter slice: the slice to summarize.
   - Returns: the feature vector for the slice
   */
  func extract(slice : PhotoSlice) -> FeatureVector
}
You must implement the FeatureVector ADT. Conceptually, a FeatureVector is a sequence of real values in the range \([0,1]\). I suggest using an immutable representation and that your public interface has at least the following three items to be compatible with some sample test cases I provide:
init(values : [Double]): Create a feature vector with the given values.init(vectors : [FeatureVector]): Create a feature vector containing the values in each of the provided vectors.func distance(to other: FeatureVector) -> Double: compute the distance to anotherFeatureVectorusing the formula in Photo Similarity.
You will be responsible for writing at least three different feature extracts: IntensityExtractor, RGBExtractor, QuadExtractor. These should match the descriptions in Photo Similarity. QuadExtractor applies another extractor to the four quadrants of a slice and returns a vector containing the results of those four nested calls.
Your Photomosaic class should include two items in its public interface to ensure compatibility with test cases I provide. The first is an initializer that takes the necessary delegate objects. The second is a computed property returning the photomosaic as a PhotoMatrix:
init(_ photo: Photo, collection : PhotoCollection, extractor : FeatureExtractor)var asMatrix : PhotoMatrix
Here, PhotoMatrix is a class representing a mutable 2-D matrix of photos. Its image property returns a UIImage with the photos in the matrix layed out in a grid. Any entries without a photo are left as black regions in the resulting image. When you create a PhotoMatrix, you must provide the size of each photo in the resulting image:
let matrix = PhotoMatrix(columns:2, rows:2, tileSize: Size(width:64, height: 64))
matrix[0,0] = somePhoto
...
imageViewer.image = matrix.image   // result is a 128x128 image.
When creating a mosaic, the original photo’s width (and height) may not be evenly divided by the width (and height) of the candidate photos. In that case, you may clip the right-most (and bottom-most) parts of the photo.
Problem 2: Photomosaics App
Your Photomosaics app provides a UI to your photomosaic generator. Your app should work on both iPhones and iPads. On an iPad and in landscape on an iPhone 6+/7+/8+/X, the generated photomosaic should be on screen at the same time as the controls to chose a photo and configure the generation parameters (i.e. in a split view). On other iPhones the photomosaic should “push” onto the screen via a navigation controller. In other words, your design will revolve around a UISplitViewController.
Below is an example UI on an iPad to give you an idea of what is expected. This is just one possible interface. You may design your interface in any way that meets the basic requirements outlined in this section.

The Master Controller is a PhotomosaicViewController that you will write from scratch. The Detail Controller is a minor variant of the ImageViewController from lecture that we provide.
See hints on Getting Started on the UI and on Working with Split Views and MVCs.
Your UI should work as follows:
The buttons in the Master Controller’s Navigation Bar select a photo from the Photo Library or take a picture with the camera.
See hints on Photo Library and Camera and on UIBarButtonItems.
The currently selected photo is shown at the top of the Master Controller’s view. It should be shown in the proper aspect ratio, which can be achieved for a
UIImageViewby setting its Current Mode to “Aspect Fit” in the Attribute Inspector.Pressing the “Collection”, “Features”, and “Quadrants” buttons enables the user to change the parameters dictating how the mosaic is created. For example, touching “Collection” brings up the following action controller:
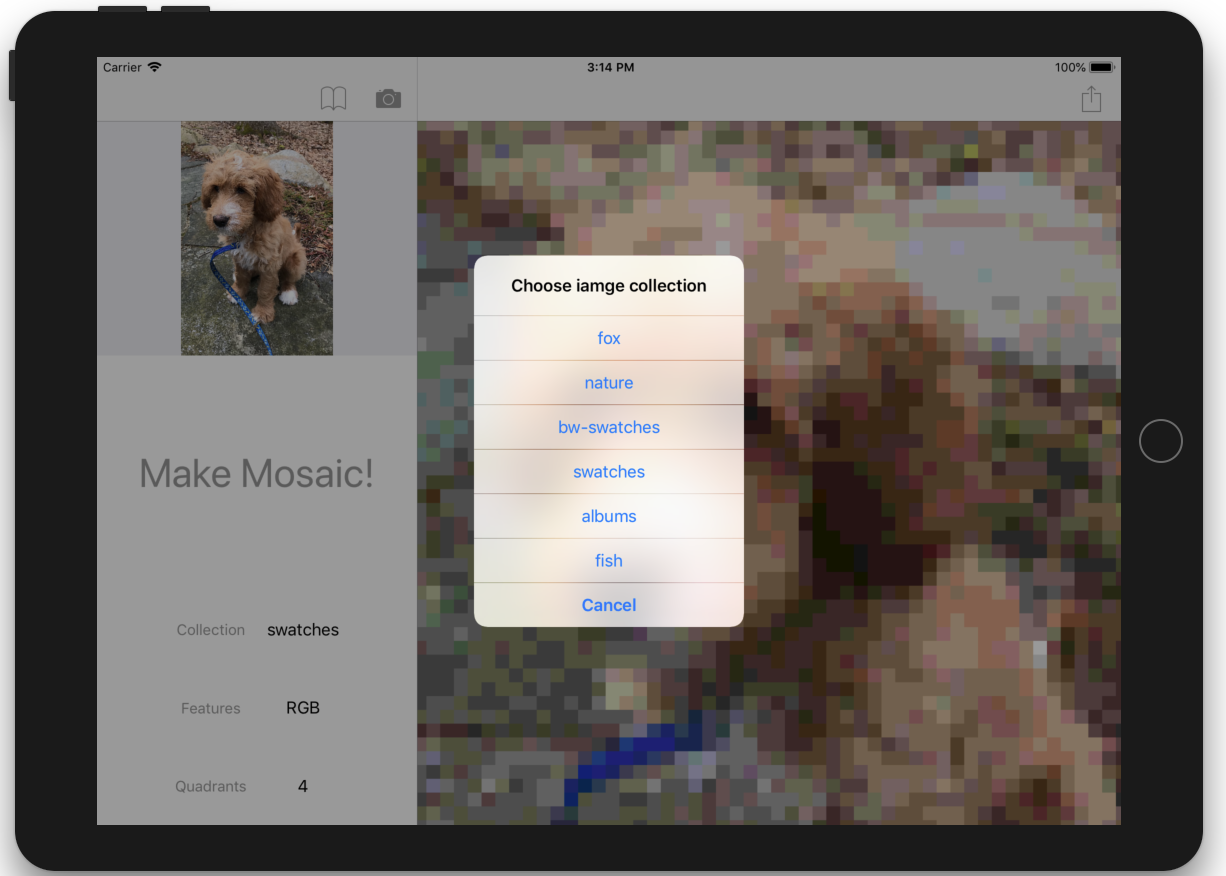
The user can touch a collection name to start using the photos from it. We provide an extension to
UIViewControllersto enable the user to choose from a list of items via an action controller. Details can be found in the documentation for the method UIViewController.chooseFromList(items:prompt:completion:).Your app must support at least the following the three parameters for how the photomosaic is generated:
- “Collection” can be any photo collection in the projects “Photo Collections” folder.
- “Features” can be either “Intensity” or “RGB”. It is the basic metric gathered for pixel colors.
- “Quadrants” can be 1, 4, or 16. It determines how many quadrants the feature extractors should divide each tile into.
Pressing the “Make Mosaic!” button generates a photomosaic to show in the Detail Controller’s view and segues to it.
The share button in the Detail Controller Navigation Bar enables you to save the photomosaic to the Photo Library or use it in another app. The
ImageViewControllercontains the code to do that – you just need to connect aUIBarButtonItemto the provided action method.When the app launches, it should use the “Collection”, “Features”, and “Quadrants” parameters last used in the app. You will thus need to store the parameter values using the UserDefaults API. The selected photo can always default to some default image of your choice (or
nil) when the app is started.See hints on UserDefaults.
You must not block the main thread of your application while performance long tasks, which include both loading a photo collection (via the method
PhotoCollection.collection(named:inFolder:)), generating the photomosaic’sPhotoMatrix, and reading thePhotoMatrix.imagecomputed property.See hints on Multithreading.
Photomosaic generation should complete in a reasonable amount of time, perhaps no more than 5-10 seconds for reasonably-sized images and collections. If it is taking significantly more time than that on images your have resized to no more than 1024x1024 and you cannot identify any performance bottlenecks, come talk to us. You can also try running in “Release Mode” as outlined in the hints on [ReleaseMode].
Problem 3: Testing Your Solution
You are responsible for specification and implementation testing of your code. We suggest several strategies below.
Specification Tests
Recall that these tests should validate your code against the specification, both at the level of units and at the level of the whole system.
Photomosaic Specification Tests
Your classes and structs from Problem 1 should be thoroughly unit tested according to the specification above. I have given you several tests to start with, but you will likely need more to do a thorough job.
UI Behavior
UI behavior is more difficult to specification test automatically, but you should still strive for a systematic testing strategy. Here is one approach to follow: For each of the required UI tasks, design a short sequence of steps to validate the behavior of your app on the provided sample data. That is, starting at launch, what do you touch, drag, zoom, etc. to demonstrate the required feature is correct, and what is the expected outcome of those steps? For example, a script to validate that parameter values are preserved across launches could be:
Requirement 7: UserDefaults: Verify that the Photomosaic configuration is saved between launches.
- Set “Collection” to “nature”, “Features” to “RGB”, and “Quadrants” to 4. (Choose different values if those are what is showing after launch.)
- Quit app from within the simulator (Cmd-Shift-H twice to bring up app list, select Photomosaics, and swipe up. Press Cmd-Shift-H again to go to Home Screen.)
- Relaunch the app.
For some required tasks, you may wish to have multiple tests. Others – like not blocking the UI thread – may be hard to test like this. You can skip that one. These “use case” test scripts help you specify the overall behavior of the system and ensure you have completed all features, reproduce problems if they arise, and that you have not regressed after making changes.
Keep in mind that a good specification test should work on any Photomosaics app, regardless of how it is actually implemented. In other words, your specification tests should not refer to any implementation details. You may wish to design these scripts even before you begin coding. You can assume photomosaic generation from Problem 1 works properly when writing them to avoid unnecessary duplication.
Also, any time you identify a defect in your app’s behavior, write a similar script describing the steps leading to the problem before changing any code. When the code has been fixed, also briefly note what was changed. You will be required to do this in the Implementation Plan below.
Implementation Tests
Additionally, you should write implementation tests for any parts of the code that are not directly tested by the specification tests. This includes any important aspects of you data structures or controllers that can be unit tested reasonably. For parts that are not easily automated because they involve user interaction or complex displays, test as thoroughly as you can by hand, but be systematic in your approach! Depending on your code, there may not be much to add beyond the above parts.
Implementation Plan
Set up your project to work on a hardware device. You can write and test almost everything with just the simulator, ut I strongly suggest you follow these steps at the start of lab to ensure everything is working properly.
The repository contains two XCode project files —
Photomosaics.xcodeprojandPhotomosaics2.xcodeproj:Lab7/ ├── Photomosaics/ ├── Photomosaics.xcodeproj/ ├── Photomosaics2.xcodeproj/ ├── PhotomosaicsTests/ └── README.mdYou and your partner should use the two different project files to help manage the signing certificates for installing your app on a device. (If we were a real company, we would create a single certificate that we all share for signing, but that costs money and is a bit overkill for this one week…) When using
Photomosaics2.xcodeproj, the installed app will be namedPhotomosaics2. Always be sure you are running the version you expect on the device.Note: The projects include all files mentioned in this handout. If you want to add additional files, have one partner create them int their project, commit them, and push them. The other partner should pull them and then add them to their project. Do not create a second copy of the files or there will be a git conflict.
Assuming you are using
Photomosaics.xcodeprojand your partner is usingPhotomosaics2.xcodeproj, the following steps will set up your project to install and run the app on your device. Your partner should do the same with thePhotomosaics2.xcodeproj.- Run the target in an iPad simulator and verify it compiles and starts properly.
- Create an Apple ID account if you do not have one. This can be done at https://appleid.apple.com/.
In XCode, add that Account: go to “XCode -> Preferences” in the menu bar and select the “Account” tab. Click the “+” in the lower left corner, select “Apple ID” from the dialog box that pops up, and then enter your account info. When complete, your Apple ID should appear in the list of accounts, and look like the following:

Note: If you switch to a different computer, you may need to add your account to XCode again.
Now, plug in your device. Select it from the devices list, and indicate that you “Trust” the computer you are connecting to.
The next step is to add your Apple ID to your project’s target in order for XCode to properly sign and load code onto a device. Click on the project name in the Project navigator and then select the
Photomosaictarget from the list in the editor panel, as shown below: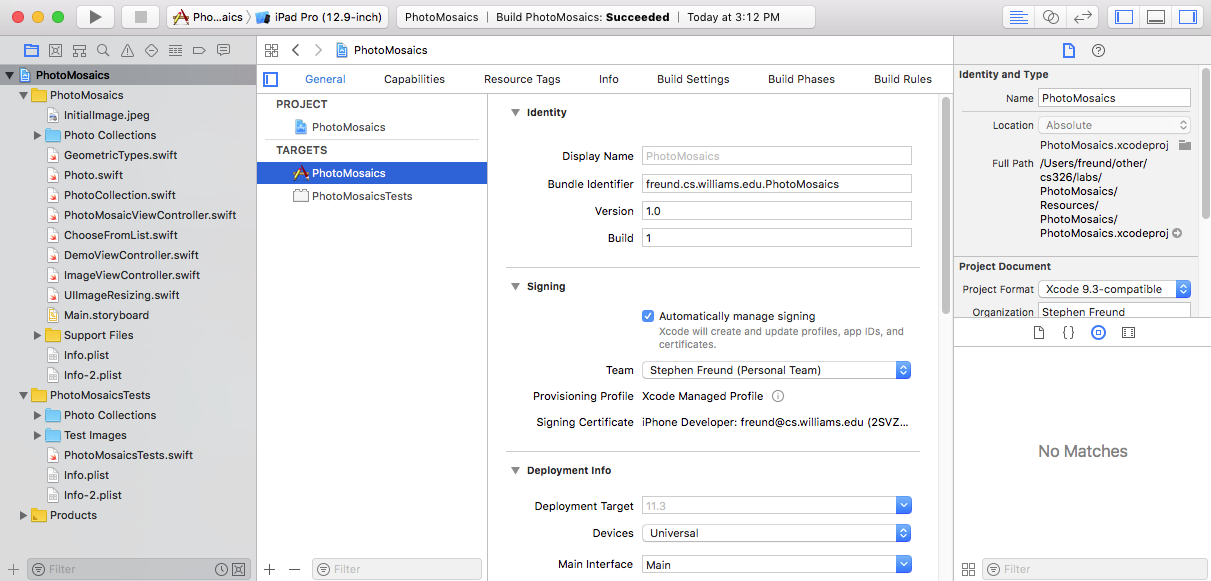
Change the Bundle Identifier to be something unique – use your last name in the fashion that I did, or something else that is unlikely to be used by anyone else. Then, replace the selection for the “Team” pop-up with your own personal account that your added in the previous steps, and be sure that “Automatically manage signing” is selected. When you run on on a phone or ipad, XCode will sign your app to give that one hardware device permission to run it. (You can’t upload the app to the App Store or share it with others — you need to enroll in Apple’s official developer’s program to do that…)
If at this point, or later, it says that the “OS version lower than deployment target”, you will need to configure your target to build for an earlier version of iOS. To do this, click on the “Photomosaic” line at the top of the Project Navigator. The project settings should appear. Under Deployment Info, set the Deployment Target to match you devices iOS version. For the OIT iPads, choosing 9.1 should be fine.
Run your app on the device. The app should open on your device, but it may take a few minutes to install the necessary develoment components on the device this one time. And depending on your iOS version, you may get an error like the following:
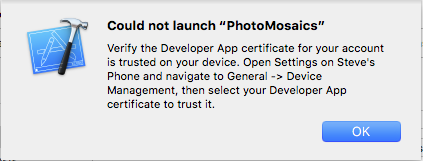
If so, follow those steps on your device. Return to XCode and run again. Launching and debugging should work exactly the same for the device as it does for the simulator.
You partner should repeat those steps for the other project file.
Implement
FeatureVectorin theFeatures.swiftsource file.
Add unit tests for your FeatureVector class to PhotomosaicsTests/FeatureVectorTests.swift.
- Implement the feature extractors, also in
Features.swift. In addition to theextract(slice:)method, you may find it useful to define a second methodextract(photo:)that extracts the features for a whole photo. There are several ways to introduce such a method without duplicating any code. (Hint: think back to our discussion in class about how theSequenceprotocol and operations onSequencesare defined.)
Add unit tests for your feature extractor classes to PhotomosaicsTests/FeatureExtractorTests.swift. Setting up a test can be a little involved since you’ll need to load a photo, create a slice, etc. You may use the three tests already in that file to get you started.
- Implement
Photomosaicin a new filePhotomosaics/Photomosaic.swift. As above be sure that bothPhotomosaicsandPhotomosaics-2are selected from the list of targets presented to you right before clicking “Create”.
Add unit tests for your generator to PhotomosaicsTests/PhotomosaicsTests.swift. You may use the three tests in that file to get you started. These tests assert that several small photomosaics were generated properly. You may ignore the warnings about unused variables in those tests — they are related to a suggestion about Viewing Images in the Debugger.
- Complete the Photomosaic app, and test it as described above in the Specification Tests section.
- Add the UI use case test scripts for the required task to your
README.md. (Keep them short so they are not a burden to run!) - Also add any additional specification tests you design in response to specific bugs you detect during development and what changes were performed. (Again, keep this short and to the point.)
While you should design a complete
PhotomosaicViewControllerbefore beginning to code, do not attempt to write it all at once. There are a number of new concepts you’ll need to explore as you go and you don’t want to go too far down the wrong path. One possible approach to staging the code is the following:Delete the
PhotoCollectionViewControllerwe provided fromMain.storyboardso that you can start with an empty storyboard.Set up a split view controller where the master
PhotomosaicViewControllershows a couple of buttons with collection names. Clicking those buttons seques to the detailImageViewControllerto show to collection as a big, single image.Add bar buttons for the camera and library, as well as an image view to show the chosen photo, to the
PhotomosaicViewController.Add a “share” bar button to the detail view. This is a good time to embed your detail view in a navigation controller if you have not already done so.
Add a “Make Mosaic” button to generating a photomosaic for the chosen photo using default parameters – RGB, 1, swatches.
Add additional features to the UI for choosing the photomosaic generator’s parameters.
Add code so that parameters are preserved in
UserDefaults.
There are many other ways to build the app, but proceed in small increments and test as you go.
Best Coding Practices
The coding in this lab has more UI design the earlier assignments, but follow all of the best practices regarding abstraction, decomposition, documentation, etc.
Of particular note, give solid thought as to what constitutes the public API of all classes/structs, including UI elements. Make all non-public API elements private.
As usual, include an abstraction function, representation invariant, and
checkRepin all classes that represent an ADT. If a class does not represent an ADT, place a comment that explicitly says so where the AF and RI would normally go. You very well may find that you have more non-ADT classes on this assignment than in the past.
Hints and Suggestions
FeatureVector, FeatureExtractors, and Photomosaic
To facilitate debugging, you may find it useful to support the
CustomStringConvertibleprotocol in your classes and structs.Think carefully about equality — depending on your design, some classes may require a semantic notion of equality, while others may require simple reference equality.
Viewing Images in the Debugger
It may be useful to actually view the images being read and created by your photomosaic generator. The XCode debugger can do that. For example, if you set a breakpoint at the end of the test
testMosaicSmall()and run it, the debugger will stop with a view like the following: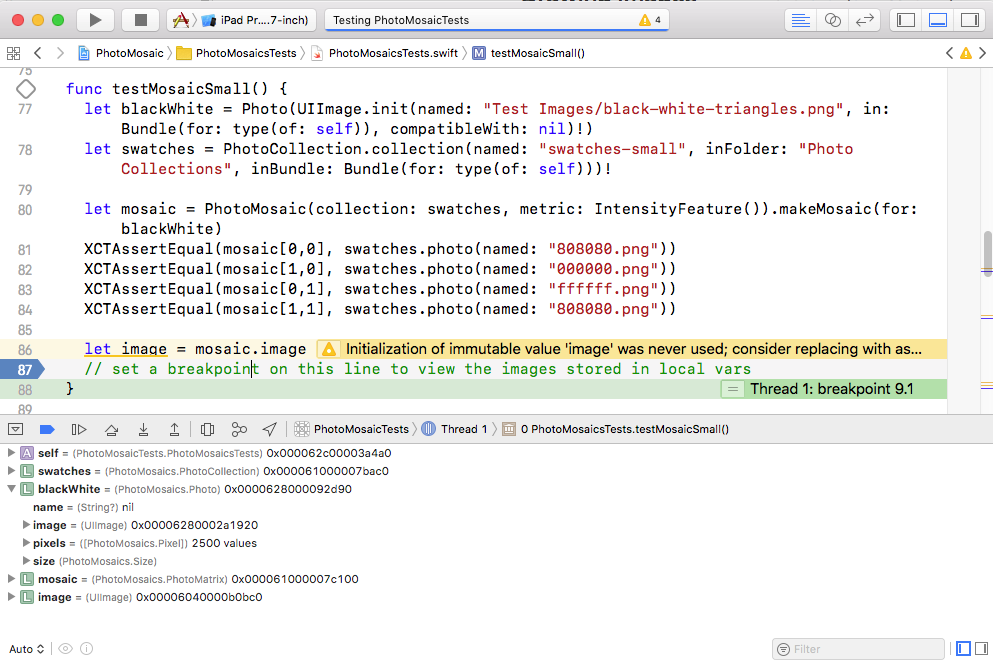
If you select the line for the
imagelocal variable in the Debugger pane and then click the “Quick Look” icon (the small eye-ball to the right of the word Auto at the bottom of the Debugger pane), theimagewill pop up: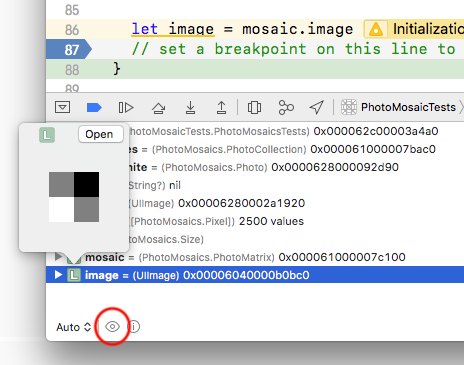
Getting Started on the UI
The
PhotomosaicViewControllersubclass ofUIViewControlleris the only UI class you should have to write or modify to completePhotomosaicapp. If you think you need to be writing other classes, you might be overdoing it.Think carefully about the model for your
PhotomosaicViewController. Remember that your model can be more than one object, and pay attention to our design principles – ie, cohesion and weak coupling.You should not need to change
ImageViewController, although be sure to hook up appropriate UI elements to itsscrollViewproperty andshareImagemethod. Note: this version ofImageViewControllerdoes not require the URL of an image to display. Instead, you is it by setting itsimageproperty directly.Avoid the temptation to copy/paste code from lecture examples. Learning to create new MVCs and segues requires experiencing it, not copy/pasting it or editing an existing storyboard that already has segues in it.
The project is initially set up so that
Main.storyboardcontains aPhotoCollectionViewController, which loads and displays all of the photos in a photo collection. You will not usePhotoCollectionViewControllerin your actual interface and can delete that controller from the storyboard, but please wait until after you have verified you can run your app on a real device.Forgetting to set the class of a
UIViewControlleror a customUIViewin the Identity Inspector in Xcode is a common error. You’ll need to do this whenever you want to use a class that you have defined in your interface.
Working with Split Views and MVCs
Don’t freak out when you drag out a
UISplitViewControllerand it brings along all kinds of other view controllers along with it. It’s just Xcode trying to be helpful. Remember that you can safely delete those extra controllers and use ctrl-drag to wire up your own MVCs (likely inside their own navigation controllers) in their places. Also recall that you can embed the detail view controller in a navigation controller by selecting it and then choosing “Editor -> Embed In -> Navigation Controller” from the menu.When writing
preparerecall that thesegue.destinationmay be aUINavigationControllerif your controllers are embedded in navigation controllers (as they should be). You likely need to get itstopViewControllerto set up the segue properly.
UIBarButtonItems
The app will use
UIBarButtonItems, which are buttons that can be placed in the navigation bar at the top of the screen. To add one, simply selected “Bar Button Item” from the Object catalog and drag it onto the navigation bar. They can be placed on either the left or right hand side. (XCode is a bit flaky about putting them in the right place. If the button doesn’t appear in the top of the window, undo the operation, and drag it to under the “Navigation Item” entry for the view controller in the Scene Outline.)You can label a bar button like a normal button or you can choose an icon for it by going to the Attribute Inspector and choosing one from the “System Item” pop up. You wire a
UIBarButtonItemto an action handler in exactly the same was as a normal button.
Photo Library and Camera
To allow your app to access the Photo Library and camera, you must have two entries in the
info.plistfile for the app target:Privacy - Camera Usage DescriptionPrivacy - Photo Library Usage Description
The OS will ask the user for permission to access the library/camera using the messages associated with those keys.
We have already added them to your target. Open the
info.plistfile and verify that the entries are there, as in the following picture.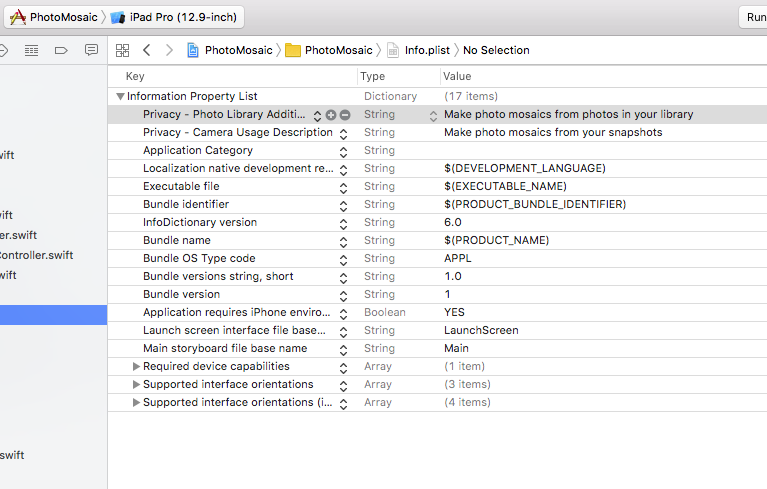
You may change the text to whatever you like. If you ever write an app using the camera or Photo Library, you’ll need to add these yourself. (In our particular project, there are two plists, one for each target, and we added these entries to both.)
Here how to access the Photo Library and camera from within a view controller. First, your controller must implement two additional delegation protocols:
UIImagePickerControllerDelegateandUINavigationControllerDelegate, as in:class PhotomosaicViewController: UIViewController, UIImagePickerControllerDelegate, UINavigationControllerDelegate {In addition, you should include the following
pickImagemethod to display the appropriate picker for the library/camera, as well as theimagePickerController(_:didFinishPickingMediaWithInfo:)delegate method that gets called when the user picks/takes a photo:/* UIImagePickerControllerDelegate method to let user pick image. This method creates a new controller that pops up to get the user's choice. */ func pickImage(_ sourceType : UIImagePickerControllerSourceType) { if UIImagePickerController.isSourceTypeAvailable(sourceType) { let imagePicker = UIImagePickerController() imagePicker.delegate = self imagePicker.sourceType = sourceType imagePicker.allowsEditing = false self.present(imagePicker, animated: true, completion: nil) } } /* Handler called when user has chosen an image. Add code to do what you like with the picked image. */ func imagePickerController(_ picker: UIImagePickerController, didFinishPickingMediaWithInfo info: [String : Any]) { if let pickedImage = info[UIImagePickerControllerOriginalImage] as? UIImage { dismiss(animated:true, completion: nil) // TODO: do something with pickedImage here. } }There is one “TODO” item in the code above, which is where you add the code to do something with the picked image. In the rest of the class, you can invoke
pickImage(.camera)orpickImage(.photoLibrary)when the user want to choose a new image.Photos from the Photo Library or camera may be very large and produce photomosaics comprised of hundreds or thousands of small pictures. It may be useful to work with smaller images to start with. We provide an extension to
UIImagethat supports aUIImage.resized(toFitIn:)method, which returns a copy of the target with the same aspect ratio but resized to fit within the rectangle parameter. You can use this in yourimagePickerControllermethod in the previous hint to limit the size of photos you initially deal with to, say, no greater than 1024x1024 or 2048x2048.
UserDefaults
You can store app preferences with the UserDefaults class, which essentially provides a way to store a map from String keys to value. You only ever need to create one
UserDefaultsobject, which can then be stored as an object property for later use.Given a
UserDefaultsobjectprefs, you can save a value for key “MyKey” viaprefs.set(value, forKey: "MyKey"). You can then retrieve the value via the methods listed under “Getting Default Values” in theUserDefaultsdocumentation. Be sure to use the proper one for the type of value that was stored. For example, useprefs.integer(forKey: "MyKey")if you stored an integer, useprefs.string(forKey: "MyKey")if you stored a string, etc. See our FaceView example that usesUserDefaults.
Multithreading
You cannot make any calls into UIKit from any thread other than the main thread. Be careful not to “accidentally” do this by calling some method which subsequently calls a method in UIKit. If you call a method from UIKit (directly or indirectly) off the main thread, your UI will fail in unpredictable ways.
If you are computing some value in a thread other than the main thread and then want to ask the main queue to do something with that result, you’d better be sure nothing has “changed” while the computation was going on.
It is sometimes useful during testing to insert long delays for tasks dispatched to other threads. Doing so enables you to verify that the UI does not hang while the operation proceeds, even if that operation would typically complete fairly quickly. While not the most robust way, one way to insert an artificial delay is to use
sleep(n)to pausenseconds. For example, a strategically placedsleep(5)in your code to construct a photomosaic can help you verify that the app does not hang during that task. Be sure to remove anysleeps — or use a “debugging” flag to turn them off — before submitting.
Release Mode
Apps can be compiled in two different modes: Debug Mode and Release Mode. Debug Mode, which is the default, inserts various run-time checks into the app, including array bounds checks, checks on type casts, etc. It is generally good to always keep those checks on, but they may cause a noticeable slowdowns under some circumstances. For very large images, the huge number array operations in your app may be such a case. You can change to Release Mode by editing your scheme to see if there is any performance improvement if you are enountering bottlenecks you cannot identify:
- Clicking on the scheme’s name in the Toolbar and then choose “Edit Scheme…”.
- With “Run” selected on the left, and the “Info” tab selected in the middle, change the “Build Configuration” to “Release” instead of “Debug”.
Be sure to change the mode back to Debug Mode before submitting!
- Clicking on the scheme’s name in the Toolbar and then choose “Edit Scheme…”.
Extras
Here are a few ideas for possible extensions, but you may add many others as well.
Add constraints to photo placement in your algorithm. Some examples:
- The number of times you may use the same photo in the collection is limited to \(n\).
- Two copies of the same photo cannot be placed closer than \(k\) steps apart in the mosaic.
If you add constraints like these, you may also wish to experiment with the order in which squares are processed, since the earliest ones stand a better chance of getting the best match. Going from the center out toward the edges is one good strategy. Random may also provide a better overall appearance than the default order.
Experiment with different distance metrics: least-squares, Euclidean distance, etc. How do they impact the final result?
Add a
Spinnerto indicate when the program is performing a long-running task.Create a new photo collection to use in your program.
Anything else you can think of!
Add a brief description of any extras to your README.md file so we know what to look for.
<–
What To Turn In
Be sure to submit everything in the following checklist: