Lab 3 : Connect The Dots
Objective
- To use the Model-View-Controller pattern in conjunction with a custom view.
- To implement several precisely-specified ADTs.
- To create a custom UIView
- Subclassing
UIKitclasses - Configuring custom views in a story board.
UIContentViewMode.redraw
- Subclassing
- To practice using the UIKit’s primitive drawing features, including:
- To implement event handlers for gestures.
- To read and manipulate JSON data.
Table Of Contents
Prelab
- Read this handout before lab.
- You will work in partners on this lab.
- If you would like to work with a specific person, please fill out this form by 11:30am on Thursday. Otherwise I will pair you up with a partner.
- It will be easiest to work with someone in your own lab section, but I won’t require that. It’s also fine for one of you to attend your partner’s lab section.
- I’ll do my best to satisfy all requests.
- If you would like to work with a specific person, please fill out this form by 11:30am on Thursday. Otherwise I will pair you up with a partner.
You will need to set up one of your Gitlab projects to be shared with both partners. Details on doing that can be found it Part 6 of the GitLab Tutorial.
Overview
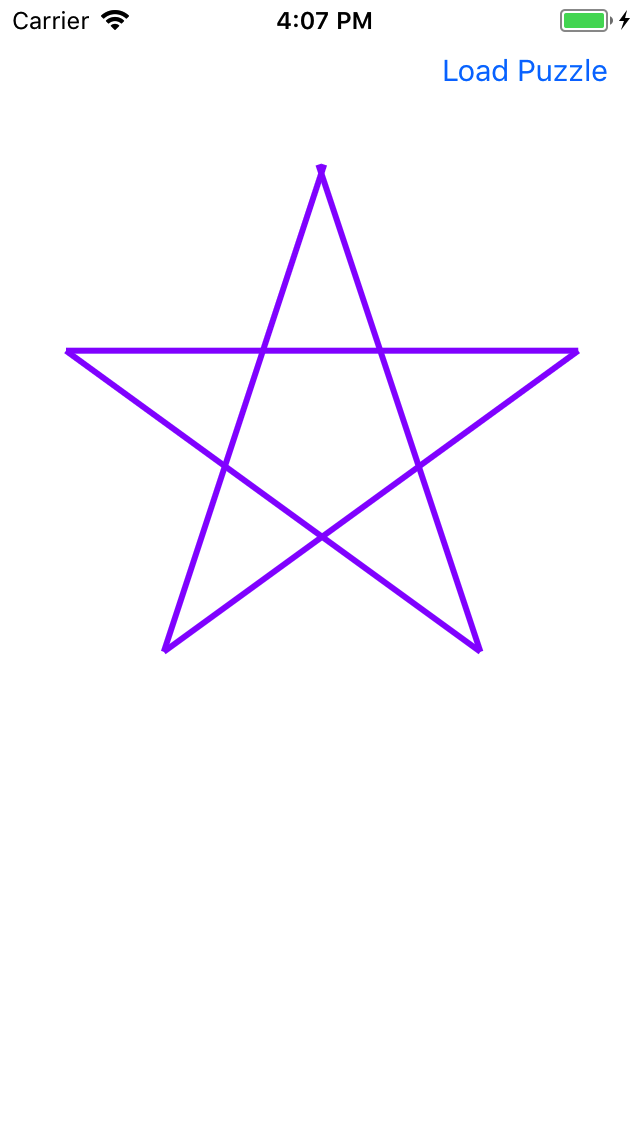
Build a connect the dots program. It should be designed primarily for an iPad, and work properly in both portrait and landscape modes, although it should also be useable on an iPhone. Here’s a view of the final product (although you are always encouraged to make any reasonable design choices in how your program looks and behaves, as long as it meets the basic standards of the assignment…):

In more detail, you will present to the user a bunch of numbered dots, as in the first panel below:
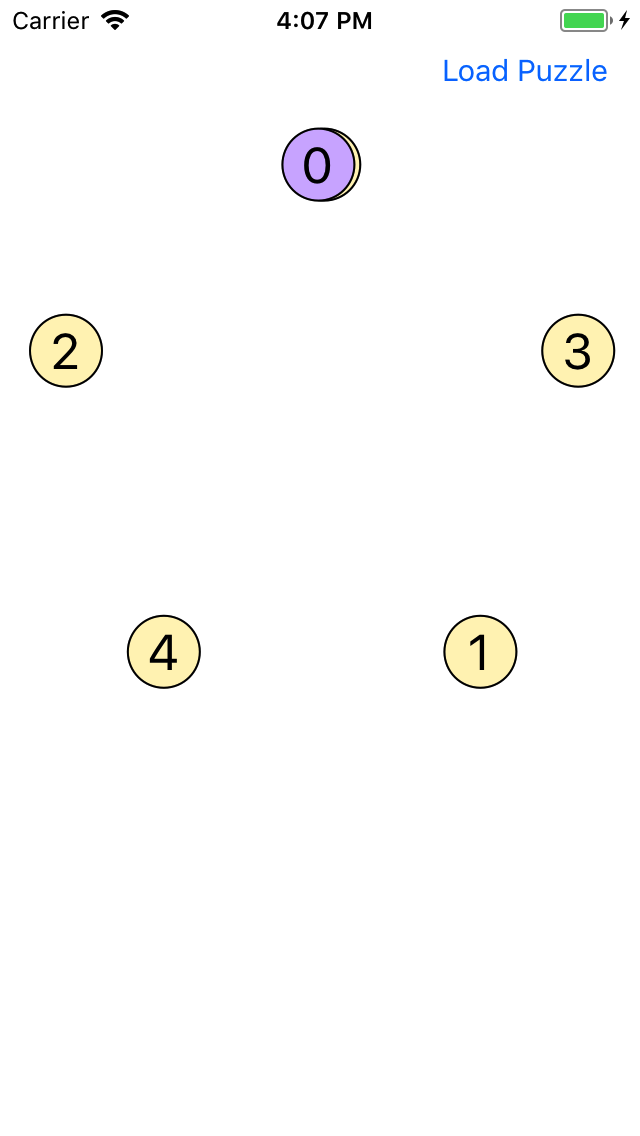
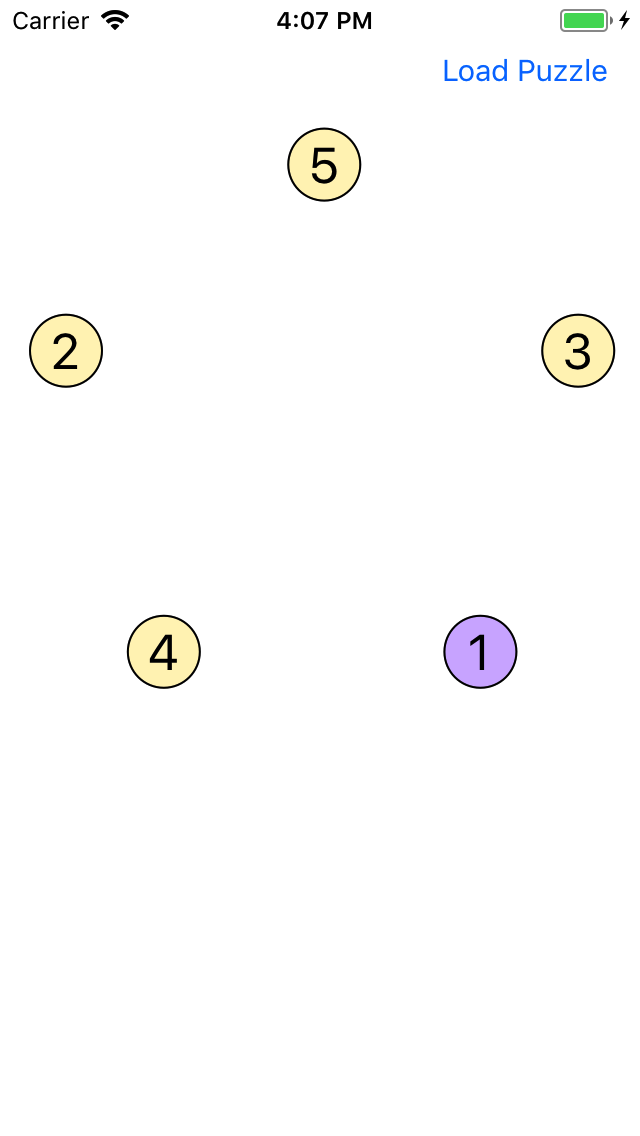
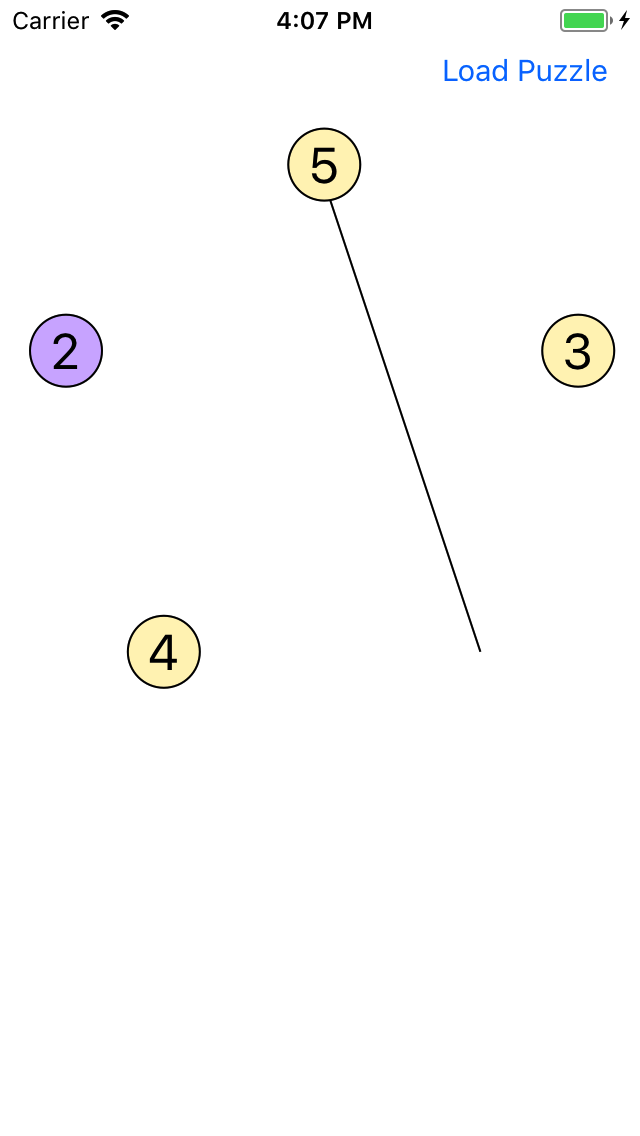
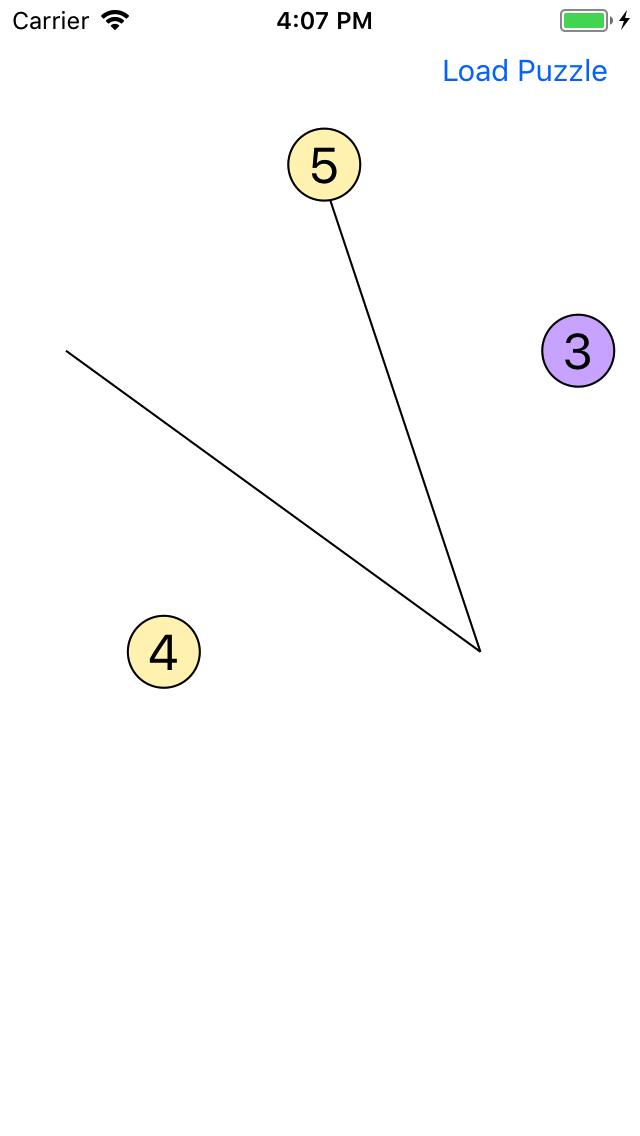
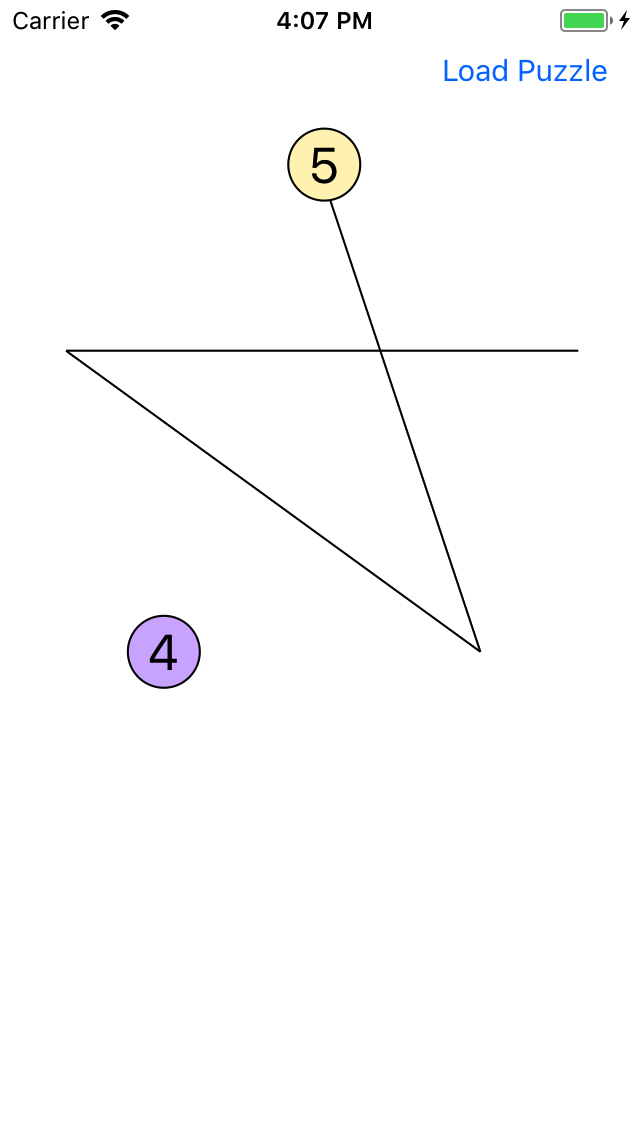
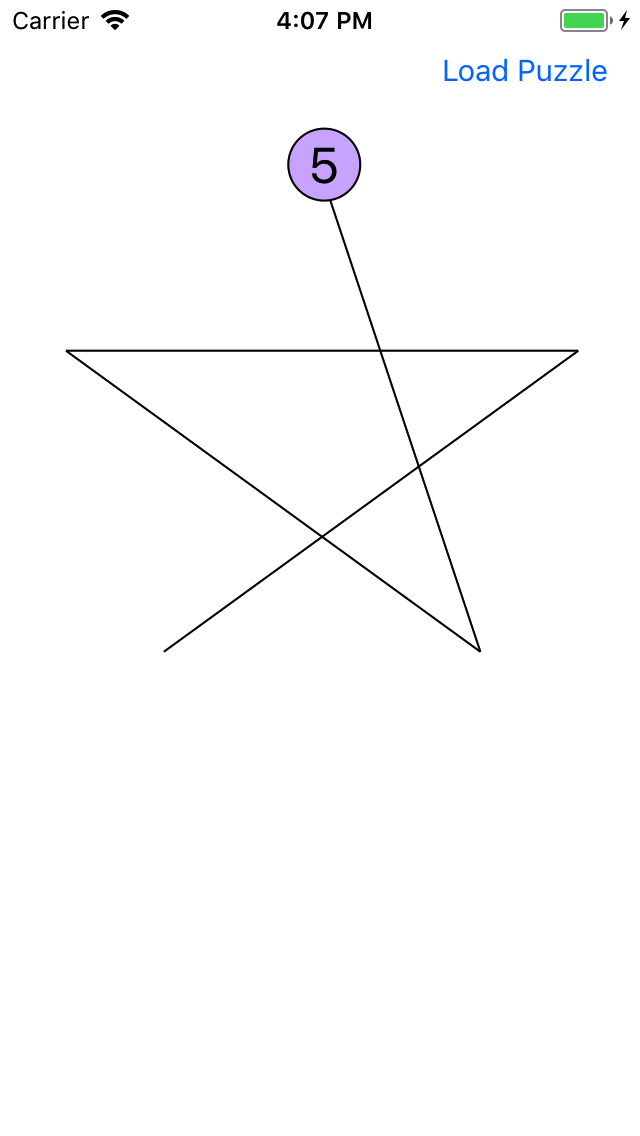
The next dot to touch is highlighted in a different color. When the user touches that dot, it disappears and the next one in the sequence becomes highlighted. The user continues to touch the dots in numeric order, and lines are drawn to connect the dots that have already been touched, as shown in the sequence above as the user clicks on 0, 1, 2, …
(Note that dots 0 and 5 almost entirely overlap, so even though it looks like the first line drawn connects 5 to where dot 1 was originally, is actually drawn between the locations of dot 0 and dot 1.)
After all dots have been touched, all of the edges should be highlighted (ie, appear thicker and in a different color).
Your app should also support zooming and panning of the puzzle, as well as a button to allow the user to select the puzzle to show.
As usual, we begin by designing the model for the program, and then consider the custom view and view controller. These three concepts will be represented by DotPuzzle, GraphView, and ConnectTheDotsController, respectively.
Model: DotPuzzle
At its core, the program’s model is connect-the-dots puzzle, which we represent as a DotPuzzle ADT. A DotPuzzle manages a bunch of Dots, each of which contain a location in cartesian coordinates (ie, a CGPoint) and its label (a number). More precisely, a DotPuzzle keeps track of which dots in a puzzle have been connected and which remain to be connected. The abstract state for a DotPuzzle is thus two lists of dots:
- those that have been
connectedand - those that remain
unconnected.
The Dots in each list should be stored in the order the have been or should be connected.
There is one producer method for DotPuzzle: a puzzle’s connectOneMoreDot() method makes a new DotPuzzle that has the same dots as the original puzzle, but with one more connected point. That is, the first unconnected point in the original puzzle is changed into a connected dot in the new puzzle.
We provide code to get you started in DotPuzzle.swift (Documentation). There are many ways to implement DotPuzzle – class vs. struct, mutable vs. immutable, etc. We chose to start with an immutable struct to reinforce our approach of limiting the use of mutable state in our ADTs. Our starter code also includes the abstract state specification and method pre/post conditions for the public parts of the DotPuzzle API.
You may add any private properties, private methods, and private init methods that you like. The DotPuzzle contains one public initializer that takes a set of CGPoints for a new puzzle. Adding a second private initializer may be useful if within your implementation you wish to create a DotPuzzle from other types of data.
They are likely fairly straight-forward (perhaps even trivial) for this ADT, but please write an explicit abstraction function and representation invariant for your DotPuzzle data type in the code. Also implement a private checkRep() method and call it in the appropriate places.
View: GraphView
Your view will present the model to the user. However, in order to design, implement, and test the view separately from the model, it will not directly use any of the code from DotPuzzle. Indeed, your view code will not even know it is drawing the data for a puzzle, and you could actually use it to draw all sorts of data, such as a graph. Since in reality a connect-the-dots puzzle is a specialized type of graph, we continue to think in terms of drawing nodes and edges.
To achieve the modularity and flexibility we’d like, your view will have a property items to store an array of GraphItems, each of which is either a node or an edge:
enum GraphItem {
  case node(loc: CGPoint, name: String, highlighted: Bool)
  case edge(src: CGPoint, dst: CGPoint, highlighted: Bool)
}
These are what the view will actually know how to draw. Your controller will set items to indicate what should be drawn in the view.
For this particular program, your controller will consult its DotPuzzle model when deciding what to include in the view’s items array, but only the controller will know what the nodes and edges actually represent.
The view should draw the items as follows:
node: A circle with the name centered inside. If a node is highlighted, it should be drawn in a different color.edge: A simple line. If a line is highlighted, it should be drawn thicker and in a different color.
Your view should use configurable settings for node size, node color, line color, etc. That is, your view class should be @IBDesignable and should have @IBInspectable properties describing how nodes and edges are displayed.
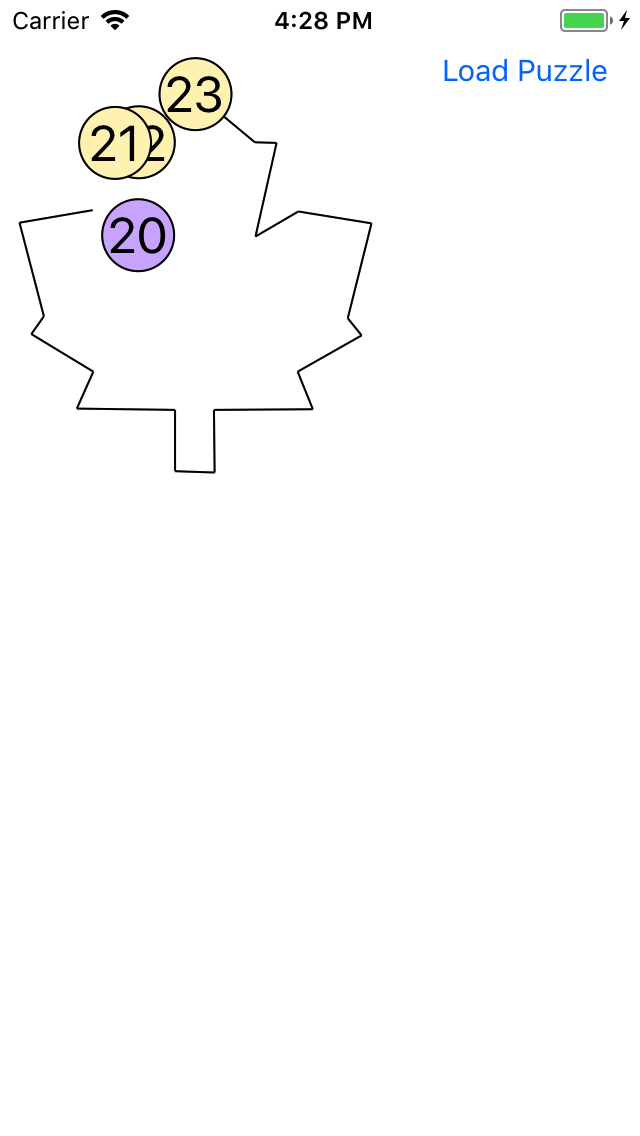
Your view should support panning and zooming as well. Zooming doesn’t change the size of nodes when they are drawn, but it does change where they appear in the view. For example, in the figure below (left) node “20” is at point (50,60). If we zoom to twice the original size, then that node has the same size but is drawn at location (100,120) in the view (below, middle). If we additionally offset the view by 150 points vertically, the node would end up at (100, 270), as we show below (right).
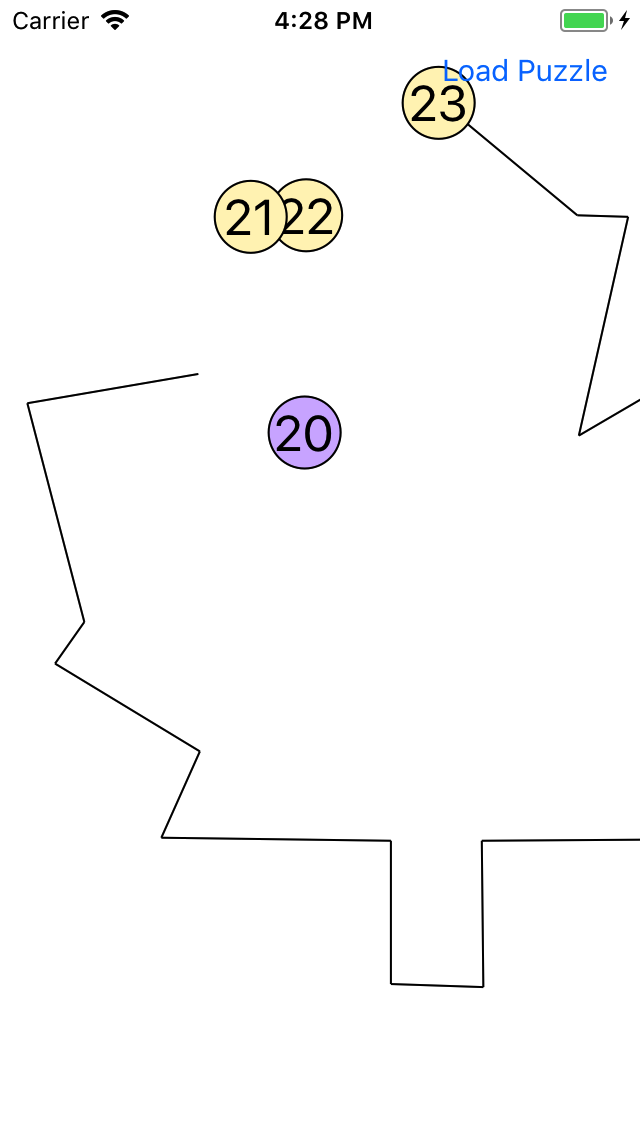
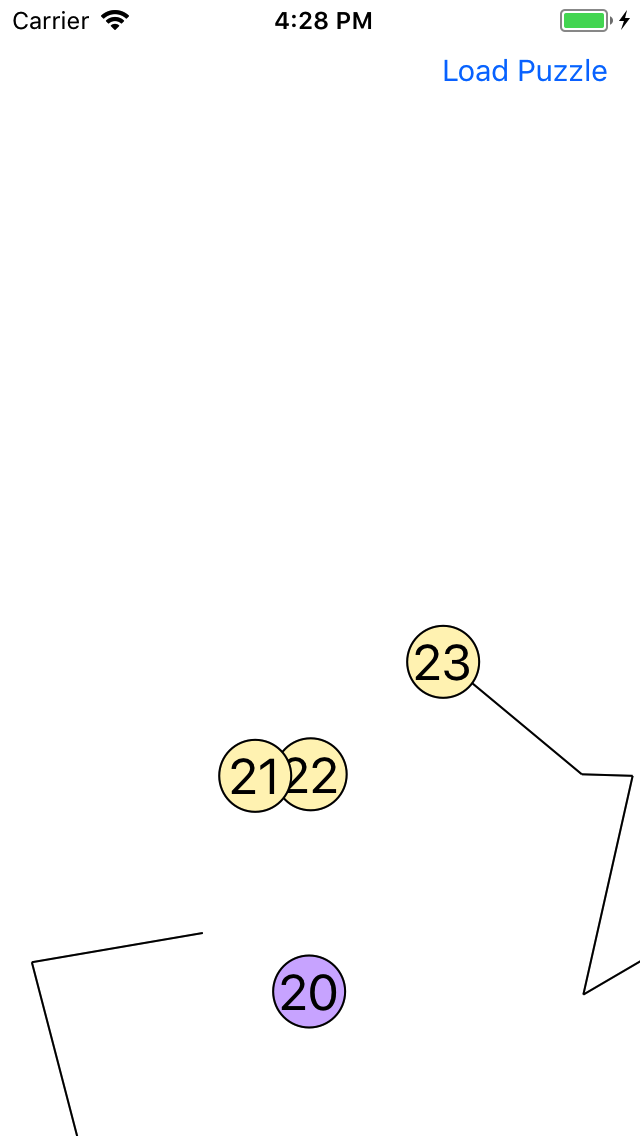
A good way to think about this is that the GraphItem locations are in a coordinate system defined by the model. The GraphView must convert those locations into locations in it’s coordinate system. A conversion can be described by a factor zoomScale > 0 and a viewOffset point (vx,vy). The point (x,y) in the model coordinates maps to the point (x * zoomScale + vx, y * zoomScale + vy).
The conversions between model coordinates and view coordinates can be a little tricky, and embedding those conversions inside a View component makes unit testing painful. (You don’t really want to have to create controllers and views during testing…) So, we’ll make life simpler by encapsulating the conversions in a ModelToViewCoordinates ADT.
ModelToViewCoordinates
We have provided some code to get you started in ModelToViewCoordinates.swift (Documentation).
The ModelToViewCoordinates ADT has the following operations:
toView(modelPoint:)andfromView(viewPoint:): observers to convert between the model and view coordinates.scale(by:)andshift(by:): producers to create new conversions by changing the scale or offset.
There are also two constructors:
init(): creates the “unit transform”, with scale 0, and offset (0,0).init(modelBounds:,viewBounds:): creates a transformation that maps the points inside themodelBoundsrectangle to the greatest possible area inside of theviewBoundsrectangle. More details on this initializer can be found here:ModelToViewCoordinates.init(modelBounds:,viewBounds:) initializer Notes.
The following code illustrates how ModelToViewCoordinates objects are created and used:
let unit = ModelToViewCoordinates()
unit.toView(modelPoint: CGPoint(x:100,y:100))      // ==> (100,100)
let scaled = unit.scale(by:2)
scaled.toView(modelPoint: CGPoint(x:100,y:100))    // ==> (200, 200)
let shifted = scaled.shift(by: CGPoint(x:50, y:-50))
shifted.toView(modelPoint: CGPoint(x:100,y:100))   // ==> (250, 150)
shifted.fromView(viewPoint: CGPoint(x:250,y:150))  // ==> (100, 100)
As above, please write an explicit abstraction function and representation invariant for your ModelToViewCoordinates ADT. Also implement a private checkRep() method and call it in the appropriate places. Include these pieces, even if they are trivial in your particular implementation.
Controller: ConnectTheDotsController
The controller manages your model, view, and user interactions. To that end, your controller should have at least the following:
Properties for your model and view.
View updater: An
updateUI()method to update the view’sitemsproperties to reflect the current state of the puzzle. This method must be called whenever the model changes.Gesture Recognizer for taps that connects the next dot if the user touched the right place.
Load Puzzle: Load a Puzzle from a list of puzzle files. (You’ll need to add a button to you UI when you implement this part.) More on this below.
Puzzle Files
Your program will be able to load puzzles from files. Those files will essentially contain just a list of (x,y) points in the order they should be connected. To make reading data from files relatively painless, we will use JSON data formats most of the time. JSON represents arrays and maps of information in a standard, easy to parse format. The section titled “Extracting Values from JSON” from Apple’s discussion on Working with JSON in Swift gives several examples of JSON formatted-data and extracting pieces out of it.
In our case, our data file will look like the following (which is taken from star.json):
[
  { "x" : 139.0, "y" : 10.0 },
  { "x" : 221.8, "y" : 258.99 },
  { "x" :  10.0, "y" : 105.11 },
  { "x" : 271.8, "y" : 105.11 },
  { "x" :  60.0, "y" : 258.99 },
  { "x" : 142.0, "y" : 10.0 }
]
If we have a string contentsOfFile containing that text, we use the class method JSONSerialization.jsonObject(with:options:) to parse it and create a Swift object for us to use. That method takes a Data object as a parameter, so we first need to convert our String to that type, as shown in the first line below. In general, the JSONSerialization.jsonObject method returns a value of type Any because the JSON text could encode any type of array or dictionary. Thus, we will cast the result to what we expect with the as? operator. (Recall that as? yields nil if that cast fails.) In general casts should be avoided at all costs. This is one of the very few places using one is permitted.
For the above data, the object returned by JSONSerialization.jsonObject(with:options:) will be an array of dictionaries, where each dictionary maps Strings to Doubles, and you would work with that object as follows:
let data = contentsOfFile.data(using: .ascii)!
if let json = (try? JSONSerialization.jsonObject(with: data)) as? [[String:Double]] {
  for pt in json {
    if let x = pt["x"],
       let y = pt["y"] {
      ...
    } else {
      assertionFailure("Bad Point in JSON: \(pt).")
    }
  }
}(JSONSerialization.jsonObject(with:options:) throws an exception if the data couldn’t be parsed, and the try? in the line above indicates that data should be set to nil if that happens.) If we get a non-nil value for json, we can then access it as any other array and extract from it the map containing the coordinates of each point in the puzzle.
All that remains is learning how to read the contents of a file. In this program, the data files will be bundled in the application, and we provide two functions to simplify reading them. These are in the provided in Files.swift (Documentation). You should add that file to your project. The file functions are:
loadFile(named:)finds the bundled file with the provided name and returns the contents as aString?.chooseFile(withExtension:forController:action:)is used from within aViewControllerto allow the user to select a file. It presents an action sheet with a list of all data file names in the application bundle with the given extension. The third parameteractionis a function that will be called if the user selects a filename. That function will be passed the name and contents. See the Files Documentation documentation for more details on how to use this.
Problem 0: Project Set Up
Note: If you are using XCode 11 on your own laptop, read these instructions.
Clone your lab3 repository following the same steps as previous weeks. The repository is initially empty (except for a .gitignore file, which tells git to ignore temporary files you should not track with version control).
Launch XCode, and select “File -> New -> Project…” from the menu bar.
Select “iOS” from the list at the top of the dialog box, and then “Single View App”. Then click next.
Set the Product Name to “ConnectTheDots” and the Language to “Swift”. Enter your name as the Organization. Be sure that the “Include Unit Tests” box is checked. Click Next.
Select the folder where you would like to save the project. Click Create.
Make your Schemes shared, by clicking on the Scheme pop-up menu in the Toolbar and selecting “Manage Schemes…”. Then click the “Shared” check box for each scheme in the table that appears in the dialog box, and then click “Close”.
As usual, move a few files out of the way. In the Project Navigator, select
AppDelegate.swift,LaunchScreen.storyboard, andAssets.xcassetsby command-clicking on each. Then control-click on them, and select “New Group From Selection”. Rename the newly-created group “Support Files”.Create a
README.mdat the top level directory for your project, as described in lab 2.Download the Lab Resources and unzip it. The resources include a
Datafolder that contains several small connect-the-dots puzzles in the JSON format above. Drag that folder into the Project Navigator, and drop it right under theMain.storyboard. A dialog will pop up: “Copy Items if Needed” should be checked, as should “Added Folders: Create Groups”, and “Add to Targets: ConnectTheDots”. The window should like the following. Verify its settings and then click Next.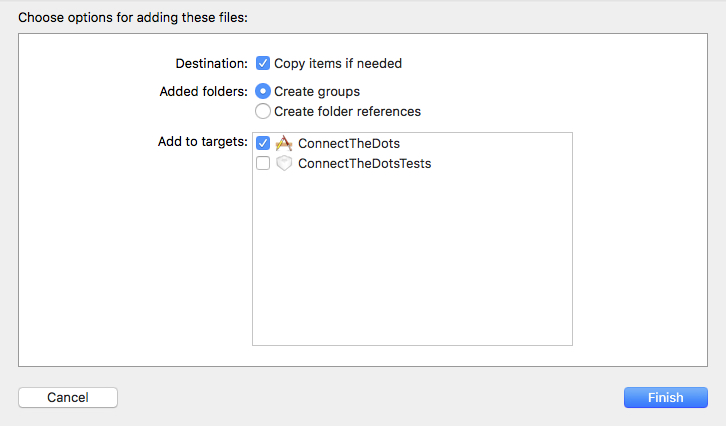
Click Finish. Those files should then appear in your project and will be compiled into your App’s bundle.
At this point, you should add and commit all the project files to your repository before doing anything else. Your project folder now probably contains a folder called
Derived Data– this is where XCode stores temporary files. By default,gitwill ignore this directory. You should not add it to your repository because they are not useful on any machine other than the one where they were created, and they will just be regenerated when you compile on a different computer.
Problem 1: A Basic App
While you may proceed in any way you wish, the following is one way to stage the development of your app and test along the way.
- A good first step is to implement the
DotPuzzlemodel. Create a new Swift file for that code. DotPuzzle.swift can be used as a starting point. (Remember to remove thepreconditionFailurelines as you complete the requirement methods.)
You should create unit tests whenever you can. DotPuzzleUnitTests.swift contains several unit tests for Puzzle — you may want to write more. That file should be put inside the ConntectTheDotsTests folder in the Project Navigator.
Switch to working on the storyboard. Following the steps from last week’s lab, create a custom
UIViewControllernamedConnectTheDotsViewControllerand set the class of the view controller showing in the storyboard to be that type. You can delete theViewController.swiftfile in your project at this point. Also create a newGraphViewclass that is a subclass of theUIViewclass – remember to select “Cocoa Touch Class” as the type of file when you create subclasses ofUIKitclasses.Select a
Viewobject from the “Object Library” and drag it into the middle of your view controller’s area. Resize that view to cover the entire Safe Area for the controller. Also, change the class of that view to beGraphViewand create an outlet for your view in your view controller. Once that is done, you are all set to begin implementing theGraphView.I recommend starting with the
itemsarray being a small collection of items you explicitly create. You can change that once your items draw properly. Once you make your view@IBDesignable, XCode will render its contents in the storyboard via thedrawmethod. So, you if populateitemswith some initial data, you can see how it looks without even running. And declare any variables to let you customize how nodes and edges are drawn as@IBInspectableso you can adjust them inside InterfaceBuilder.Ignore zooming and panning for the moment — just assume the model coordinates for
itemsare the same as the view coordinates.Change the
ConnectTheDotsViewControllerto keep a list ofDotsin a property, and make it so that a tap adds a new dot for the tapped point to the array. Follow the pattern of calling anupdateUI()method whenever the array changes and update what the view is showing in that method. Create edges between consecutive points to ensure your edge code works correctly. Experiment a bit! Be sure you understand how the pieces of your MVC are interacting.
Problem 2: Panning and Zooming
- First, implement
ModelToViewCoordinates. You can use ModelToViewCoordinates.swift as a starting point. Don’t forget to have a look at the extra nodes for ModelToViewCoordinates.init(modelBounds:,viewBounds:), which you’ll need to write for the “zoom to max” gesture.
Methods in ModelToViewCoordinates should also be unit tested thoroughly. Do not modify your view until you have verified this structure works properly. ModelToViewCoordinatesTests.swift contains several unit tests — you may want to write more. That file should be put inside the ConntectTheDotsTests folder in the Project Navigator.
- Next, add a
ModelToViewCoordinatesproperty to your view, as well as gesture controllers for pinching and two-finger panning.
Answer the following in the README.md for your project.
- Typically controllers recognize all the gestures for your app, but zooming and panning are more naturally thought of as part of the view’s behavior and can be put on your
GraphViewclass instead. Why is that the case?
For each gesture you wish to add to your view, first drag the appropriate gesture recognizer from the “Object Library” and drop it on top of your view in the storyboard. Then, write the appropriate handler method in
GraphView. The last step is to click and drag with the mouse from the circle next in the margin to the left of the gesture handler name in the source code to the recognizer icon in the view controller title bar in the storyboard. Your will need to use thetranslation(in:UIView?)andsetTranslation(_:CGPoint,in:UIView?)methods forUIPanGestureRecognizersin this part. TheUIViewparameter is the view you would like to pan. If your action is in theGraphViewclass, this parameter will just beself.In the simulator, you can perform pinch gestures by holding down the Option key while dragging the mouse. For two finger panning, be sure to set the number of required “Touchs” to 2 in the Attribute Inspector for that gesture recognizer. You simulate a two finger pan by holding down the Option and Shift keys while dragging the mouse.
Also add a recognizer for two-finger double taps that “zooms to max”. That is, it zooms in and re-positions the view so it is as large as possible while still fitting all of the dots and lines in the view’s visible area. Be sure to set the number of required “Touchs” to 2 and number of “Taps” to 2 in the Attribute Inspector for the new tap gesture recognizer. You simulate a two finger double-tap by holding down the Option and Shift keys with double clicking the mouse.
The
ModelToViewCoordinates.init(modelBounds:,viewBounds:)will be handy here. The rectangle forviewBoundsis simply theboundsrectangle for your view, inset enough to prevent nodes from going off the edges of the screen. ThemodelBoundscan be computed by finding the smallest rectangle that includes the location of each node initemsand also the start and end points for each edge initems. There are many ways to do this. Be sure to look over the methods available to you for CGRects.
Problem 3: Final Features
Change the
ConnectTheDotsViewControllerto instead store aDotPuzzle. The puzzle can initially be set up with some connected and unconnected dots that you create just for testing. Change yourupdateUI()method to create the appropriateitemslist for yourGraphViewbased on this puzzle. Also change tap to work as specified for puzzles. To complete this part, you will need a method to determine whether a tap is within the circle drawn for a particularDot.QuestionAnswer the following in the
README.mdfor your project.To determine whether a tap is within a node, you may wish to write a method with the following signature:
func pointIsInside(_ point: CGPoint, nodeCenteredAt: CGPoint) -> BoolWhat specific pieces of information do you need to implement the body of
pointIsInside? Given the choice between including the method in yourConnectTheDotsViewControlleror in yourGraphView, which is a better design? Why?
Add the ability to load puzzles to the controller. You’ll need to add Files.swift to your project to do this. Override your controller’s viewDidLoad() method to load the
star.jsonpuzzle. Once that works, also add a “Load Puzzle” button to your interface and let the user choose which puzzle to load. After loading a puzzle, your app should zoom in and re-position the view as in the previous step.
Extras
There are many possible extensions to the basic app. Here are a few to consider:
When you zoom in our out, the view may not remain centered on the same location. Change your zooming code so that the center of the visible part of your model stays fixed as the user performs a pinch gesture.
Some apps, like GoogleMaps, allow you to both zoom in/out and pan the view at the same time. Change your gesture recognition code to support this behavior.
It is a little pesky to use touches to complete a large puzzle. Allow the user to use a dragging gesture to connect dots rather than individual touches.
Add a “Create mode” that lets you design a puzzle to solve.
Add a way to let the user customize how the puzzles are shown (color, size, etc.).
Add a brief description of any extras to your README.md file so we know what to look for.
What To Turn In
Be sure to submit everything in the following checklist:
- The code for the ConnectTheDots app and unit tests. Be sure to include rep invariants, abstraction functions, and
checkRepmethods in bothDotPuzzleandModelToViewCoordinates. - Answers to the questions 1-2 in the
README.md. - A description of any extra features you added, also in the
README.md.
As always, verify your solution is complete and runs by cloning your repository to a temporary location and checking it.
Grading Guidelines
This class emphasizes both program correctness and best practices, including programming style, documentation, specification, sound design principles, testing methodology, etc. Grading will reflect both of these emphases. There is, of course, some subjectivity when evaluating design and specification decisions, but your choices should follow the basic philosophies and methodologies we have been exploring. Labs will be graded on the following scale:
A+: An absolutely fantastic submission of the sort that will only come along a few times during the semester. Such a submissions reflects substantial effort beyond the basic expectations of the assignment.
A: A submission that exceeds our standard expectation for the assignment. The program must reflect additional work beyond the requirements or get the job done in a particularly elegant way.
A−: A submission that satisfies all the requirements for the assignment — a job well done.
B+: A submission that meets the requirements for the assignment, possibly with a few small problems.
B: A submission that has problems serious enough to fall short of the requirements for the assignment.
C: A submission that has extremely serious problems, but nonetheless shows some effort and understanding.
D: A submission that shows little effort and does not represent passing work.