Lab 9 : Campus Paths App
Objective
- Use multiple view controllers and your model to design an iOS app to find routes between buildings.
Table Of Contents
Overview
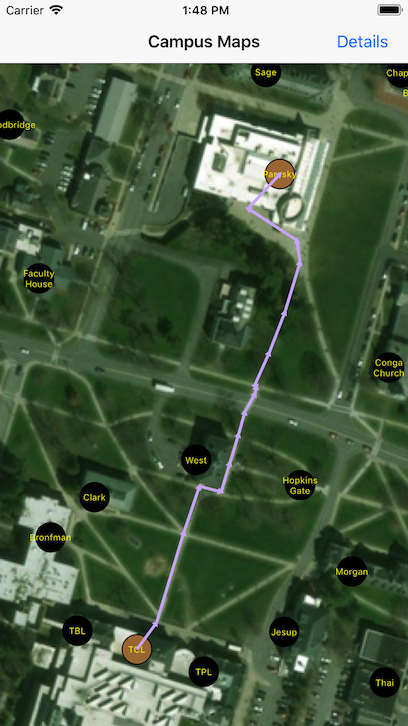
To help visitors navigate the Williams campus you will build a route-finding app. It will generate directions for the shortest walking routes between two buildings, using your graph ADT to represent buildings and pathways on campus. The following screen shot illustrates such an app showing the shortest path from TCL to Paresky. (Your app need not match this interface this exactly — it is only to illustrate the basic idea…)
You will continue using your GraphProjects workspace for this project, specifically the UIClients/CampusPathsApp. You should have completed the command-line version of this program before starting the iOS app.
The Controller and View
You are free to design the CampusPaths interface in any way that meets the following minimal “informal” requirements. (These requirements are “informal” in the sense that they mix feature descriptions with UI uses cases and implementation details – that is fine for this lab in which the problem and solution is fairly constrained, but not ideal when building your projects from scratch. You’ll want to be more rigorous in separating features, use cases, and implementation details for your projects.)
“Informal” Requirements
When the app starts it should display a Map containing the campus map image
WilliamsCampus.jpgwith each building in the data set indicated.That Map view should support the usual navigation features: two-finger zoom, pan, and “zoom-to-max” operations from previous weeks.
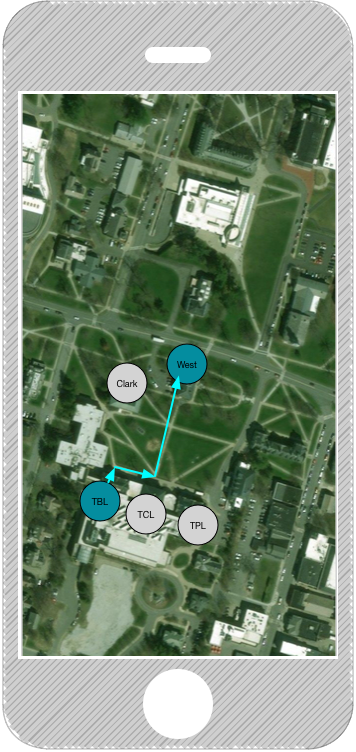
To find directions between buildings “A” and “B”, the user will touch “A” and then drag the finger to “B”. When the user finishes the gesture in “B”, the shortest path from “A” to “B” should be drawn on the screen. Both “A” and “B” should be highlighted as well. If the gesture does not begin or end in a building, the app should reset the view so no buildings are highlighted and no paths are drawn.
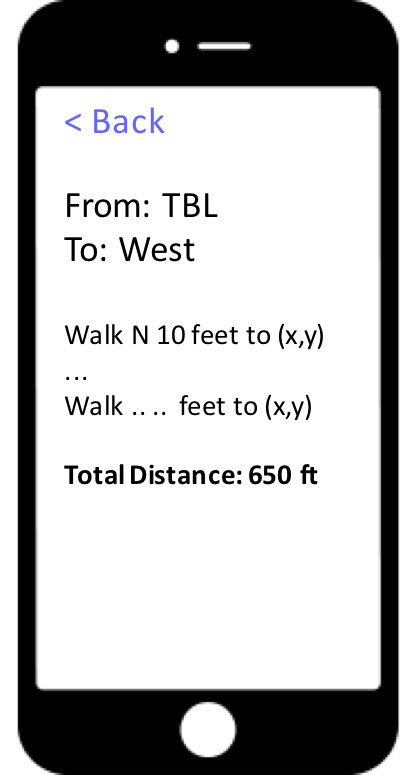
Your app must enable the user to switch to a Detailed Directions view to present detailed instructions for the selected path, but only when there is a path to show. The Detailed Directions view must present at least: the full names of the starting and ending buildings, the full list of steps along the path in the form
Walk <dist> feet <direction> to (<x>, <y>)and the total distance. The detailed steps and total distance should be computed and presented exactly as specified in the section on testing. That section also describes how to compute the compass direction for each step along the path.
You may use a
UITableViewControllerfor this part, or any other UI component that you find handy. The action to bring up the details may be pressing a button, performing a swipe gesture, etc. It is up to you. However, that action should be disabled if there is no path to show.There must be a way to switch back from the Details back to the Map, which should show exactly what was showing before switching to Details.
Hints
I have added two inspectable properties to our good-old
GraphViewclass that will help you draw a graph showing the image of campus, buildings (GraphNodes), and paths (GraphEdges).backgroundis aUIImageto show behind the graph in the view. You can setbackgroundto be any image stored in the CampusPaths target through the Attribute Inspector just as you would set any other@IBInspectableproperty. The GraphView’sdrawmethod will draw the background image appropriately zoomed and offset.edgesWontOverlapNodesis a Boolean value indicating whether the arrows drawn for edges are allowed to overlap nodes. In the previous labs, edges were shortened to not overlap their source and destination nodes. But now we want them to remain their full length since in all likeliehood the only nodes you will draw are for buildings, and not for all path intersections. Thus you should set this property to be set tofalsefor the GraphView you create in the storyboard for CampusPaths.
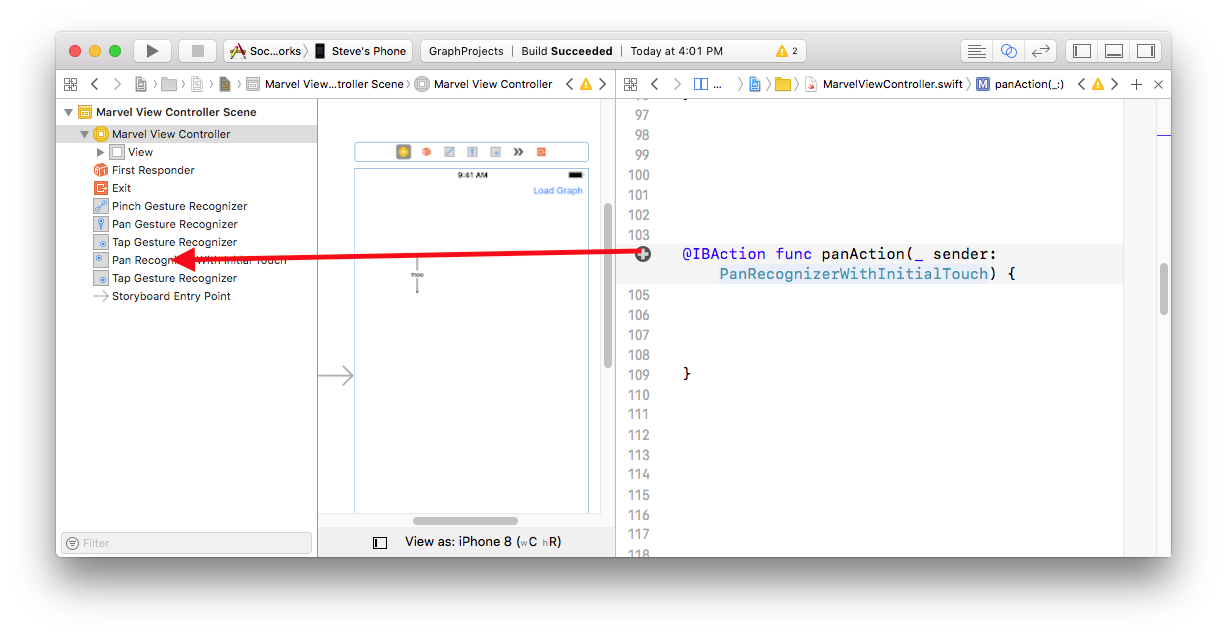
Recall that the fastest way to connect an action method in a view class to a gesture is to drag from the plus icon in the margin next to the method up to the appropriate gesture icon in the Storyboard outline.
You are free to design the interface to your app however you like, as long as it as reasonable aesthetics and behavior. You’ll likely to want to use some combination of navigation controllers, custom controllers table view controllers, etc.
You will likely borrow code from your previous projects, which is great, but please try to design your app to avoid code duplication as much as possible. You may find it useful to refactor earlier code to make it more general. Feel free to do this, but document those changes in your code and in your
README.md. This is formally required below.We previously used
DrawableGraphsto layout nodes visually. You don’t need such a class this time around because the model itself stores locations for the graph nodes.Designing the entire model, view, and controller ahead of time is good, but do not implement much of the UI until you have thoroughly tested the model (below).
UI Tests
We will follow the strategy from our Requirements lecture by using Use Case Unit Tests to test the UI of your CampusPaths app. I have already written the tests for you in the Appendix. Feel free to add any additional ones specific to your app, but these cover the basic assignment requirements.
Extensions
Here are a few extensions you could add to make the app more usable, although there are many others as well:
- Add zoom limits to prevent the user from zooming out beyond the bounds of the image.
- When a path is selected, zoom in to show that path in as much detail as possible.
- Provide an option to show all paths in the graph.
- Show the shortest path in real time as the user drags their finger.
The detailed directions can be pesky because of multiple consecutive steps all telling you to walk in the same direction. Change your detailed view to simplify the directions. Here are two ways:
- Merge all sequences of steps that go in the same compass direction into one longer step.
- Merge all sequences of steps between points that correspond to intersections. By intersection, we mean a node in the graph that has more than two incoming/outgoing edges. If such a sequences has multiple directions, you can fall back to the first suggestion, or compute the general direction for the whole subsequence you are trying to simplify.
- Add way to search for location with text field.
- Add a way to show the shortest path from a building to every other building. (This is a minimal spanning tree.)
- Add a feature for adding/removing buildings or paths from the model.
Change your Dijkstra’s algorithm to return the best 3 paths. This is subtle – you’ll need to change how your algorithm works a bit.
Appendix: Campus Paths Requirements and Use Case Unit Tests
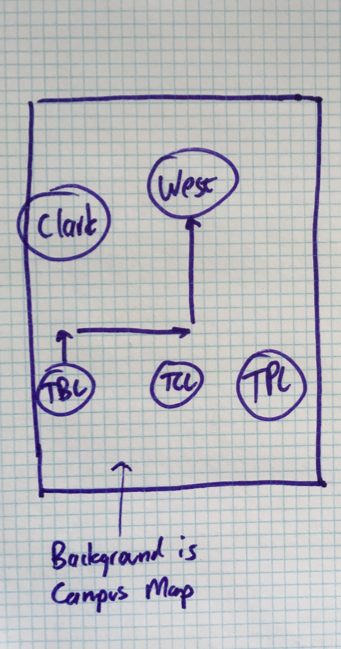
The following illustrates some parts of the Campus Paths requirements along the lines of what you will produce for your final project. This example doesn’t include everything, but it should demonstrates how the feature list, use cases, and ui sketches are related and how they present a unified vision for the app. You are welcome to use whatever format you like. They don’t have to be styled or formatted exactly like these.
I have also included unit tests derived from the use cases. You may use them to test your app, as required above. Feel free to define others – and put them in your README.md – but the collection here should be sufficient for most purposes.
- Show Map
- Displays map of campus with buildings marked.
- User can navigate around the map.
- Finding Paths
- User can select two buildings.
- The shortest path between selected buildings is shown.
- [Optional] Alternative paths are also shown.
- Detailed Instructions
- User can view shortest path as step-by-step instructions.
- Each step conveys a distance and compass direction.
- [Optional] The steps are described from the user’s perspective (eg: turn left)
1. Map Navigation
Main Path:
1. User launches app.
2. Williams Campus image and buildings are displayed.
3. User performs zoom and pan gestures.
4. Displayed image is adjusted accordingly.
2. Find Shortest Path
Main Path:
1. User performs search gesture.
2. System identifies the buildings at start and end of gesture. The shortest path is displayed as a sequence of arrows and the start/end buildings are highlighted.
Alternative Path:
2.1. The System recognizes the touch at the start or end (or both) of the gesture was not in a building. Any existing path on map disappears.
3. Show Step-By-Step Instructions
Main Path:
1. User performs search gesture.
2. System identifies the buildings at start and end of gesture. The shortest path is displayed as a sequence of arrows and the start/end buildings are highlighted.
3. User requests Step-By-Step Instructions
4. System shows the shortest path as a list of steps, each with a number of feet and compass direction.
5. User requests to return to map view.
6. Systems shows exactly what was shown before Step 3.
Alternative Path:
2.1. The System recognizes the touch at the start or end (or both) of the gesture was not in a building. Any existing path on map disappears.
3.1. User requests Step-By-Step Instructions
4.1. Return to Main Path at Step 6.
Note: These will be useful for testing your CampusPaths app, but you will not include unit tests in your project requirements document.
1a. Map Navigation: Basic
1. Launch app.
2. Use zoom and two-finger pan in focus in on the Science Quad. 3. Double two-finger tap to zoom back out.
Outcome: Individual buildings should be positioned properly and the image clear enough to identify sidewalks and roads when zooming in.
1b. Map Navigation: With Path
1. Launch app.
2. Find shortest path between two buildings 3. Use zoom, two-finger pan, and two-finger double tap to navigate in map.
Outcome: Edges on shortest path should stay positioned properly.
2a. Find Shortest Path: Successful
1. Perform search gesture from TCL to West.
Outcome: TCL and West buildings should be highlighted, and a path of 4 arrows should connect TCL to West.
2b. Find Shortest Path: Not Successful
1. Perform search gesture from TCL to West.
2. Perform search gesture from TCL to area of map with no building.
Outcome: No buildings should be highlighted, and no arrows should be present on map.
3a. Show Step-By-Step Instructions: Success
1. Perform search gesture from TCL to West.
2. Switch to Step-By-Step Instructions.
Outcome: A list of steps should appear with the following basic form:
Walk 57 feet NE to (1065,1286)
Walk 160 feet N to (1081,1233)
Walk 82 feet N to (1090,1206)
Walk 45 feet N to (1088,1190)
The display should also indicate the start and end buildings and a total distance of 345 feet.
3b. Show Step-By-Step Instructions: Return To Map
1. Perform search gesture from TCL to West.
2. Switch to Step-By-Step Instructions.
3. Switch back to map.
Outcome: TCL and West buildings should be highlighted, and a path of 4 arrows should connect TCL to West.
3c. Show Step-By-Step Instructions: No Path
1. Perform search gesture from TCL to area of map with no building.
2. Try to switch to Step-By-Step Instructions.
Outcome: System stays on map view. No buildings should be highlighted, and no arrows should be present on map.