Lab 2 : Calculator
Objective
- To use many of the Swift features we’ve covered, including:
- functions and properties (instance variables)
- computed vs. stored properties
- let versus var
enum,struct, andclass- Optionals
- String and Dictionary
- ?? operator (hopefully)
- To gain experience using XCode’s GUI design features, and to implement an iOS app from scratch using the following basic concepts:
- Model-View-Controller pattern
- Target/Action and Outlets
- UILabel
- UIButton
- UIViewController
- To create an iOS project from scratch in XCode.
Table Of Contents
Partners
You may work with a partner on this lab if you like. To do so, set up one of your Gitlab projects to be shared with both partners. Details on doing that can be found it Part 6 of the GitLab Tutorial.
Overview
Build a calculator like the one we designed in lecture. It should be designed for an iPhone, and look good and work properly in both portrait and landscape modes. Your design should follow the MVC pattern, with each piece designed and tested as independently as possible. The following outline is one way to approach building your app.
Problem 0: Project Setup
Clone your lab2 repository following the same steps as previous weeks. The repository is initially empty (except for a .gitignore file, which tells git to ignore temporary files you should not track with version control).
To create a new project, first launch XCode.
Select “File -> New -> Project…” from the menu bar.
Select “iOS” from the list at the top of the dialog box, and then “Single View App”. The click Next.
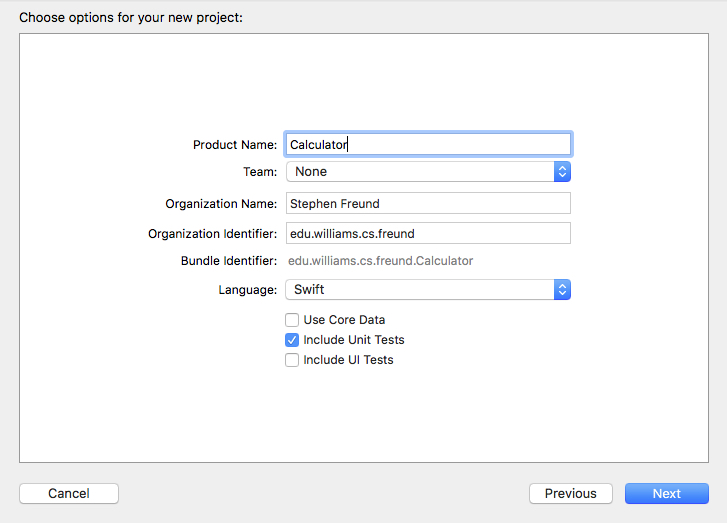
Set the Product Name to “Calculator” and the Language to “Swift”. Enter your name as the Organization Name, and
edu.williams.csas the Organization Identifier. Be sure that the “Include Unit Tests” box is checked. The window should something like the following. Verify its settings and then click Next.
Select the folder for your lab2 repository and then click Create.
Make your Schemes shared, by clicking on the Scheme pop-up menu in the Toolbar and selecting “Manage Schemes…”. Then click the “Shared” check box for each scheme in the table that appears in the dialog box, and then click “Close”.
As usual, move a few files out of the way. In the Project Navigator, select
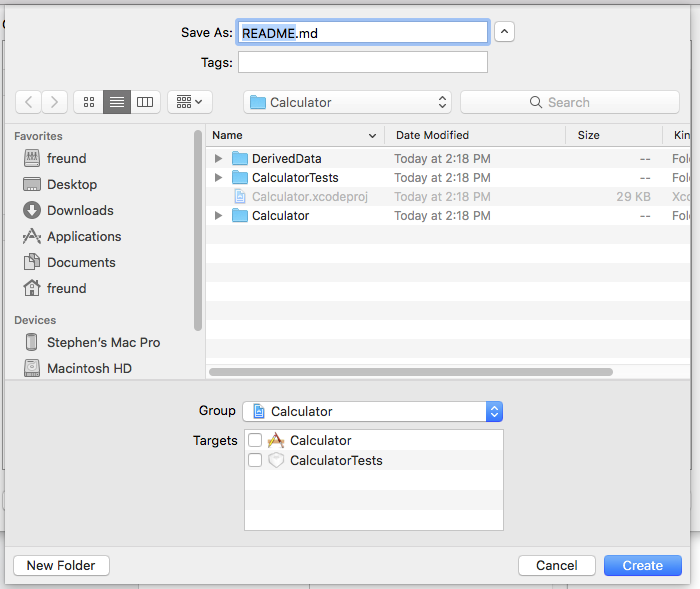
AppDelegate.swift,LaunchScreen.storyboard, andAssets.xcassetsby command-clicking on each. Then control-click on them, and select “New Group From Selection”. Rename the newly-created group “Support Files”.All projects should include a README.md file. Create one now by selection “File -> New -> File…” from the menu bar, and then select “Markdown File” as the template for the new file. Save the new file in the top level directory for your project, as shown below:
 Include in the README your names and a brief description of your project. For this week, one or two sentences is sufficient.
At this point, you are ready to go. However, I suggest adding and comitting all the project files to GitHub before doing anything else. If you are in the top-level directory of your repository,
git add Calculatorfollowed bygit commit -ashould suffice.Run your Calculator and verify that it compiles and runs on an iPhone 8/X/XR or similar phone. It won’t do anything interesting, but you can verify that the simulator properly starts and launches your application, which will just display a white screen. The first time you run your code, XCode must essentially create a new phone installation to use in the simulator. This may take a minute or two, but on consecutive runs it will be much faster.
Problem 1: CalculatorModel
Create a new CalculatorModel class for our model.
Select the “Calculator” folder in the Project Navigator (that is, the folder containing
Main.storyboard, etc.).Select “File -> New -> File…” from the menu bar.
Select “Swift File” for the Template and click Next.
Name your class
CalculatorModel.swift. Be sure it will be stored in the “Calculator” folder, that its Group is “Calculator” and the “Calculator” Target is checked. The window should like the following. Verify its settings and then click Create. Once created, if the new file does not appear next to the other source files within theCalculatorgroup in the Project Navigator, you can just click and drag it to the right place.

- You may use our template as a starting point if you wish.
A few details on this part:
You may wish to complete all (or most) of the model – including unit testing (below) – before proceeding to work on the UI.
You can use any Unicode characters you want as your mathematical symbols for your constants and operations. For example, symbols like 𝝅, √, and ± are perfectly fine.
In your case to perform a binary operation, you may need to complete the last binary operation that was started so that, for example, the sequence “6 x 5 x 4 =” properly results in 120).
And be sure to unit test thoroughly.
Include unit tests for your CalculatorModel class. You should have a folder titled “Calculator Tests” in your project. You can run the tests by changing the Run Button to be the Test Button as we did last week. But the keystroke “Command-U” will also run the tests. If you look in that folder, there will be a file CalculatorTests.swift. You can delete the skeleton text XCode inserted in that file and write your own unit tests in their place. Here’s one example test to get you started. Be sure to give each test a descriptive name that always starts with test..., and to include the @testable import line. If XCode complains that Calculator is undefined when you try to compile and run the tests, you most likely forgot that line. Handy tip: Now that we are building iOS apps, you can use Command-R to run and Command-U to run tests without switching the play button from Run to Test and vice-versa.
import XCTest

// allow your test cases to access internal
// properties/methods of the Calculator module.
@testable import Calculator

class CalculatorTests: XCTestCase {

    func testExample() {
      let c = CalculatorModel()
      c.set(operand: 10.0)
      c.perform(op: "+")
      c.set(operand: 11.0)
      c.perform(op: "=")
      XCTAssertEqual(c.result, 21)
    }
}
Problem 2: View and CalculatorViewController
Design the View in your app’s Main.storyboard. Your calculator view should have at least 20 buttons. In addition to those from lecture — 0-9,+,*,/,-,=, and π — these should include buttons for at least a couple additional functions of your choice, as well as . (to enter floating points) and C (clear).
Once your calculator is laid out as you would like, create your custom CalculatorViewController subclass of UIViewController, and change the controller for you storyboard to that custom view controller in the Identity Inspector:
Create the file as you did for the model above except select “Cocoa Touch Class” for the Template. — we use this whenever we create a custom version of a UIKit library class — and then select
UIViewControllerin the “subclass of:” popup menu. Name your classCalculatorViewController.Open
Main.storyboardand select the Controller for your scene. The easiest way to select items from a storyboard is often to use the Document outline appearing to the left side of the storyboard, as shown below. If the outline is not there, select “Editor -> Show Document Outline” from the menu bar. Then click on the controller line at the top, which I have highlighted. (Your controller will likely have a different name than what is showing.)
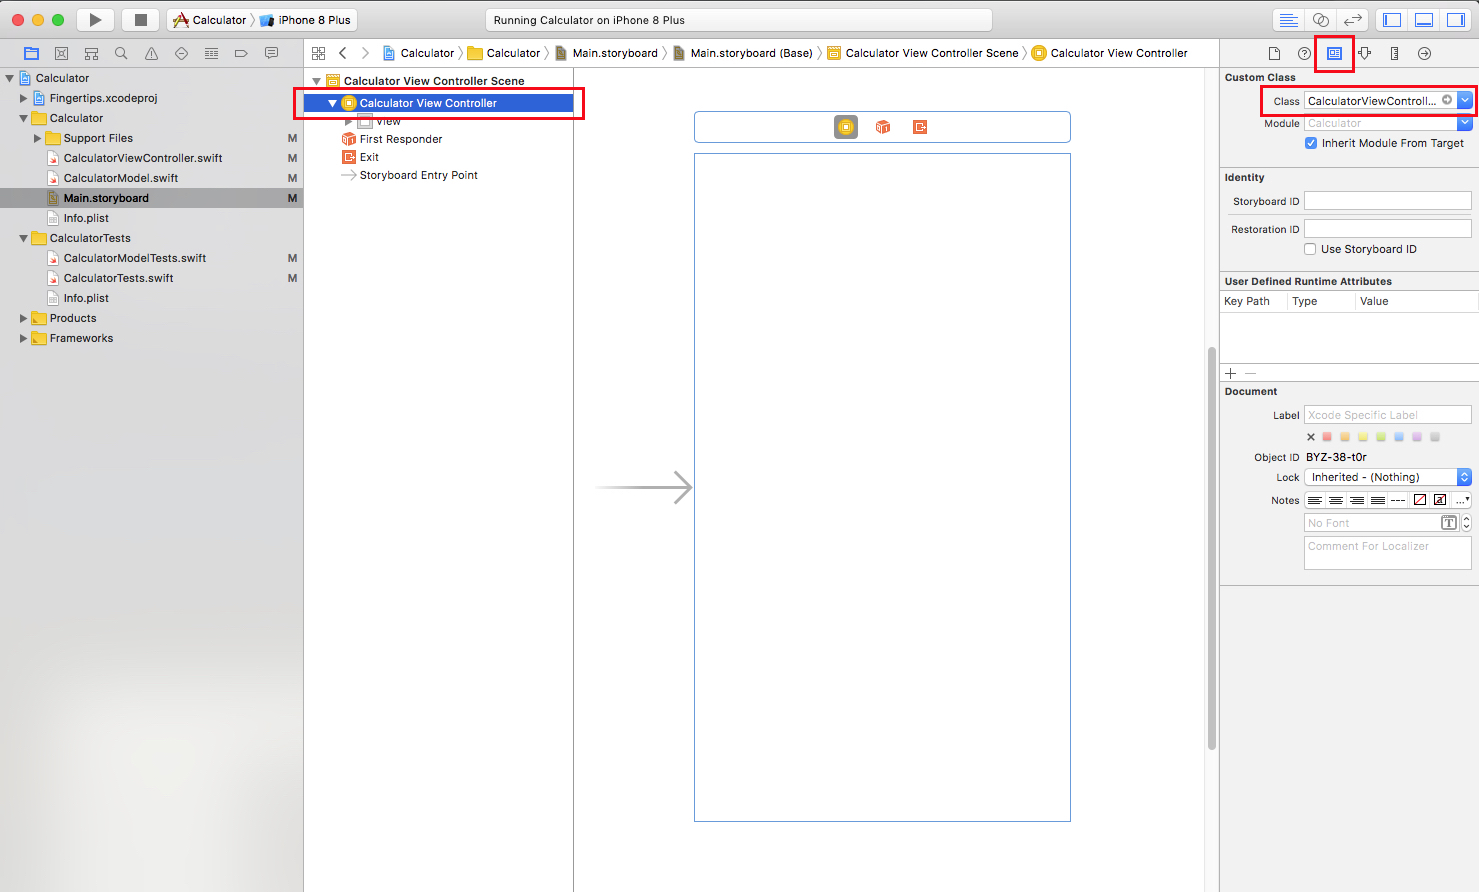
Then click on the “Identity” button at the top of the Inspector panel on the right-hand side of XCode’s window. That button is also highlighted in the image. Below that button, change the Class to be
CalculatorViewController.At this point the
ViewController.swiftfile in your project is no longer needed. You can control click on it and delete it.You can use our template as a starting point for your controller. Be sure to connect your buttons to the appropriate event handlers. I have given you one
@IBActionhandler for digits. You’ll need to wire that one to your UI button and also create a second action for the command buttons. Also, note thatMARKcomments in the template. These help you organize and navigate through a file with the “Jump Bar” at the top of the editor:
If you click on
CalculatorViewControllerin the Jump Bar, a popup menu will allow you to jump to any declaration in that file. The MARKs appear as headings in that popup menu.
Proceed to fill in the details to process touches and update the display as appropriate. A few additional details for this part:
Use color to make your UI look nice. At the very least, your operations buttons must be a different color than your keypad buttons, but otherwise you can use color in whatever way you think looks nice.
Your layout constraints should ensure that the layout looks okay in either portrait or landscape mode.
Allow legal floating point numbers to be entered using the
.button in your calculator. The String methodcontains(String)will be useful here. This should only take one or two lines of code. Be careful to test (and nicely handle) the case where the user starts off entering a new number by touching the decimal point (i.e. the user touches the decimal point button whileuserIsInTheMiddleOfTypingis false).Implement the clear button
Cto reset the state of the calculator. This should leave your Calculator in essentially the same state it was in when you launched it.If you set a
UILabel’s text to nil or an empty string, it will resize to have zero height (shifting the rest of your UI around accordingly). You may find this disconcerting for your users. If you want aUILabelto appear empty, but not be zero height, simply set its text to be a single space character: “ ”.
Problem 3: Description Label
Extend the calculator to show a description of the sequence of operands and operations that led to the currently displayed result value. To do this:
Add a
Boolproperty to your model calledresultIsPendingthat returns whether there is a binary operation pending.Add a String property to your model called
descriptionthat returns a description of the sequence of operands and operations that led to the value returned by result (or the result so far ifresultIsPending). The character “=” should never appear in this description, nor should “...”. We give some hints on this step below.Implement a
UILabel descriptionLabelto your UI showing the sequence of operands and operations that led to (or is leading to ifresultIsPending) what is (or “will be” ifresultIsPending) showing in the display. IfresultIsPendingis true, put...on the end of the UILabel, else put=. If theuserIsInTheMiddleOfTyping, you can leave thedescriptionLabelshowing whatever was there before the user started typing the number. Be sure your Clear button clears the history as well.
Here are some examples of the completed feature in action.
| Touches | Description UILabel | Display UILabel |
|---|---|---|
| 7 + | “7.0 + …” | 7.0 |
| 7 + 9 | “7.0 + …” | 9.0 |
| 7 + 9 = | “7.0 + 9.0 =” | 16.0 |
| 7 + 9 = √ | “√(7.0 + 9.0) =” | 4.0 |
| 7 + 9 = √ + 2 = | “√(7.0 + 9.0) + 2.0 =” | 6.0 |
| 7 + 9 √ | “7.0 + …” | 3.0 |
| 7 + 9 √ = | “7.0 + √(9.0) =” | 10.0 |
| 7 + 9 = + 6 = + 3 = | “7.0 + 9.0 + 6.0 + 3.0 =” | 25.0 |
| 7 + 9 = √ 6 + 3 = | “6.0 + 3.0 =” | 9.0 |
| 5 + 6 = 7 3 | “5.0 + 6.0 =” | 73.0 |
| 4 × π = | “4.0 × π =” | 12.5663706143592 |
Hints For Part 3
CalculatorModel Abstraction. For Parts 1 and 2, your model’s abstract state was the single public property, namely
result. In Part 3, you can think of theCalculatorModelas an abstraction of three items that can be observed by the client through the analogous public properties:Abstract StateresultThe value currently stored in the calculator’s accumulator. resultIsPendingwhether or not the calculator is waiting for the second operand of a binary operation. descriptionThe history of steps leading to the current calculator state, represented by a String. Note: there are probably better abstractions than this. For example, we could represent the history as a sequence that could be traversed and examined rather than just as a String, or we could include which binary operation may be pending rather than indicating that there is some pending binary operation. However, this less detailed abstraction is sufficient for our purposes this week.
Implementation. In the simplest case, the
descriptionproperty should just produce a string describing how the currentaccumulatorvalue was created. If you think of it this way, then all you have to do is to create and store a String representation for theaccumulatorevery time you set the value of theaccumulatorto a new value. Thus, you may find yourself wanting your model to have two variables (theaccumulatorand its String representation) whose values are always set at the same time and that should never be out of sync with each other. In this case, a good design is to capture both variables in an immutablestruct:private struct ValueWithDescription { let value : Double let description : String }Your
accumulator’s type becomesValueWithDescription, and your model’sresultanddescriptionproperties are computed based on theaccumulator’s value.Things are a bit trickier when you have a pending binary operation: the calculator’s
descriptionshould not only include how theaccumulatorwas created, but also a description of how the pending binary operation was created (ie, the description of how the left operand was computed, and by the operator symbol). While you’ll likely want to make other changes toPendingBinaryOperationstruct as well, an important first step to supporting this is to have it store and operate onValueWithDescriptionoperands rather than onDoubleoperands to facilitate doing that:private struct PendingBinaryOperation { let leftOperand : ValueWithDescription let binaryOpFunction : (Double,Double) -> Double func apply(rightOperand : ValueWithDescription) -> ValueWithDescription { ... } }You may want to store the operator symbol in the structure as well.
Abstraction Function. We haven’t had much practice writing abstraction functions yet, but here is one way that we could describe mapping the
accumulatorandpendingBinaryOperationrepresentation properties to the model’s abstract state used by clients:Abstraction FunctionAF(self): self.resultIsPending\(\equiv\) self.pendingBinaryOperation != nilself.result\(\equiv\) self.accumulator’s value, ornilif it does not existself.description\(\equiv\) self.accumulator’s description if no result is pending; orself.pendingBinaryOperation’s description followed byself.accumulator’s description if result is pendingTesting. Test the changes to your model as you go, perhaps even before modifying the UI.
TestingAdd unit tests for
CalculatorModelto test theresultIsPendinganddescriptionproperties. The examples in the table above should provide the basis for a number of tests, but note that you won’t be able to test the scenarios where the user is in the middle of typing a multi-digit number since theCalculatorModelinterface doesn’t consider partially entered operands. Here are a couple tests to get you started:func testPendingBinaryOp() { let c = CalculatorModel() c.set(operand: 7.0) c.apply(operator: "+") XCTAssertEqual(c.description, "7.0+") XCTAssertTrue(c.resultIsPending) } func testBinaryOpCompletedWithEqual() { let c = CalculatorModel() c.set(operand: 7.0) c.apply(operator: "+") c.set(operand: 9.0) c.apply(operator: "=") XCTAssertEqual(c.result, 16) XCTAssertEqual(c.description, "7.0+9.0") XCTAssertFalse(c.resultIsPending) }
Extras
Here are some thoughts on additional features you could add:
Implement a “backspace” button for the user to touch if they hit the wrong digit button. This is not intended to be “undo,” so if the user hits the wrong operation button, he or she is out of luck! It is up to you to decide how to handle the case where the user backspaces away the entire number they are in the middle of typing. You will probably find the Strings and Characters section of the Swift Reference Guide to be helpful here.
Use the iOS struct NumberFormatter to format your display so that it only shows 6 digits after the decimal point (instead of showing all digits that can be represented in a Double). This will eliminate (or at least reduce) the need for Autoshrink in your display. While you’re at it, make it so that numbers that are integers don’t have an unnecessary “.0” attached to them (e.g. show “4” rather than “4.0” as the result of the square root of sixteen). You can do all this for your description in the
CalculatorModelas well.Make one of your operation buttons be “generate a random double floating point number between 0 and 1”. This operation button is not a constant (since it changes each time you invoke it). Nor is it a unary operation (since it does not operate on anything). The Swift function
drand48()will be useful here.Add app icons to your
Assets.xcassetsfile (which you likely moved to Supporting Files). The only trick here is to provide versions of your icon in all the right sizes.Create a launch screen for your Calculator in
LaunchScreen.storyboard. Remember that you will want to use some simple autolayout to make your launch screen look good on all platforms.
Add a brief description of any extras to your README.md file so we know what to look for.
What To Turn In
Be sure to submit everything in the following checklist:
- The code for the Calculator app and your unit tests.
- A description of any extra features you added, also in the
README.md.
As always, verify your solution is complete and runs by cloning your repository to a temporary location and checking it.
Grading Guidelines
This class emphasizes both program correctness and best practices, including programming style, documentation, specification, sound design principles, testing methodology, etc. Grading will reflect both of these emphases. There is, of course, some subjectivity when evaluating design and specification decisions, but your choices should follow the basic philosophies and methodologies we have been exploring. Labs will be graded on the following scale:
A+: An absolutely fantastic submission of the sort that will only come along a few times during the semester. Such a submissions reflects substantial effort beyond the basic expectations of the assignment.
A: A submission that exceeds our standard expectation for the assignment. The program must reflect additional work beyond the requirements or get the job done in a particularly elegant way.
A−: A submission that satisfies all the requirements for the assignment — a job well done.
B+: A submission that meets the requirements for the assignment, possibly with a few small problems.
B: A submission that has problems serious enough to fall short of the requirements for the assignment.
C: A submission that has extremely serious problems, but nonetheless shows some effort and understanding.
D: A submission that shows little effort and does not represent passing work.