Boggle!
Attention
Submit your solution to Part 1 and Part 2 by the due date on April 27/28.
Submit your solution to those parts and Part 3 by the due date on May 4/5.
Objectives
In this lab you will gain experience with using multiple classes in Python as you implement a solitaire version of the classic game Boggle.
The official rules for Boggle are posted here. If you are unfamiliar with the game, you may wish read these instructions before reading the description of the lab.
Administrativia
You are strongly encouraged to work in pairs on this assignment, but it is not required.
This assignment differs from our normal weekly labs in several ways:
First, you have more time to work on it.
Second, this lab handout describes important classes and methods, and provides some tips on programming techniques that should be helpful, but unlike previous lab handouts, it will not present a detailed overview of the internal structure of the program. That part of the program’s design will be your responsibility.
Finally, since this is a multi-week lab, this assignment will be counted as two labs when determining your final grade.
On a related note, this handout is also a bit longer than usual. Be sure to read it carefully.
Playing Boggle
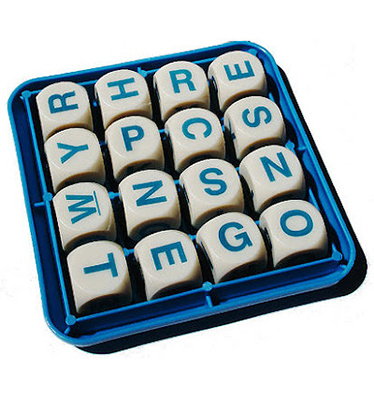
In Boggle, players form words by linking together adjacent letters appearing on dice that are arranged in a 4x4 grid. Points are awarded based on the length of the word found, and the player finding words with the highest total score after 3 minutes wins. That game is shown below on the left. Our version is shown on the right.
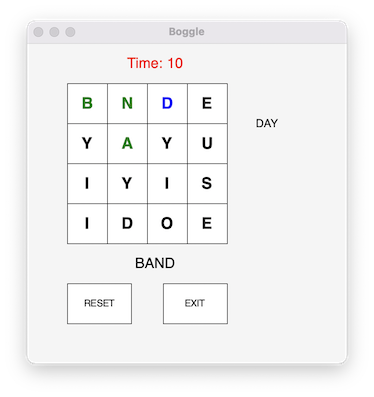
Our screenshot shows the most important elements of the user interface. Instead of physical dice, we use a 4x4 grid of “buttons” labeled with letters. When the player – and this is a single-player version of Boggle! – identifies a group of letters that form a word in the grid of letters, they enter the word by clicking the appropriate buttons in the order that the letters appear in the word. The letters of the word currently being entered are displayed below the letter grid in the program window. In the example shown, the letters BAND appear below the grid, indicating that the buttons labeled B, A, N and D have been clicked in that order.
In your version, you are welcome to customize the game with different colors and fonts (but please adhere to the colors specified in the “Creating a word” section below).
Below we give an overview of the main features of the game you will implement.
Creating a Word
In the figure above, you may notice that the letters B, A and N are displayed in green while the letter D is displayed in blue. In our implementation, the most recently clicked letter is displayed in blue and the letters clicked while entering the current word are displayed in green. If the next letter clicked is adjacent to the last one (i.e., the one displaying a blue letter) and if the letter is not already included in the current word (i.e., it is black rather than green), then that letter is added to the current word. The letter that had been displayed in blue becomes green and the letter that was most recently added becomes blue. Your game should provide similar feedback as letters are clicked.
Completing a Word
To indicate that a complete word has been entered, the player clicks a second time on the last (blue) letter of the word. The program then checks to make sure the word is at least three letters long, has not previously been entered, and is a valid word (using the provided dictionary). If it passes these tests then the word is added to the collection of words the player has found, and the text area to the right of the grid is updated to include the word.
Resetting a Word
The player can indicate that a mistake has been made and there is no apparent way to complete the word by clicking any non-adjacent letter of the blue letter. Doing this will reset the colors of all of the selected letters to black, and clear the word in progress shown below the grid, allowing the player to start over by clicking the first letter of a new word.
Resetting and Exiting the Game
The components at the bottom of our program’s window are used to control when games start and end. If the RESET button is pressed, the program randomizes the letters displayed on the boggle cubes (described below), clears all words and text areas, and begins a new game. If the EXIT button is pressed, the game ends and the window closes.
Shaking the Dice
When your program first starts, or whenever you press RESET, your code should randomize the letters shown in the grid of buttons representing the Boggle cubes.
The game of Boggle uses a set of cubes labeled with letters in a way that is intended to yield a nice mix of consonants and vowels when the Boggle box is shaken to randomize the letters. To make your game resemble the original, your program should choose the letters displayed based on the letters appearing on the actual Boggle cubes. To do this, you will use the provided brandom.py Python random module, which has functions for picking a random integer and for shuffling the contents of a list. This algorithm is described in detail below.
Getting Started
Clone the lab resources from the gitlab repository, as usual:
git clone https://evolene.cs.williams.edu/cs134-labs/22xyz3/lab09.git
where your CS username replaces 22xyz3. If you are working with a partner, you replace this with your CS username and your partner’s CS username, sorted, and separated by a - (eg, 22xyz3-24abc2). The description of the files provided in the starter is available in README.md and discussed below.
Note
If you are using a Windows machine, you need to set the DISPLAY variable to get the graphics to work. This step is described
in Windows Setup For Turtle and Graphics.
graphics.py Module
We have provided you with a simple graphics library for implementing your game, graphics.py. This is the same module we used in class to implement Tic-Tac-Toe. You should not edit this module. We have provided an overview of the objects and methods that will be particularly useful for this lab here.
Board Class
The Board class in board.py is the same base class we developed in lecture to implement our Tic-Tac-Toe game. The Board creates a grid of rectangles, with the default row, column, and size values appropriately set for a Tic-Tac-Toe game. (You will need to specify different row and column values for Boggle.) The Board class also allows us to draw an exit and reset button, and provides methods for checking for clicks inside of those buttons. There are methods for manipulating the text above, below, and to the right of the grid as well. Spend some time reviewing the Board class if necessary, but do not make any changes to it.
Even though we used the Board class for Tic-Tac-Toe, there are some differences between the boards for the two games. Thus, just as we did for Tic-Tac-Toe, you will extend the Board class to leverage the existing code and customize it as needed for Boggle in the BoggleBoard class in boggleboard.py. You can take advantage of the helper functions provided in Board for converting between window coordinates and grid locations. Remember, by inheriting from the Board class, your subclass BoggleBoard will have access to all of those methods. That’s the beauty of inheritance!
Since we discussed the Board class in lecture as we developed our Tic-Tac-Toe game, we do not provide a detailed discussion of individual methods here. You should review the code and lecture slides to make sure you understand how to use it. We do provide a sample usage of the Board class in the if __name__ == "__main__" block of code. This sample code shows how to use some of the provided methods for working with mouse clicks. You can run it by typing:
python3 board.py
You can also see documentation of the Board class by typing the following (note that you can type “q” to quit when finished looking to get back to your Terminal):
pydoc3 board
In this lab, you will implement your Boggle game using the classes described in the Parts below.
Part 1: BoggleLetter Class
Start by implementing the BoggleLetter class in boggleletter.py. This class implements the functionality of a single letter cube in Boggle. A BoggleLetter is minimally defined by:
its grid coordinates on the Boggle board (typically read as (column, row)).
a
Textobject from the graphics module that displays the letter on the cube. This object further has attributes that encode what the object represents (i.e., the string that represents the letter itself), and stylistic features such as the text color. (You can read more about theTextobjects and methods here.)
We have provided some method headers and some comments to help you get started. Think about what attributes and methods are required to capture the state of a single BoggleLetter. We have filled in some attributes in __slots__ but you may choose to add more. Do not change any existing methods, but feel free to add more helper methods as needed.
Complete the method headers in the file boggleletter.py by replacing pass with your own implementation.
BoggleLetter Method |
Behavior |
|---|---|
|
initializes the attributes of the class. We have provided this method for you. |
|
getters for the row and column attributes of a |
|
getter/setter for the character a |
|
getter/setter for the color of a |
|
return whether the |
|
returns the appropriate string representation of a |
The if __name__ == "__main__:" block of boggleletter.py contains the following testing code:
from board import Board
win = GraphWin("Boggle", 400, 400)
board = Board(win, rows=4, cols=4)

let1 = BoggleLetter(win, 1, 1, "A")
let2 = BoggleLetter(win, 1, 2)
let2.setLetter('B')
let2.setColor("blue")
let3 = BoggleLetter(win, 3, 1, "C", color="green")
let3.setColor("green")

# pause for mouse click before exiting
point = win.getMouse()
win.close()
This code creates an instance of the Board class and draws the letters on the board. Running the file as a script, should produce the following BoggleLetters in your Board window:
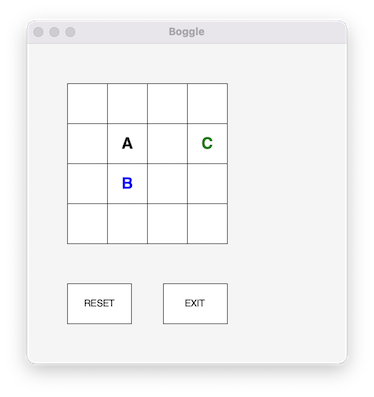
BoggleLetter test code
We have also provided some doctests on some of the methods. While we won’t require any specific number of tests, you should add more tests to the methods your write, following our examples to see how to create windows/boards/letters in tests. You may also add additional testing code in if __name__ == "__main__:". Ensure that your BoggleLetter class is working completely before moving on to the next part.
Part 2: BoggleBoard Class
After completing your BoggleLetter implementation, move on to the BoggleBoard class in boggleboard.py. This class inherits from the Board class, just as we saw in our implementation of Tic-Tac-Toe. In addition to the methods and attributes inherited from Board, you should implement several additional board methods that are specific to Boggle. As before, do not change any existing methods, but feel free to add additional attributes to __slots__ and methods as needed. Minimally, a BoggleBoard will need an attribute to represent the grid (which should be a list of lists of BoggleLetters).
Complete the method implementations found in the file boggleboard.py by replacing pass with your own implementation.
BoggleBoard Method |
Behavior |
|---|---|
|
initializes the inherited attributes of the super class ( |
|
returns the |
|
changes all letters to be black. |
|
clears all state to start a new game: clears letters, clears all text areas (right, upper, and lower) on board, and resets the letters on the board by calling |
|
returns the appropriate string representation of a |
|
implements the algorithm below to simulate shaking the Boggle cubes. |
Shaking Cubes
Our starter code initializes an attribute __cubes__ as follows:
self._cubes = [[ "A", "A", "C", "I", "O", "T" ],
               [ "T", "Y", "A", "B", "I", "L" ],
               [ "J", "M", "O", "Qu", "A", "B"],
               [ "A", "C", "D", "E", "M", "P" ],
               [ "A", "C", "E", "L", "S", "R" ],
               [ "A", "D", "E", "N", "V", "Z" ],
               [ "A", "H", "M", "O", "R", "S" ],
               [ "B", "F", "I", "O", "R", "X" ],
               [ "D", "E", "N", "O", "S", "W" ],
               [ "D", "K", "N", "O", "T", "U" ],
               [ "E", "E", "F", "H", "I", "Y" ],
               [ "E", "G", "I", "N", "T", "V" ],
               [ "E", "G", "K", "L", "U", "Y" ],
               [ "E", "H", "I", "N", "P", "S" ],
               [ "E", "L", "P", "S", "T", "U" ],
               [ "G", "I", "L", "R", "U", "W" ]]
This definition associates the name _cubes with a list of lists of strings. It assumes that the Boggle board has 4 rows and 4 columns (thus has 16 letters on it). Thus, _cubes contains 16 rows (one for each letter cube on the grid) and 6 columns. Each row in _cubes describes the 6 letters appearing on the sides of one of the 16 cubes included in the real Boggle game.
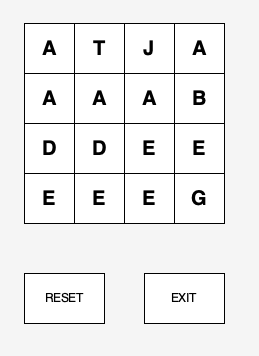
One way to assigned letters to the 16 BoggleLetter objects in our _grid is to use the first letter in each of our 16 cube lists, giving us the following (assuming we place letters in the first row from left-to-right, then the second row, etc.):
Of course, every time we assign letters in this way, we end up with the same board. We can begin to randomize the board by first changing our algorithm to choose a random letter from each cube for our _grid. So, letter at position (0,0) is drawing randomly from [ "A", "A", "C", "I", "O", "T" ], the letter at position (0,1) is drawn from [ "T", "Y", "A", "B", "I", "L" ], and the letter at (3,3) is drawn from [ "G", "I", "L", "R", "U", "W" ]. That gives us many different possible boards, but it still isn’t random enough! For example, it is impossible, to have a "B" in position (0,0) since the first cube does not contain that letter. This motivates one step we’ll do before assigning letters in this way: we’ll shuffle the order of cubes in the _cubes list. After shuffling, any of the 16 cubes may be any index in the list. That means that when we subsequently choose letters for cubes, both the choice of cube and the choice of side for each cube will be random.
We provide several helper functions in brandom.py to help you generate random integers within a range and shuffle the elements in a list. Our brandom functions are designed to produce the same result every time you run your program. That is, the board you generate will always be the same. While that helps for debugging, it makes for a boring game to play! To make your program generate different boards on each run, add a call to randomize() in the if __name__ == "__main__:" part of your code.
Note that 'J' and 'Qu' only appear once on the Boggle cubes and they appear on the same Boggle cube. So, if your program ever generates a game board with two 'J's or two 'Qu's or one of each, you did not implement the randomization process correctly.
Just like boggleletter.py, we have provided method headers and docstrings to guide your thinking. At the bottom of the starter code, in the if __name__ == "__main__:" block, we have provided some simple code that you can use for testing your class. You should uncomment that code to test your class before moving on.
Once complete, the test code should produce a BoggleBoard in your game window (your letter arrangement will likely be different):
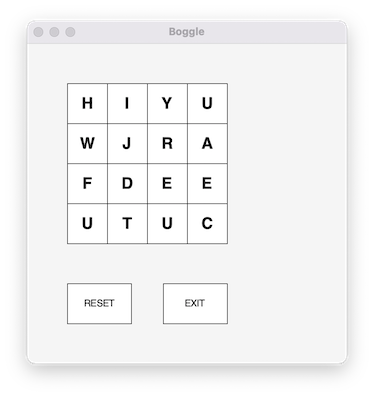
BoggleBoard test code
As you click on letters in the grid, you should see information about the grid location displayed in the Terminal. Even though this looks like a functioning Boggle game, it won’t quite work as expected yet. But you’re getting closer!
Note
To have your code produce different boards each time, yo
must add a call to randomize() at the start of your
if __name__ == "__main__:" block. However, don’t do that
until you have mostly completed your code, or it will be
much harder to test and debug!
Part 3: BoggleGame Class
After completing the BoggleLetter and BoggleBoard classes, you are ready to implement the rules of the Boggle game in the BoggleGame class in bogglegame.py. This step requires careful planning. Think through all possible scenarios as you play the game, and remember to reset state when appropriate.
The BoggleGame class contains four attributes:
_validWords: the set of all valid Boggle words. A helper method__readLexicon()is provided that reads all valid Boggle words (one per line in the filebogwords.txt) and returns a set of valid uppercase Boggle words._board: ourBoggleBoard._foundWords: A list of strings containing all valid words found by the user._selectedLetters: A list ofBoggleLettersthat the user has clicked on while building the current word. (That is, a list containing theBoggleLettersthat are either blue or green during play.) The objects should appear in the order they are clicked.
The doOneClick(self, point) method is called whenever the user clicks in the window. Here, point is the (x,y) coordinate of the mouse. Your method should determined what action to take in response to that click, and it should return True if play should continue or False if the game is over. You will likely
want to create several private helper methods to simplify the design of doOneClick.
Clicking on letters. Each time a player clicks on one of the letters in the Boggle grid, the function doOneClick should account for the following possible cases:
whether the letter clicked is the same as the last letter clicked (thus forming a potential word), or
whether the letter is one of the other letters already used in the current word (thus canceling the current word), and if not
whether the letter is adjacent to the last letter added to the current word (thus adding a letter to the current word).
To check these conditions and update the state of board, use relevant methods implemented in the BoggleLetter and BoggleBoard class, as well as you BoggleBoard attributes.
We have provided comments to help guide your thinking, but feel free to add helper methods to make your implementation as readable and efficient as possible. When complete, running bogglegame.py as a script should have the behavior of a correctly-functioning Boggle game that can be played.
The if __name__ == "__main__:" block is set up with our usual click handling loop. As in Part 2, if you’d like to produce different boards on each run, add a call to randomize() at the start of that block.
Extra Credit
In terms of extra credit, we encourage you to think creatively and extend the game in any way that would enhance the user’s experience. Here are some potential ideas.
Option 1: Keep score
Compute and display the current score of a user as they play the game. Look up rules for keeping score in Boggle to do this appropriately.
Option 2: Timing is everything
The real Boggle game includes an hourglass used to limit play time to three minutes. You will notice that our sample game shown above also shows the time. Implementing this feature is extra credit. To implement this functionality, your program should take advantage of the time module in Python. In addition, you might find it advantageous to use the non-blocking checkMouse() method rather than the blocking getMouse() method of our graphics package.
Option 3: Use recursive linked lists for _foundWords in BoggleGame
Think about how you can create and use your own recursive wordList instead of a “normal” list here. We will discuss recursive data structures more in class soon. Your recursive wordlist should implement the special methods next() and contains() in order to recursively traverse and check for membership of a given word in the wordList.
Similarly, use a recursive list for storing BoggleLetters in _selectedLetters. Think about how you can use your recursive linked list to not only store strings for the _foundWords attribute, but also BoggleLetters for the _currentWord attribute. Once again, you will need to make sure the appropriate special methods are implemented to make your game work as expected.
Option 4: Find all words
Armed with our grid of letters and dictionary, you should be able to (possibly recursively) calculate all possible words in our grid. This is a little tricky, but very satisfying once functional.
Note: If you choose to modify bogglegame.py, please make a copy first. Submit your “original” file and create a new file bogglegameEC.py for implementing any of the above changes. Make sure you add and commit all files when submitting your lab for grading.
Submitting Your Work
When you’re finished, stage, commit, and push your work to the server as in previous labs. Good luck and have fun!
Grading Guidelines
Some things to keep in mind:
Subclasses should make use of the methods and attributes available via their superclass. Avoid repetitive code that duplicates what the superclass does!
Similarly, do not write redundant code that has already been implemented in a different class: make use of your classes and helper methods/functions effectively.
Just like previous labs, we require that the functions, methods, and attributes provided in starter code follow our specifications exactly. Do not modify the method names, their parameters, nor what is returned.
Test your code using doctests or interactively often to simplify debugging.
See lab Syllabus for an overview of the rubric used in grading. The file Gradesheet.txt gives you specifics of our expectations for this lab.
Functionality and programming style are important, just as both the content and the writing style are important when writing an essay. Make sure your variables are named well, and your use of comments, white space, and line breaks promote readability. We expect to see code that makes your logic as clear and easy to follow as possible. Python Style Guide is available on the course website to help you with stylistic decisions.